The 3D Step Dungeon Maze Kit is available as optional DLC. This page explains some of the core functionality present inside this template
Creating a New Maze
Step 1) Loading the maze builder interface
To design a new maze you will first need to load the “Map Editor Grid” Interface. You can do that either by selecting to “Play” or “Test” the Interface (not to be confused with Testing the entire game).
The Interface is fairly straightforward to use. Initially the Map is going to be filled with “Wall” tile, and you can begin painting on it by selecting any of the other existing tiles on the right side with your left click and then left clicking anywhere on the grid to place it (for most tiles you can also hold left click and drag to paint faster). It is also possible to right click any of the existing tiles on the grid to “pick” that to your cursor.
It should be noted that while the grid’s coordinates go from 1 to 32, the actual Map the player will navigate in is going to be a size of 96. That is because each tile for this project translates to 3 whole tiles in the engine. Coincidentally, the player also moves 3 whole tiles every time you walk in this grid-based system.
Step 2) Exporting the new maze
After designing your maze you can then export it by clicking on the “Export Map” button located at the bottom-right corner of the Interface. This will generate a .txt file in: \Documents\001\Games\[Your project’s name]
Step 3) Importing the new maze
To import your newly created maze you need to close the Map editor and head over to where your project’s Tables are located. Identify the “MazeMaps” Table and click “Edit”. On the window’s top-left corner click “Data”, select “Import Data…” and then look for your generated .txt file to import. And you’re done!
NOTE:
If your newly imported maze was added to a new floor, in other words if you increased the Table’s Z size, then you will also need to make sure that change is reflected on the “MazeMapsFog” Table too in order for everything to function properly. If the new maze also contains signs, chests and enemies, then the same thing will need to be done for the “Signs_Maze”, “Loot” and “Enemy_Spawn” Tables respectively.
Step 4) Setting up the new maze
Technically speaking, the “MazeMaps” Table is where all your mazes are going to be located in. You can have as many floors (Z layers) as you’d like and make use of maze themes – or in other words, different Tile-Sets – to give the player the illusion that there are multiple different mazes. To have the player load into a maze, edit the script located in the “Activated” trigger of an “Items Choice x” Field by changing the value of the “MazeTable” “HUD” Interface Variable which will determine what Z plane of the “MazeMaps” Table the player will load into. There you can also determine the look of the maze by changing the value of the “Maze_ID” “HUD” Interface Variable which will determine what Tile-Set will be used to build the maze.
It is also important that in order to avoid jumping from one maze to another via staircases you should edit the “Activated” trigger script of the “ContextButton” located in the “HUD” Interface to prevent that (unless of course that is desired, in which case you can leave it as is). If your “MazeMaps” Table has 17 Z planes and 3 mazes which are set up like this: Maze A Floor 1-5, Maze B Floor 6-9, Maze C Floor 10-17 — then you can utilize branches to first determine what maze the player is in by checking the floor they’re in, and then deciding whether to allow a descent or ascent to a lower or higher floor respectively.
Loading an Existing Maze for Editing
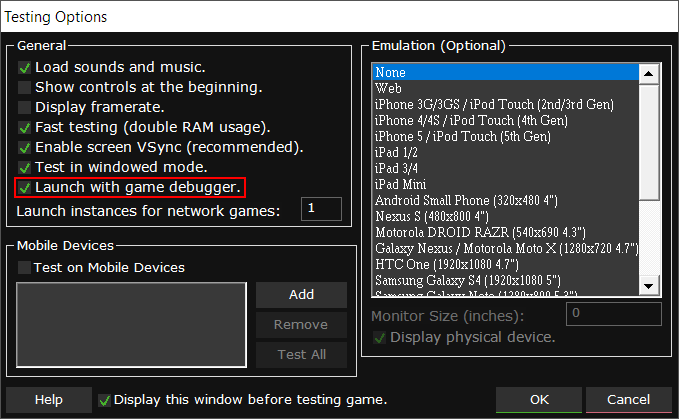
To edit an existing maze you will have to load the “Map Editor Grid” Interface. You can do that either by selecting to “Play” or “Test” the Interface (not to be confused with Testing the entire game). Additionally, you need to make sure to check the “Launch with game debugger” tick-box in the Testing Options window.
With the editor Interface now loaded, open the Variables window from the Debugger window and double click the “Maze_Base” Table to open it, then click “Data” on the window’s top left corner and select “Import Data…”.
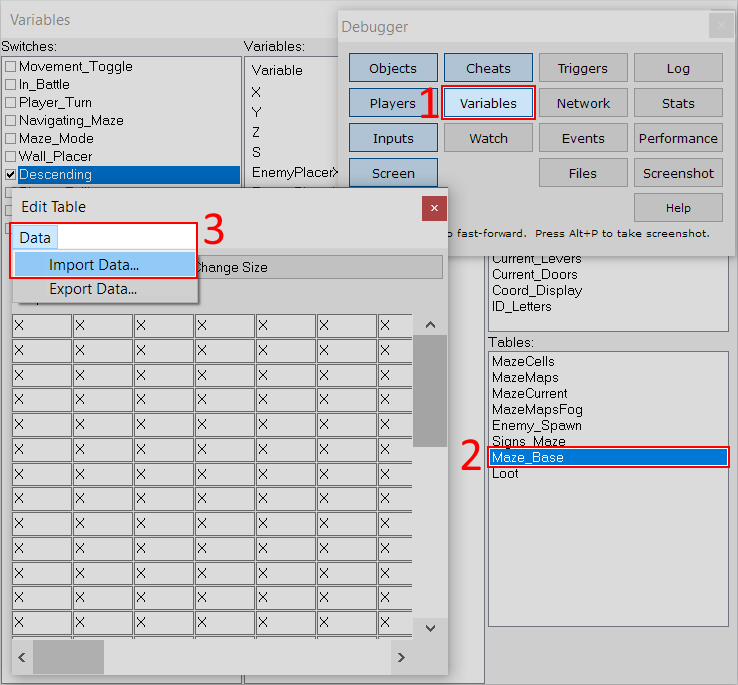
After locating your file and importing it, simply click the “Update Grid” button located at the bottom-right corner of the Interface and the grid will be updated to reflect the changes.
Setting Up Enemy Spawn Tables
Setting up enemy spawns can be done in the “Enemy_Spawn” Table.
That Table is composed of 2 cells per Z plane, where:
- Y: 1 = “Weak enemy” (“E.Weak” in “Map Editor Grid” Interface)
- Y: 2 = “Strong enemy” (“E.Strong” in “Map Editor Grid” Interface)
The Z dimension is used to represent the different floors. By writing in the cells the names of desired Actor Template entries, you can have them spawn as enemies in a maze.
Setting up Chest Loot Tables
Similar to enemy spawn Tables, you can set up loot Tables in the “Loot” Table.
The Table’s Y size can be changed to whatever you might like, and it represents the list of Items that can be randomly awarded to the player whenever they open a chest. The Z dimension is used to determine what floor number of the maze these Items can be found in. By writing in the cells the names of the desired Items, you can have them be awarded to the player whenever they open a chest.
TIP:
Since Items are randomly picked from that list, it is possible to set different percentile chances by having the same Item take up multiple spots.
For example, if you have 4 cells in total and they are of this composition:
“Potion”, “Potion”, “Potion”, “Elixir”… it means that the player will have a 75% chance of getting a “Potion”, and a 25% chance of getting an “Elixir”.
If you want the chest to also have a chance of containing nothing, then you will need to alter the script, since putting nothing as a value in a cell will simply have it re-pick from the list.
To do that, inside the “Talked to / Activated” trigger of the “Chest” Actor Template cut the 1st branch of the 2nd Comparison Branch Event.
Maze Cells
There are two types of “Cells” that make up the maze: Floor Cells and Wall Cells. A Floor Cell tends to be a passable empty space (which may contain passable objects, such as torches, decorations, hazards or floor traps) that the player can move through. A Wall Cell tends to be an impassable block that takes up the entire cell, which may have an interaction of some type when the player is facing the wall that the player cannot move through (this includes levers, buttons, fountains, or trap launchers that block player movement).
Maze Themes
You can choose which maze floors use the different maze themes or Tile-Sets by setting up floor ranges in the Maze_Themes Collection. Each entry in the Collection represents a different maze theme, with entry 1 representing Maze Theme 1, entry 2 representing Maze Theme 2, and so on. To specify that the first 5 floors in the maze belong to Maze Theme 1, you would simply change entry 1 of the Maze_Themes Collectio to “1-5” without the quotes. To specify whether or not the maze has a ceiling, you must use a semicolon followed by a “1” or a “0” at the end of this range value. For example, if you would like Maze Theme 1 to be floors 1 through 4, Maze Theme 2 to be floors 5 through 8, and Maze Theme 3 (which has no ceiling) to be floors 9 and 10, you would set up the Maze_Themes Collection as follows:
-
1-4;1
-
5-8;1
-
9-10;0
This allows you to divide the maze into different areas, simulate multiple mazes with different environments, or use the Maze Selection menu to ‘jump’ to certain floors of the maze with different themes.
3D Sprites and Tiles
All the tiles and Sprites are 3D objects. Every Sprite with moving parts has been animated in the 001 Sprite Sequencer using translation or rotation, making it incredibly simple to add new objects. Nothing has to be animated outside of 001, unless you prefer to do it that way.
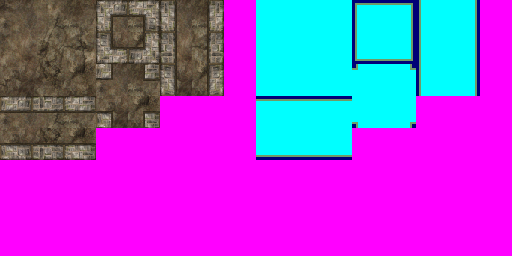
As explained earlier, all tiles and objects must be within a 96x96x96 pixel grid. For Wall tiles, you can easily make a cube in any 3D editor (Blender or Crocotile 3D) and apply a 96×96 pixel texture to the faces of the cube. The base textures for the three existing maze themes can be found in the Map Objects > Object Textures folder in the Sprite Editor, allowing you to make additional tile objects using the same textures. Most Wall tiles are simple 4-sided cubes with the top and bottom faces removed to display the same 96×96 texture on each side. Textures do not have to be 96×96, but the models have to be.
This allows them to be placed in most maze layouts while displaying just one side of the cube to the player. They can still be placed however you like, but be aware there are some small things to consider. Wall tiles that have interactions like Lever Slots, Mana/Health Founts, or Trap Walls will check the four cells around them (looking first to the North, South, West, then East) to find the first adjacent Floor Cell (0, or any tags considered to be a floor tag) to spawn the interactable Actor object that the player will see in the maze, such as the actual 3D Lever, Button, or Trap Spawner. All four sides of the object will not have interactions, despite displaying the same texture. Only the first side that was found to be against a Floor tile will have an interactable object. Wall tiles using simple interactions that do not require the spawning of an Actor, such as Sign Walls, can be interacted with from all four sides.
If the object is intended to be placed in a Maze without a ceiling, there is no limit to the height (Z axis) of the model. This allows for objects that would otherwise extend beyond the normal ceiling layer, such as trees, castle wall copings, tall archways, tall fortress walls, towers, or rooftops.
Some maze objects are theme-specific (such as buttons, switches, sliding walls, holes, or trap launcher cells) while others are considered generic maze objects (such as healing founts, torches, and loot chests) which appear the same no matter which maze theme they are found inside. Theme-specific object Sprites have the theme ID as a prefix in the form of “1_”, “2_” etc. followed by the name of the object, such as “1_Switch” or “3_Door”. There are examples of each of these types of objects in the Actor Templates editor so you can decide whether to create new maze objects that have theme-specific graphics if you wish, or they can be set up to be used across all maze themes.
Floor/Ceiling Tiles
Every Cell in the maze is made up of tiles from a Tile-Set, and each Cell takes up a 3×3 grid in 001’s Map editor. Each maze theme utilizes three different Tile-Sets to produce the different parts of each Cell. Floor tiles are found in the “#_Floor” Tile-Set, Ceiling tiles are found in the “#_Ceiling” Tile-Set, and Wall tiles or objects are found in the “#_Walls” Tile-Set. The number at the beginning of each Tile-Set indicates which maze theme the Tile-Set belongs to. For example, the Ancient Crypt maze theme is Maze ID 1, so each of the Tile-Sets that make up the Ancient Crypt theme are labeled “1_Floor”, “1_Ceiling”, and “1_Walls”. A ceiling Tile-Set is not required if the maze is not intended to have a ceiling (such as in the case of outdoor maze designs).
A single Floor Cell is typically made up of flat ‘floor’ layer tiles and takes up a 3×3 space on the grid (Or 96×96 pixels), which is 3 standard 001 tiles wide and 3 tiles high. If the maze is set to use a ceiling, a second 3×3 set of tiles is placed along the top of the cell at Z: 96 to produce a ceiling using a ‘lower’ layer Tile-Set.
A single Wall Cell typically takes up a 3x3x3 space in the grid (Or 96x96x96 pixels), which is 3 standard 001 tiles wide, 3 tiles high, and 3 tiles tall, forming a cube. Wall Cell objects use the ‘lower’ layer Tile-Set type and do not typically have floor or ceiling tiles drawn in the same cell. The exceptions for this are Pillars, which have floor and ceiling tiles placed ‘around’ a pillar object, and entrance/exit gates that are inset to the wall. Wall tiles intended to be used in a maze theme with no ceiling can be taller than 96 pixels on the Z axis and extend beyond the ceiling height.
Floors and Ceilings are both drawn using the same Tile-Set layout, and are placed using custom auto-tile scripts that ensure the correct terraformation or transition between floors and walls. These can be found in the “Floor Placer” and “Ceiling Placer” subscripts inside the Maze Generator Custom Event. As long as new Floor and Ceiling Tile-Sets are arranged in the same layout, they will automatically work correctly with the Maze Generator.
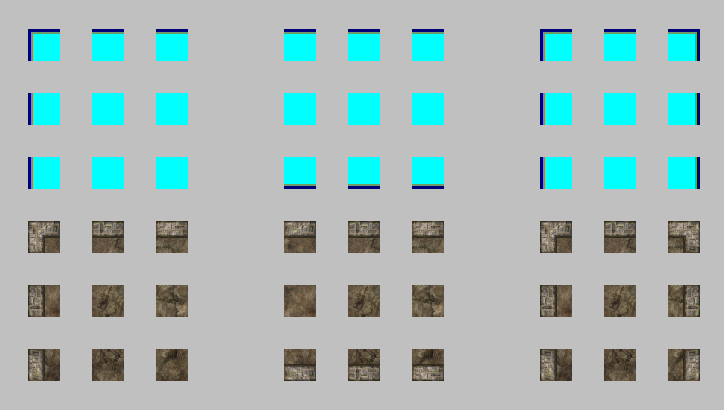
The tiles are arranged as follows:
- 9 x Tiles make up the Main Floor Tile
- 4 x Tiles make up the outer corners
- 4 x Tiles make up the inner corners
- 6 x Tiles for the upper and lower edge tiles
- 6 x Tiles for the left and right edge tiles
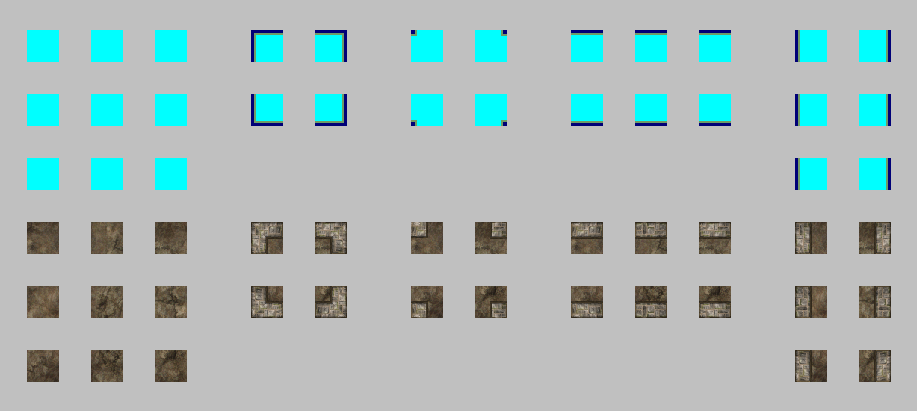
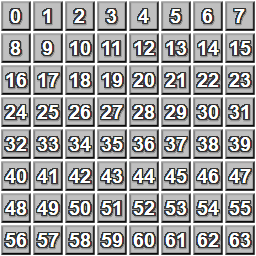
These 29 tiles are assembled into various 3×3 tiles that make up the edges where floors/ceilings and walls meet. The 9 tiles in the upper left corner of the Tile-Set make up the ‘basic floor’ tile for a standard empty Floor Cell in the maze that is not touching any Wall Cells. The corner and edge tiles are placed around the “center tile” (Tile ID 9) to produce the different auto-tile/terraform configurations, such as dead ends, hallways, corners, etc. wherever a Floor Cell touches a Wall Cell. They must be 32px each.
Each tile in a Tile-Set is referenced by using its tile ID number. Tiles are numbered from left to right, starting from 0 and go up to 63 in a standard Flipping or Rotating Tile-Set. The Maze Kit comes with a tile ID number chart in the Tile-Set editor, and every Tile-Set is numbered for easy referencing.
Every tile-change event node throughout the project utilizes these Tile ID numbers to place tiles rather than directly referencing a specific Tile-Set, allowing for the use of multiple maze themes using the same maze generator.
By changing the value stored in the “Tile Name” Field in the Tile-Set editor, you can also give every Wall Tile a description that will be displayed when the player clicks on the main camera Field in the HUD.
Maze Elements
Each element in the maze is either a Floor Cell object or a Wall Cell object, and depending on the type, can have different interactions or requirements. The 3D objects that make up the maze elements are all 96×96 pixels, meaning they fit within a 3×3 grid space in 001’s Map editor. Inside the maze generator, there are two Table Loops. The second Table Loop produces a navigation Map based on the passability of cells in the currently loaded maze floor. This Table is made up of X’s and 0’s which determine where the player can and cannot move around the maze floor. The first Table Loop contains the scripting that actually places tiles on the 3D Maze Map. Inside this first Table Loop you will find the scripting that places Floor Cell objects contained inside the “Floor Cells” subscript, while Wall Cell objects can be found inside the “Wall Cells” subscript.
There are two subsets of Floor Cell elements. The first type includes cells that produce an effect on the player, but may not have any obvious decorations or 3D models, instead using only floor and ceiling tiles to represent the Cell. These are just referred to as “Floor Cells” in the project. This includes things like invisible Rotator Cells, Hole traps, Pressure Plates or Instant Traps, invisible Teleporters, or any passable floor Cell that the player will be able to walk through which should trigger something to happen. Floor Cell elements automatically pass through the ‘Floor Placer’ and ‘Ceiling Placer’ subscripts in the maze generator, so any Cell that requires the use of floor and ceiling tiles is considered a “Floor Cell” element. These are found in the first half of the “Floor Cells” script.
The second type of Floor Cell element includes cells that contain an object or decoration, but may still be passable allowing the player to walk through it if the object were moved. This type of cell is called a “Floor Object” and may contain an object like a loot container or an Actor. Objects such as Enemy Spawns, Torches, Chests, or Actors that can move around the maze and leave an empty Floor Cell would be considered a “Floor Object.” These can be found in the second half of the “Floor Cells” script.
There are two types of Wall Cells as well, distinguished only by whether or not they are interactable. Wall Cells are essentially impassable objects, decorations, or hazards that take up a full cell that the player cannot walk through. They can either be decorative or have attached interactions, such as buttons, trap launchers, or readable signs. Non-interactable or standard decorative Wall Cell objects are found in the first half of the “Wall Cells” script. New non-interactable Wall Cell objects can be added at the end of the first Comparison Branch.
The second type of Wall Cell object is an impassable object that the player can interact with, including things such as healing fountains, trap launchers, buttons, or levers. These objects are found in the second half of the “Wall Cells” script. New interactable wall tiles can be added at the end of the chain of Condition Branches, marked with a comment to show where a new tile tag branch should be added.
In most cases, a new interactable wall object just requires that you copy/paste the blank Template Nodes and update them with your new Tile ID number in order to draw the new tile on the Map. However, some of the 2-Letter Tag object types are a bit more complicated to set up and may require that you copy/paste various elements from the existing scripts, since they use spawned Actors or a second Cell placed elsewhere in the maze.
In the Loaded trigger of all enemy or Map object Actor Templates, there is a script used to set the Display Name of that particular Actor Template. When the player taps the HUD’s main camera view, a message is displayed with a description of the object or enemy in front of the player. By default, the message is put together with a prefix “There is a” and concluded with “ here.” so that these are added to the beginning and end of the stored description. Setting a Display Name to “ flipped switch”, ensuring that you use a space at the beginning, would display the sentence “There is a flipped switch here.” (“There is a” + “ flipped switch” + “ here.”). For anything using vowels, use an “n” at the beginning, such as “n unflipped switch” to get the description “There is an unflipped switch here.”.
Adding New Maze Elements to the Maze Generator
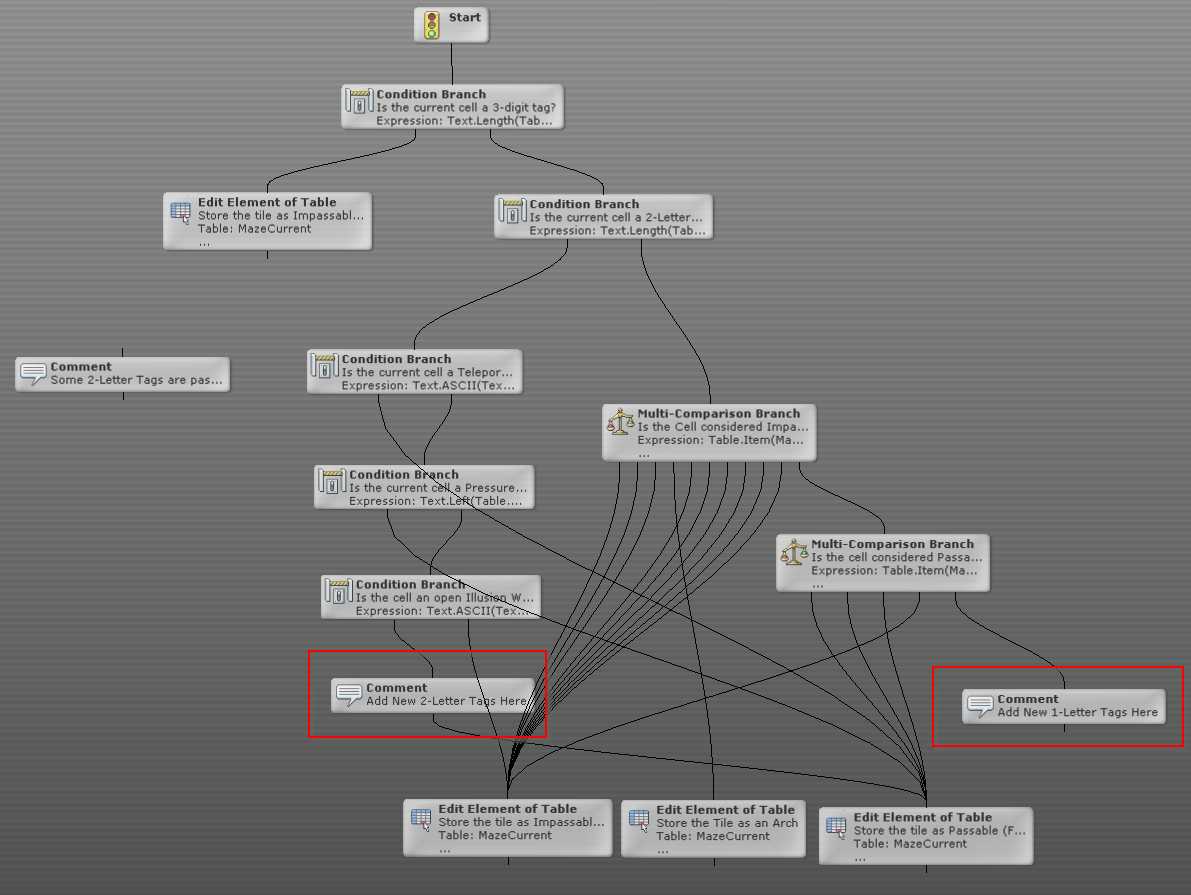
Each new object that is added to the maze generator requires that you add a new “tag” to represent the new tile. For example, using the letter “K” to represent a Wall Cell with a decorative tapestry. The new wall tile model must be imported to the “#_Walls” Tile-Set of the maze theme you are importing a tile for. This tag must be added in several different places throughout the project in order for the new tile to be included in the game. New Floor Cell tile tags must be added to the “List_Floor_Tags” Collection, while new Wall Cell tile tags must be added to the “List_Wall_Tags” Collection, or the maze generator will not be able to find them properly.
If this type of tile will be used across maze themes, you must also import the tile for each of the other maze themes or the maze generator will produce an empty cell when drawing the maze Map using the other maze theme Tile-Sets. You don’t have to do this if you only plan to use the tile for one maze theme. This also allows you to select a tile tag and use it to represent different decorative objects in each maze theme, if you import different object models to the same tile ID slot in each of the maze theme Tile-Sets.
Next, you need to take note of the Tile ID number for the newly imported tile. You can use the included tile ID reference chart to help keep track of how the tiles are numbered. Depending on whether you are adding a Floor Cell or a Wall Cell, enter the corresponding subscript inside the maze generator to find the Comparison Branches you need to add the new tile “tag” to.
For adding a new Floor Object that the player does not interact with, such as instant effect traps, rotators, damage tiles, or other passable floor cell, the tile “tag” and placement script should be added just after the script for Rotator cells, marked with a Comment to show where to add new objects.
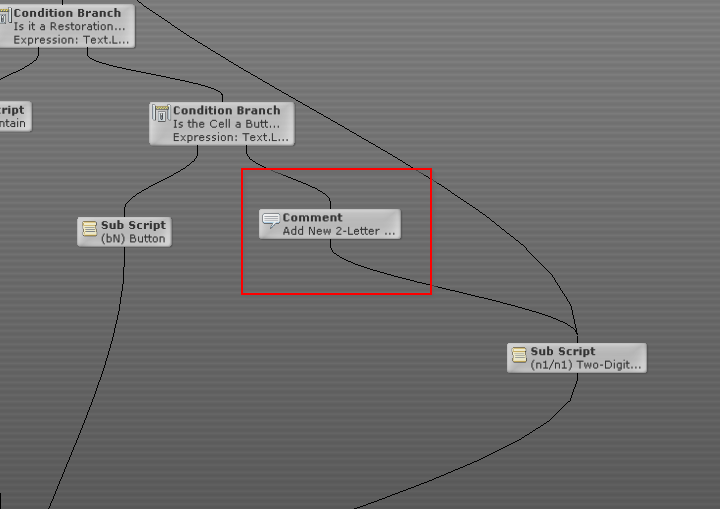
Floor Cells that are linked to a second object and use a 2-letter tile tag, such as teleporters, pressure plates (linked to trap spawner walls), or sliding walls (linked to button walls) should be placed just after the script Illusion cells, marked with a Comment showing where to add new objects.
To add a new Floor Object to the maze, such as a container, character, anything that may move around the maze, or objects that require sitting on floor tiles, the “tag” and corresponding script should be added to the second half of the “Floor Cells” script just after the Torch, marked with a Comment showing where to add new objects.
For adding new Wall tiles without interactions, such as decorative walls or wall variations, the tile tag should be added just after the Pillars in the first half of the “Wall Cells” script inside the maze generator, marked with a Comment showing where to add new objects. There is also a set of Template Nodes that can be copy/pasted and edited to reflect the Tile ID number of the newly added tile.
If you are adding a new Wall cell that has an interaction, it should be added to the second half of the script at the end of the line of Condition Branches, marked with a Comment showing where to add new objects.
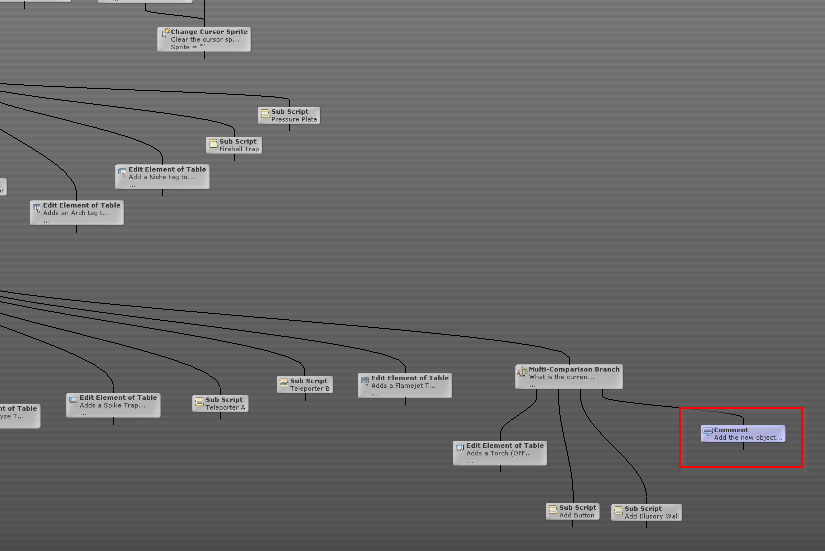
This will allow the maze generator to place the newly added tile on the Map when the player enters. Each of the existing maze object scripts throughout the maze generator contain additional information related to how each type of object works, and in most cases, new tile types can be copy/pasted and modified from these existing scripts. If the new tile requires use of a spawned Actor, you must also create a corresponding Actor Template. Most of the existing Actor Templates can be duplicated and modified to create new objects, such as switches, buttons, projectiles, or decorative objects since for the most part, all newly added tiles will likely utilize similar behaviors as one of the existing objects.
Updating the Navigation Map Generator
Now that the new tile has been added to the maze generator so it is placed on the Map, you still have to tell the generator whether this tile should be passable or impassable. The second Table Loop inside the maze generator Custom Event scans through the currently loaded maze floor and creates a ‘navigation Table‘ of X’s and 0’s that tell the game where the player can and cannot walk. The new tile “tag” must be added to the script inside the Table Loop.
Simply add the tag in the appropriately marked spot, whether it is a 2-Letter tag or 1-Letter tag, link it to the corresponding Passable (0) or Impassable (X) nodes, and the maze generator will be able to build the navigation Table correctly.
Floor Traps
Floor traps include Cells that damage the player or affect the player’s position and rotation, such as Rotator Cells, Teleporter Cells, Spike Traps, Poison Traps, Flamejet Traps, Paralyze Traps, Dark Cells, and Holes. The effects of Floor Cell traps are handled in the main player Actor’s WHEN triggers. This is where you can add additional trap effect types by checking the player’s X and Y coordinates in the maze Table against the coordinates of a Floor Cell containing a trap. If there is a Trap Tag at the X and Y position of the player, then the WHEN trigger will cause the effects of the trap to apply to the player.
Hole Traps store the player’s current X and Y positions and ‘transport’ the player to a lower floor in the maze before applying Fall Damage multiplied by the number of floors. Holes work by checking each floor until a Floor Tag or “0” is found, allowing the player to fall until they hit a floor tile lower in the maze.
The WHEN triggers are set up using a Structure to check whether or not a maze Map layout is being tested while using the Map Editor or if the main game is running, in order to determine whether to check the MazeMaps Table or the Map editor’s current layout stored in the Maze_Base Table for tile tags.
Adding the Object to the “Map Editor Grid” Interface
In order to use the new tile with the maze Map Editor Grid, you also have to add it to the “Map Editor Grid Interface. The new tile requires an icon Sprite named “Ico_Tilename” that can be used to represent the tile on the Map editor. The scripting for placing tiles in the maze Map editor can be found inside the field named “2×2” within the Mouse/Touch Down trigger. This is where you must also add the new tile “tag” in order for the Map editor to be able to place the tag inside the maze Map Table, marked with a Comment showing where to add new objects.
You also have to add a button to the Interface for selecting the tile to be placed on the editor. This is as simple as copy/pasting one of the existing tile buttons and simply changing the graphic to the new “Ico_Tilename” Sprite for this tile.
“Map Editor Grid” Interface Legend
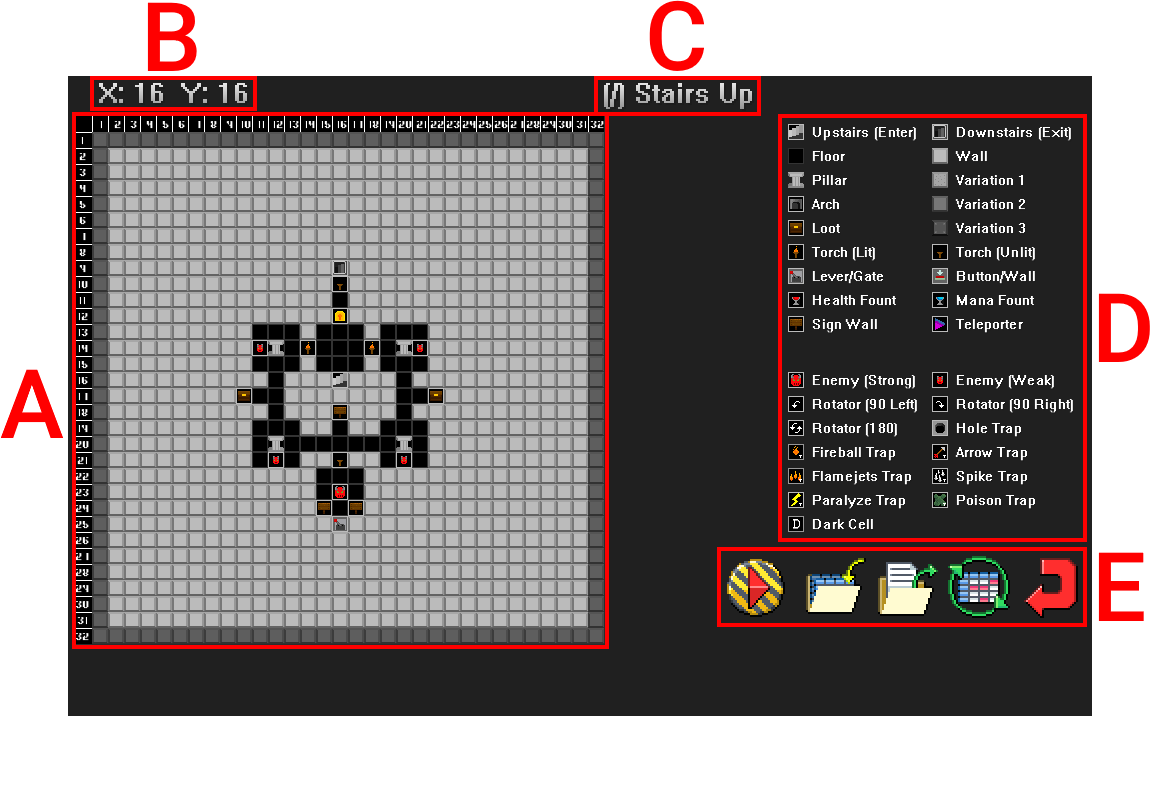
- A: A 32 by 32 editable maze grid. Can be painted on by picking a tile from the list (D) with the left mouse click, or by picking a tile from the grid itself with the right mouse click.
- B: The coordinates that the cursor is pointing at.
- C: Information on the tiles’s tag, as well as its name.
- D: A list of existing tiles that can be placed on the grid.
- E: A list of commands that execute different actions. You can see their description by hovering the cursor over them.
Tile Tags Legend
| Name | Tag | Description |
|---|---|---|
| Floor | 0 | Generic passable tile. |
| Wall | X | Generic stationary Wall tile (impassable). |
| Variation 1 | x | Generic variation of a stationary Wall tile (impassable). |
| Variation 2 | W | Generic variation of a stationary Wall tile (impassable). |
| Variation 3 | w | Generic variation of a stationary Wall tile (impassable). |
| Pillar | P | Generic Pillar tile (impassable). |
| Archway (Unblocked) | a | A generic archway for decorative purposes (passable). |
| Archway (Blocked) | A | A generic archway for decorative purposes (impassable). |
| Upstairs (Entrance) | / | Takes the player to a higher floor. Is also where the player will spawn upon first entering a maze, so it is a mandatory tag. |
| Downstairs (Exit) | \ | Takes the player to a lower floor. |
| Torch (Lit) | T | Emits Light. Will be turned off after being interacted with. |
| Torch (Unlit) | t | Does not emit any Light. Will be turned on after being interacted with. |
| Loot (Unopened) | L | After opened, the tag will turn into a lowercase “l” to be marked empty. |
| Loot (Opened) | l | A chest that has been opened. Marked with a lowercase “l”. |
| Switch | 1[A-Z] | The number is followed by a letter of the English alphabet, meaning there can be a maximum of 26 pairs of Switches/Locked Doors in each maze. The number of Switches and Locked Doors should be equal. After opened, the letter in the tag will turn lowercase to reflect that change. |
| Locked Door | 2[A-Z] | The number is followed by a letter of the English alphabet, meaning there can be a maximum of 26 pairs of Switches/Locked Doors in each maze. The number of Switches and Locked Doors should be equal. After opened, the letter in the tag will turn lowercase to reflect that change. |
| Button | B[A-Z] | The letter “B” is followed by another letter of the English alphabet, meaning there can be a maximum of 26 pairs of Buttons/Illusion Walls in each maze. The number of Buttons and Illusion Walls should be equal. After pressed, the first letter (“B”) in the tag will turn lowercase (“b”) to reflect that change. |
| Button (Pressed) | b[A-Z] | The letter “b” is followed by another letter of the English alphabet, meaning there can be a maximum of 26 pairs of Buttons/Illusion Walls in each maze. The number of Buttons and Illusion Walls should be equal. The first letter (“b”) being lowercase signifies that the Button has been pressed. |
| Illusion Wall | I[A-Z] | The letter “I” is followed by another letter of the English alphabet, meaning there can be a maximum of 26 pairs of Buttons/Illusion Walls in each maze. The number of Buttons and Illusion Walls should be equal. After its respective Button has been pressed, the Illusion Wall will open and the first letter (“I”) in this tag will turn lowercase (“i”) to reflect that change. |
| Illusion Wall (Opened) | i[A-Z] | The letter “i” is followed by another letter of the English alphabet, meaning there can be a maximum of 26 pairs of Buttons/Illusion Walls in each maze. The number of Buttons and Illusion Walls should be equal. The first letter (“i”) being lowercase signifies that the Illusion Wall has been opened. |
| Sign Wall | S[x] | The letter “S” will be followed by an ID number that ties to the Y cell of the “Signs_Maze” Table. There can be a maximum of 99 Sign tiles in each maze. |
| Pressure Plates | p[A-Z] | The letter “p” will be followed by another capital letter of the English alphabet, meaning there can be a maximum of 26 pairs of Pressure plates & Fireball/Arrow Traps in each maze (regardless which Trap they are tied to). |
| Health Fount | F0 | After being used, the “F” in the tag will turn lowercase to be marked empty. |
| Mana Fount | F1 | After being used, the “F” in the tag will turn lowercase to be marked empty. |
| E. Strong | E | A Strong Enemy that is determined by what’s specified in the Y=2 cell of the “Enemy_Spawn” Table. There can be a maximum of 99 enemies in each maze (including both Weak & Strong). |
| E. Weak | e | A Weak Enemy that is determined by what’s specified in the Y=1 cell of the “Enemy_Spawn” Table. There can be a maximum of 99 enemies in each maze (including both Weak & Strong). |
| Hole | H | Trap that causes the player to fall down to the maze floor below (same XY) when stepped on. Multiple Hole traps can be stacked in different floors and on the same XY coordinates so that they are connected and can lead the player to much lower floors, increasing fall damage as well. |
| Dark Cell | D | Obstructs the player’s vision completely. |
| Rotator | @ | Passable tile that turns the player 180 degrees when stepped on. |
| Spike Trap | ^ | Passable tile (trap) that will cause emerging spikes to hurt the player when stepped on. |
| Flamejet Trap | ^ | Passable tile (trap) that will inflict the “Burning” Status Effect on the player when stepped on. |
| Poison Trap | ^ | Passable tile (trap) that will inflict the “Poison” Status Effect on the player when stepped on. |
| Paralyze Trap | ^ | Passable tile (trap) that will inflict the “Paralyze” Status Effect on the player when stepped on. |
| Fireball Trap | *[A-Z] | The asterisk (*) will be followed by a letter of the English alphabet, meaning there can be a maximum of 26 Fireball Traps (Arrow Traps included too) in each maze. |
| Arrow Trap | ![A-Z] | The exclamation mark (!) will be followed by a letter of the English alphabet, meaning there can be a maximum of 26 Arrow Traps (Fireball Traps included too) in each maze. |
| Teleporter A | >[x] | Teleports the player to the respective Teleporter B. The symbol “>” will be followed by a number, which will tie to the Teleporter B of that same number. |
| Teleporter B | <[x] | Teleports the player to the respective Teleporter A. The symbol “<" will be followed by a number, which will tie to the Teleporter A of that same number. |
While it is easier to keep track of the tags you are using if you avoid sharing the first letter of a two-letter/digit tile tag with that of a single-letter tile tag, it is possible to use a single-letter tag, such as the letter “D” and still set up a two-letter/digit tag that uses the same letter, such as “D1”, “d1”, or “1D” and the maze generator can tell the difference. For example, the tag “G” could be used to represent a Gate Cell, the tag “G1” would be read separately by the maze generator as an object with the ID number of 1, tag “g1” could be the unlocked version of “G1”, and “1G” would be interpreted as a Switch (1) with ID letter “G”. It could get confusing using the same letter across multiple tile types, but keep in mind that it is possible to do so.
The following tags are still available for use in the project and can represent any new objects or tiles you wish to add to the game. This is not the full list, as you can also use accented letters or special characters and symbols.
Available Letter Tags: G, g, J, j, K, k, M, m, O, o, Q, q, R, r, U, u, V, v, Y, y, Z, z
Available Number Prefixes: 3, 4, 5, 6, 7, 8, 9
Available Symbols: $, (, ), [, ], {, }, |, ?, ~, +, -, =, _
Reserved Letters: C – Character/NPC, N – Niche/Shelf
Variable Definitions
Switches
| Name | Description |
|---|---|
| Wall_Placer | Switches between two alternating variations of the basic wall type. |
| Player_Descending | Is the player Ascending (/) or Descending (\) in the maze? |
| Player_Falling | Is the player currently falling through floors? |
| Player_Teleporting | Is the player currently teleporting? |
| Maze_Generating | Is the maze currently generating? |
Collections
| Name | Description |
|---|---|
| List_Wall_Tags | A list of all tags considered to be impassable Walls. |
| List_Floor_Tags | A list of all tags considered to be passable Floors. |
| Letters_Uppercase | A list of all available Uppercase Letters. |
| Letters_Lowercase | A list of all available Lowercase Letters. |
| List_Wall_Traps | A list of all available Wall Traps. |
| List_Floor_Traps | A list of all available Floor Traps (pressure plates). |
| List_Blocking_Floors | A list of all tags considered to be impassable Floors. |
| Available_Levers | A list of all available Levers (1-26) for the Map Editor. |
| Available_Doors | A list of all available Doors (1-26) for the Map Editor. |
| Available_Buttons | A list of all available Buttons (1-26) for the Map Editor. |
| Available_Illusions | A list of all available Illusion Walls (1-26) for the Map Editor. |
| Available_Traps | A list of all available Traps (1-26) for the Map Editor. |
| Current_Levers | A list of all currently placed Levers in the Map Editor. |
| Current_Doors | A list of all currently placed Doors in the Map Editor. |
| Current_Buttons | A list of all currently placed Buttons in the Map Editor. |
| Current_Illusions | A list of all currently placed Illusion Walls in the Map Editor. |
| Coord_Display | Used to spawn the coordinate numbers along the sides of the Map Editor. |
| ID_Letters | A list of available Letter Tags. |
| Maze_Themes | Used to set up floor ranges for the different maze themes. |
Tables
| Name | Description |
|---|---|
| MazeCells | A table filled with unique ID numbers for each cell in the maze. |
| MazeMaps | Contains all floor map layouts. The Z coordinate represents the number of floors. |
| MazeCurrent | Contains the Passable/Impassable tiles for the current floor. Passable tiles are represented as a “0” and Impassable ones as an “X”. |
| MazeMapsFog | Contains the Fog-of-War for the Reference Map. Shows how much of a maze the player has explored on the mini-map (marked with a “0”). As the player explores more of a maze, the 0s will turn into 1s and the “fog” will be lifted. |
| Enemy_Spawn | Contains the Scripting IDs for enemies you wish to spawn on each floor. The Z coordinate reflects the maze floor (the Z coordinate of the “MazeMaps” Table), while the Y coordinate the “Weak Enemy” that will spawn (Y=1) or the “Strong Enemy” (Y=2). |
| Signs_Maze | Contains the messages you wish to display on Signs placed in the maze. The Z coordinate reflects the maze floor (the Z coordinate of the “MazeMaps” Table), while the Y coordinate the sign’s ID in that floor. |
| Maze_Base | A blank maze map filled with impassable walls. Reflects the maze that is used in the “Map Editor Grid” Interface during the editing process. Is also the one being exported to a .txt file. Filled with the “X” (Wall) tag by default. |
| Loot | Determines what Items the player can receive from chests. The Z coordinate reflects the maze floor (the Z coordinate of the “MazeMaps” Table), while the Y coordinate the Items that can be randomly awarded. |
“HUD” Interface Variables
| Name | Description |
|---|---|
| Player_Direction | The direction the player is currently facing. N (North), S (South), E (East), or W (West). |
| Player_X_Position | The player’s X position in the maze. |
| Player_Y_Position | The player’s Y position in the maze. |
| Player_Stepping | Returns 0 if the player is stationary, 1 if in the middle of taking a step. |
| Maze_ID | Determines the maze theme (Tile-Set) that will be used to generate the Map. |
| MazeTable | The floor number the player is in (Z Coordinate of the “MazeMaps” Table). |
| Action_Text | Holds information on text that will appear at the bottom part of the script during various interactions. |
| Maze_Ceiling | Set to 0 if the maze has no ceiling, 1 if the maze has a ceiling. |
| Button_Held | Returns 1 if a directional button is held, 0 if it is not. |
| Front_Cell | Stores the tag of the cell that is right in front of the player. |
| Footstep | Stores the floor material to decide what footstep Sound effect to play. |
| EnteringX | Stores the current X position of the player for hole traps. |
| EnteringY | Stores the current Y position of the player for hole traps. |
| EnteringDirection | Stores the current facing direction of the player for hole traps. |
| StoreMazeFloor | Stores the current floor the player started on when falling through holes. |
“Maze Generator” Custom Event Local Variables
| Name | Description |
|---|---|
| MazeX | Holds the X position in the current maze Table (X coordinate). |
| MazeY | Holds the Y position in the current maze Table (Y coordinate). |
| MazeZ | Holds the Z position in the current maze Table (Which maze floor). |
| WallType | Stores the Tile ID number for placing Wall Tiles. |
| EnemyIDNumber | A number used to give each spawned enemy a unique ID. |
| ChestIDNumber | A number used to give each spawned chest a unique ID. |
| ArchIDNumber | A number used to give each spawned arch a unique ID. |
| TorchIDNumber | A number used to give each spawned torch a unique ID. |
| FontIDnumber | A number used to give each spawned fount a unique ID. |
| RestoType | Holds whether spawned fonts are Health or Mana. |
| TeleporterType | Holds which teleporter pad is being modified (Pad A or Pad B). |
| TilesetLayer | Which Tile-Set layer to use (Floor, Lower, Upper, etc.). |
| DeleteActor | Stores the ID for deleting Actors while running an Actor loop. |
“Maze Generator” Custom Event Parameters
| Name | Description |
|---|---|
| MazeIDNumber | Which maze theme to use. |
| MazeCeiling | Does this maze have a ceiling? |
| MazeID | Which maze floor to use. |
| FloorType | The material type of the floor (for SFX). |