The Visual Novel Kit is available as optional DLC. This page explains some of the core functionality present inside this template.
Creating a Cutscene
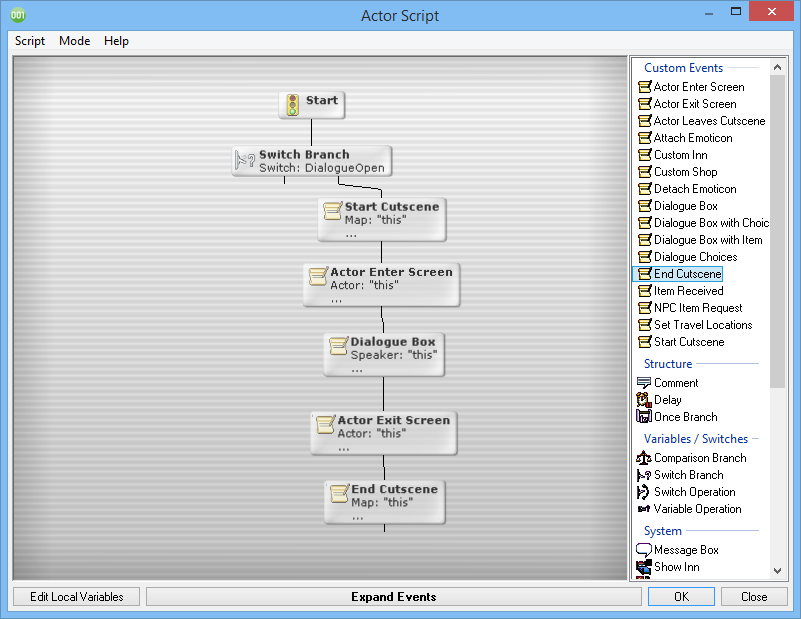
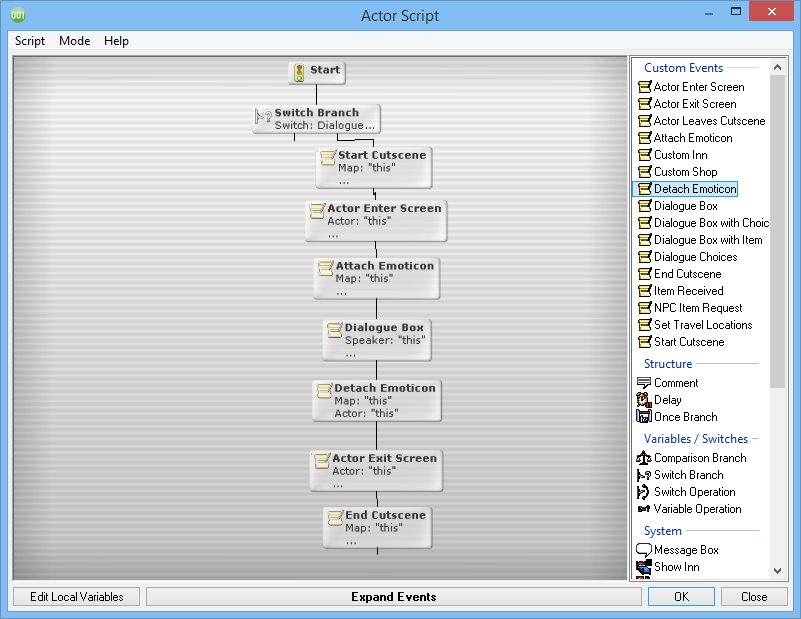
In the Visual Novel Kit, most cutscenes follow the same basic flowchart, with variations and extra scripting depending on the functions of the character. To create a new cutscene, first create a new actor or edit an existing actor. All cutscenes start using the mouse, so you will want to use a “Mouse Down” trigger for the actor.
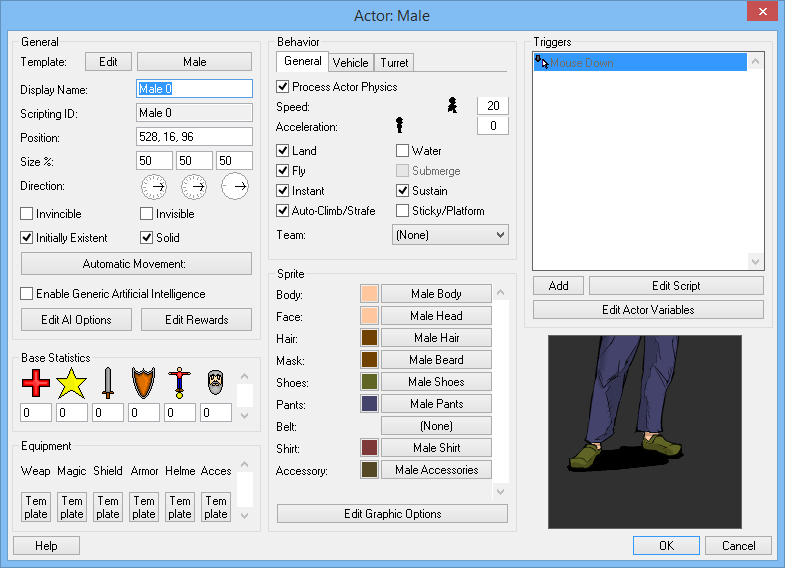
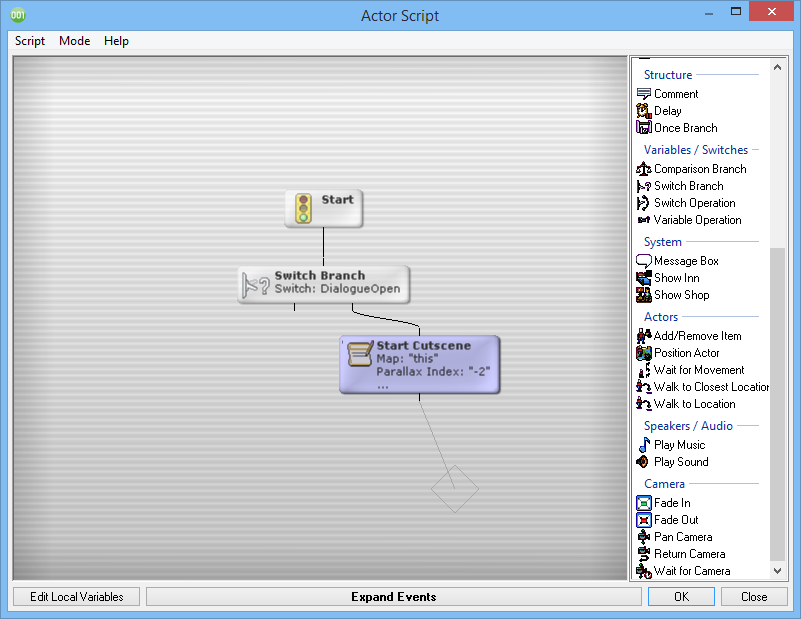
The first event you need to add in this trigger will always be a “Switch Branch”. Whenever an actor is clicked, you need to check to see if the player has already entered dialogue or is in a menu. Without this check, players will be able to rapidly click on actors, each time starting their cutscene script again, which produces undesired results. Inside the Switch Branch, select the switch “DialogueOpen”.

In a basic cutscene, the next event you add will usually be a “Start Cutscene” custom event. This event allows you to select which actors will be involved with the cutscene, which map the cutscene will take place in (usually “This” or whichever map the actor is on), the index of the “Black Background” parallax layer (by default, this is -2), and how long the parallax background and the actors you selected will take to fade in and out respectively. A good starting point for these durations is typically 1 second each. You can hold CTRL and left-click to select more than one actor. The event will save the actors’ original scales, locations and facing directions to their actor variables, then darken the tint of any actor not specified in this event to take focus away from these background actors.
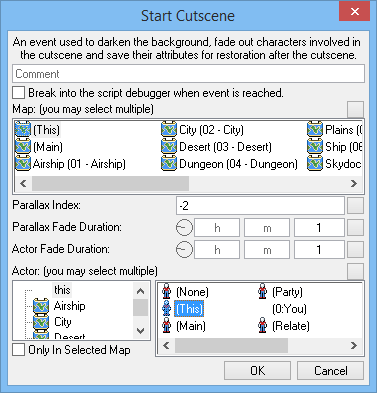
By default, when adding this event after the Switch Branch, it will be connected to the left node of the branch, which means “When DialogueOpen is ON, start the cutscene”. We want the cutscene to only start when DialogueOpen is OFF, so you will need to disconnect the event by right-clicking on the connection, and then left-clicking and dragging from the right node of the Switch Branch to the top node of the Start Cutscene event.
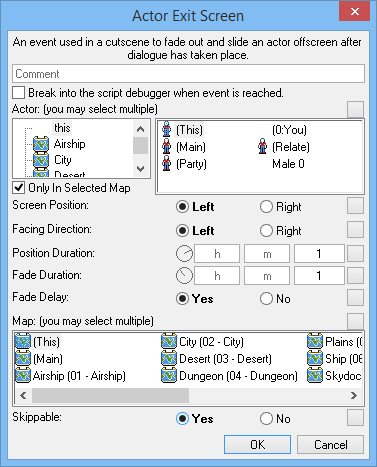
If you were to test your script now, you would see that when you click the actor to start the cutscene, the HUD will turn off, the screen will darken, and the actors you selected fade out from view. Next, we want some actors to slide onto the screen to start the cutscene. Back in your script, insert an “Actor Enter Screen” event. If you hover over each parameter, a tooltip will appear to give you information about what that parameter does. Select the first actor you want to appear on screen. Select which side of the screen you want them to be on, and which direction they should be facing. Position Duration and Fade Duration are similar to the parameters used in the “Start Cutscene” event, and 1 second is a suitable duration for these too. Select the map the cutscene takes place on. The last parameter, “Skippable”, determines if the event can be skipped or forced to play when the “Skip” button is pressed during a cutscene. For non-important animations and dialogue, “Skippable” can be set to “Yes”. For events that players need to see, “Skippable” should be set to “No”.
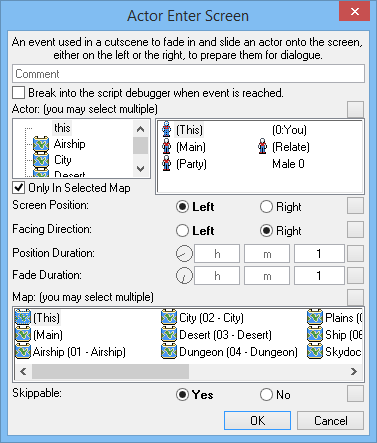
If you selected multiple actors to be involved with the cutscene, you may wish to insert another “Actor Enter Screen” event and position the second actor on the opposite side of the screen, facing toward the first actor. Only two actors should be on-screen at once. If you need to have more than two actors speaking to one another, you will need to use a combination of “Actor Enter Screen” and “Actor Exit Screen” events during the cutscene to display the correct actors.
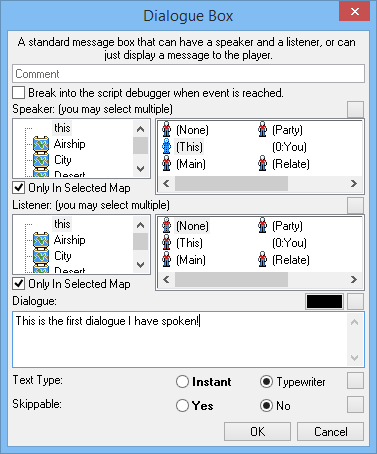
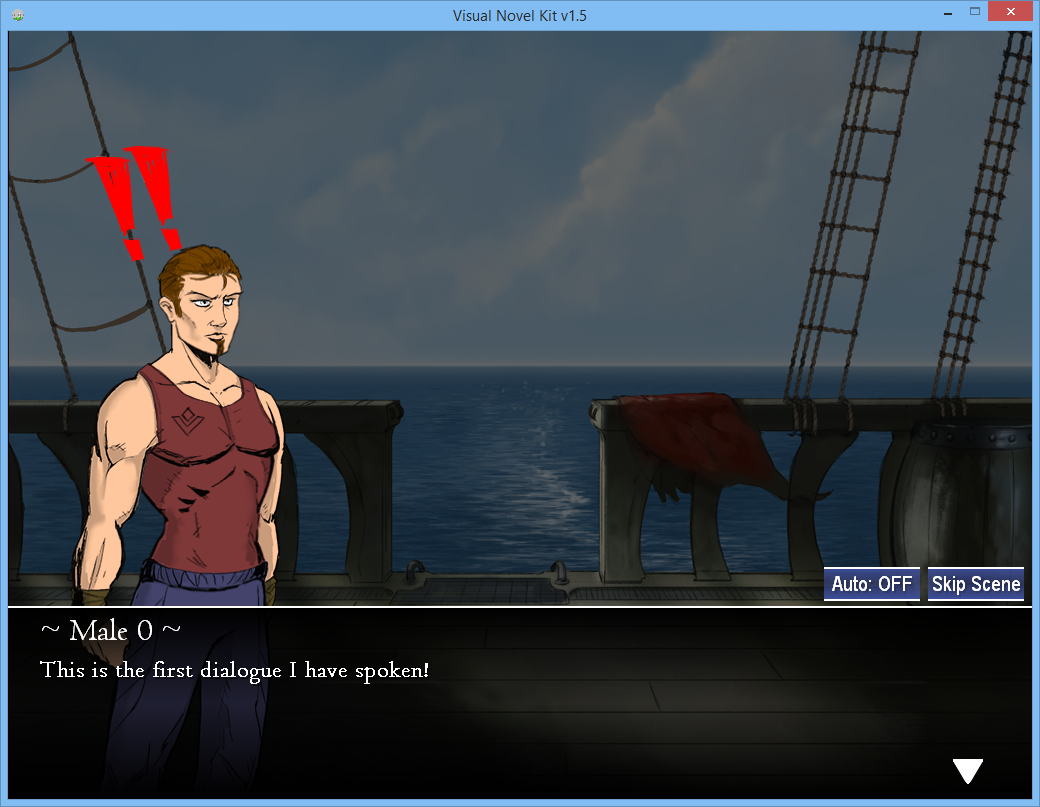
For now, let’s continue with the cutscene by adding some dialogue. The most basic form of dialogue is the “Dialogue Box”, which will only present text that an actor is saying. The “Dialogue Box” has a number of parameters that will affect the actors in the cutscene. The “Speaker” parameter is used to display the name of the actor speaking, and remove any dark tinting they may have to show they are the active actor. The “Listener” parameter is used to darken the tint of the actor to show that they are not actively speaking, but are still involved in the cutscene. Set the “Speaker” to the actor that will speak the first line. Set “Listener” to another actor if you selected multiple actors to be in the cutscene, or “None” if there is only one actor involved. Type in your dialogue in the text box. Choose a text animation type – by default, all text is set to “Typewriter”. Set whether you wish the dialogue to be skippable or not.
After this Dialogue Box, your cutscene can continue using any combination of dialogue custom events, or using other events to manipulate the screen, actors, variables or other elements of the game. When it is time to finish the cutscene, you will want to slide and/or fade the actors offscreen, then return the map to normal. This is accomplished by first using “Actor Exit Screen” to remove any actors still visible. The parameters are the same as “Actor Enter Screen” except the actors will be fading out and sliding offscreen this time.
Once all actors have exited the screen, the final event to reset the map after a cutscene is “End Cutscene”. Again, the parameters for this event are the same as “Start Cutscene”. This event resets the scale, location and facing direction of actors that were just involved with the cutscene, fades them back into the map, and fades out the Black Background parallax layer to make the map visible again.

Using this formula and a combination of any other event you desire, you can create some very unique cutscenes and storytelling! It is recommended you investigate the various actors already set up in maps throughout the kit, as there are some good examples of advanced cutscenes that have been premade for you.
Creating Skippable Sequences
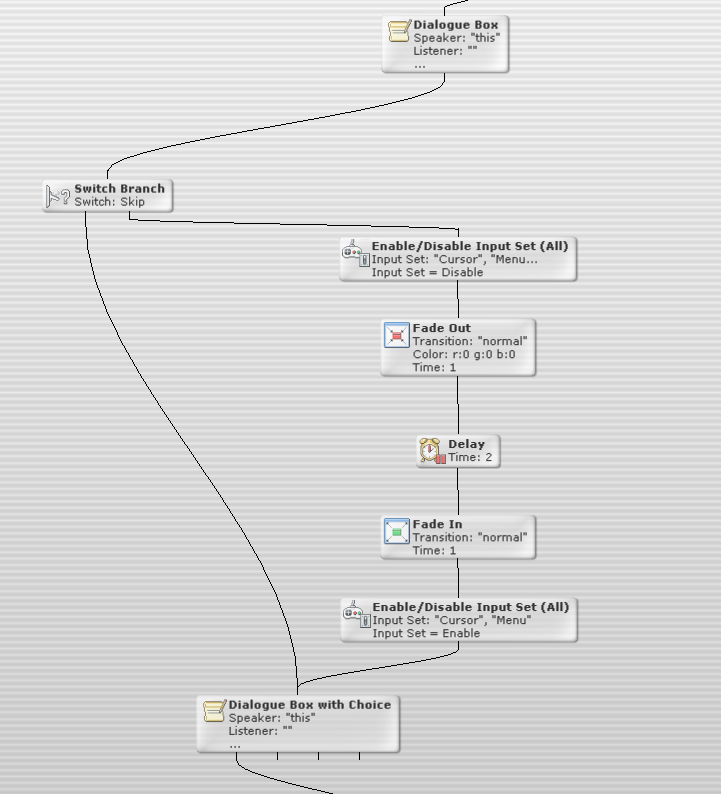
The custom events used for creating cutscenes are already setup to obey skipping and non-skippable sequences. However, when using built-in events to create animation sequences within a cutscene, these events will always play unless you use a “Switch Branch” to check if “Skip” is ON. It is important to do this check as otherwise the Skip function will not skip those events, which may annoy players.
Using Emotions
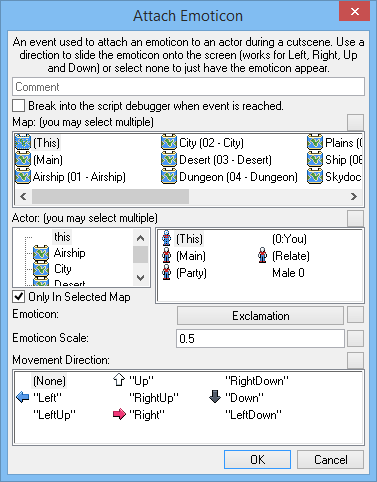
There are 17 available emoticons for you to use to add some flair and emphasis to your dialogue in cutscenes. The “Attach Emoticon” event can be used before a “Dialogue Box” to have an emoticon animate and hover over an actor’s head while they are speaking. Select the map and actor involved in the cutscene, then select an emoticon sprite from the “Emoticons” folder. Selecting “Left/Right/Up/Down” for “Movement Direction” will slide the emoticon slightly as it fades in, giving a bit more life and animation to your game. Selecting “None” or any of the other directions will fade the emoticon in only.
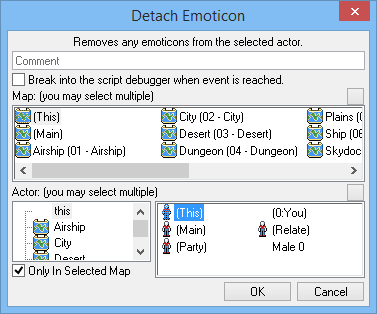
To remove emoticons from an actor, simply use “Detach Emoticon” and select the actor whose emoticons you wish to remove.
Adding A New Location (Map)
There are four steps required in order to add a new location to the game successfully.
Importing a Background Sprite
The background sprites included with the DLC are 1024×768 resolution. You may want to ensure any new backgrounds you import are of the same size to make things easier. Make sure to set the sprite to “Overlay” as it will be used as a parallax background. You should name the sprite the same as the Display Name for the map it is associated with, as the system will use this shared name to display the sprite in the Travel Menu and send the player to that map. The Scripting ID can be different.

Creating the Map
There are maps already created for each of the included locations in the DLC. It may be easiest to copy and paste one of the existing maps to work off. If you make a map from scratch, the settings shown below will match the height and width of the existing background sprites. You also need to ensure to untick the various boundings as actors slide on and off screen during cutscenes. Boundaries would cause them to become stuck.
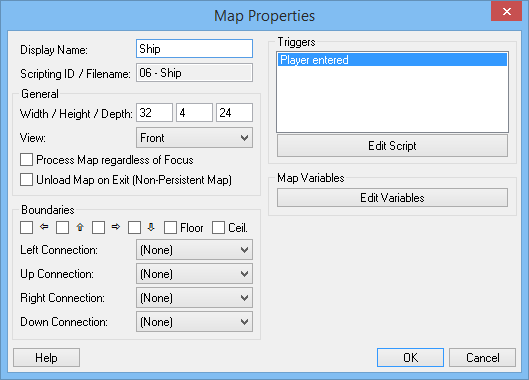
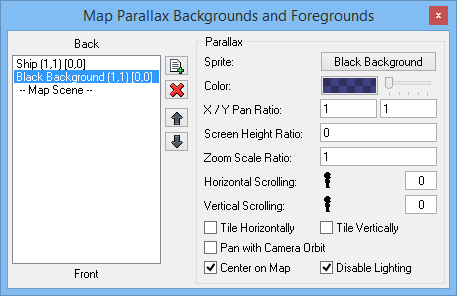
You will then need to use the sprite you added as a parallax background. Go to Map Environment and select “Edit Parallax Backgrounds and Foregrounds”. You will need to add 2 parallax backgrounds. The first will be a “Black Background” sprite, which is used to dim the screen when entering a cutscene. By default, the Black Background parallax should have its Color slider all the way to the left so that it is initially invisible. Next, you will want to untick “Tile Horizontally” and “Tile Vertically”, and tick “Center on Map”.
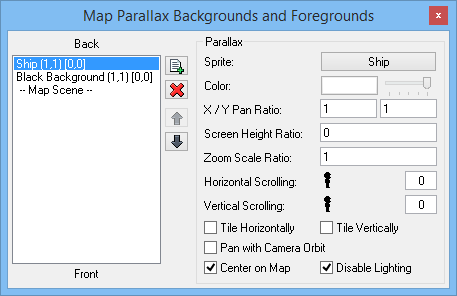
The second is your new background. It needs to go behind the Black Background parallax layer so that it is visible during cutscenes but darkens to point focus toward the actors. Leave the Color slider to the right, as this layer will always be visible. Otherwise, the settings are the same for this parallax layer.
Giving the location a description
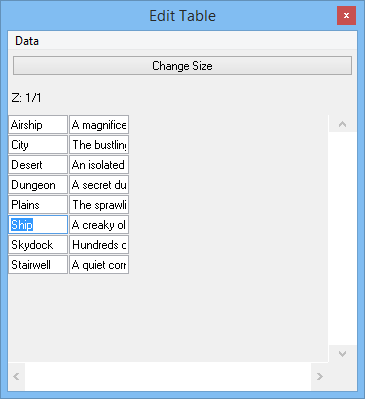
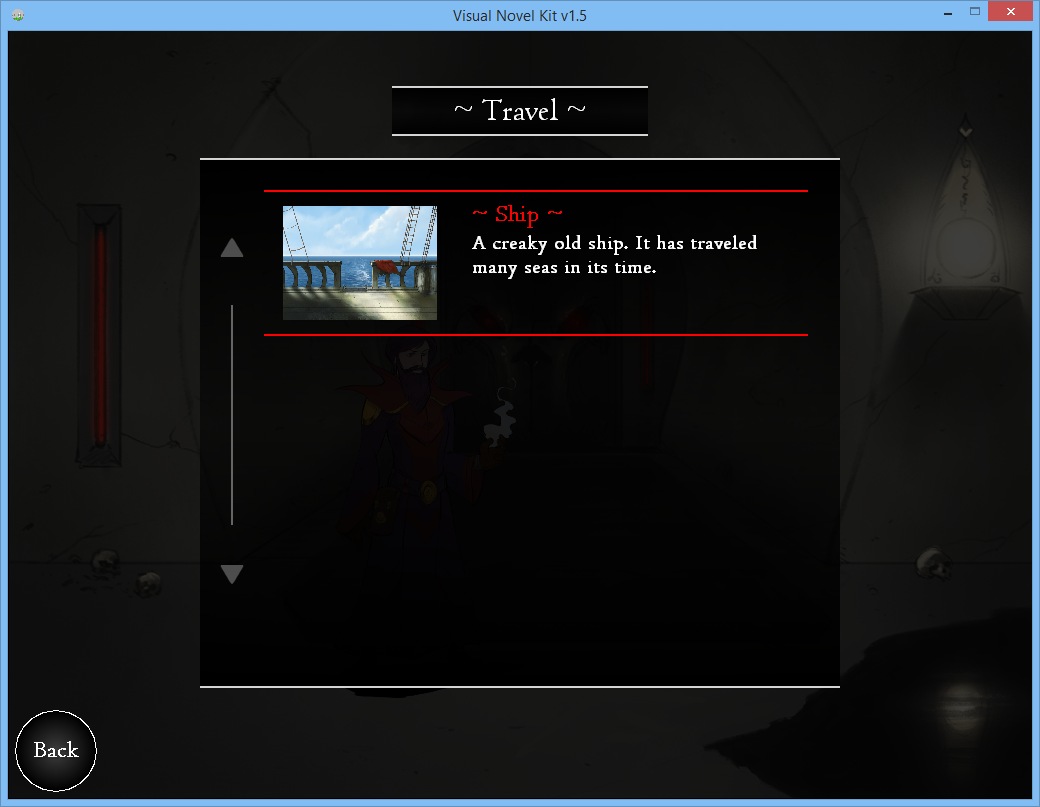
The “Locations” table holds the names and descriptions of each map. When you want to add a new location to the game, you will need to add a new entry to this table. You can use the “Change Size” button to add new blank cells. In the left column, the Display Names of the maps are stored. In the right column, a custom written description is paired with each location name. It is important that each new location you add has both a name and description, or else the scripts inside the fields in Travel Menu will not be able to find the map you are trying to travel to and may produce errors.
Adding the new location to the game
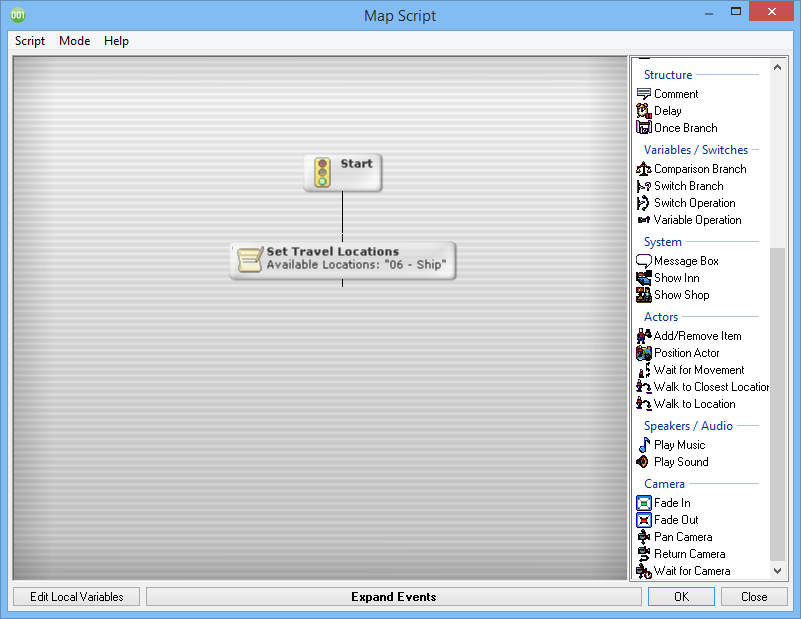
A custom event has been included with the DLC that allows you to set which maps can be travelled to from a given map. Using the “Set Travel Locations” custom event, you can specify any number of available maps to travel to by holding CTRL and left-clicking each map. In most cases in the template, the “Set Travel Locations” event is found in the “Player Enters” trigger of each map, so that each time the player travels their list of available travel options is updated.
When opening the Travel Menu in-game, you’ll see your new location!
Input Sets
Cursor
| Key | Method | Description |
| LMB | Pressed | Runs the mouse down trigger. The mouse can be used to interact with everything in the game. |
| LMB | Released | Runs the mouse up trigger. |
Menu
| Key | Method | Description |
| Left Arrow | Pressed | Changes the selected field based on the current selected field. Navigates to the left. |
| Right Arrow | Pressed | Changes the selected field based on the current selected field. Navigates to the right. |
| Up Arrow | Pressed | Changes the selected field based on the current selected field. Navigates upward. |
| Down Arrow | Pressed | Changes the selected field based on the current selected field. Navigates downward. |
| Action | Pressed | Activates the selected field. |
Custom Events
Actor_Enter_Screen
An event used in a dialogue cutscene to position and fade an actor onto the screen.
- Actor – The actor that is being positioned onto the screen
- Screen_Position – The side of the screen the actor will be positioned on (left or right)
- Facing_Direction – Which direction the actor should face during the animation and while on screen
- Position_Duration – The time it takes an actor to slide onto the screen (0 for instant)
- Fade_Duration – How long it takes an actor to fade from transparent to opaque
- Map – The map in which the cutscene takes place
- Skippable – A flag used to determine if the event should be skipped after the Skip button has been pressed
Actor_Exit_Screen
An event used in a dialogue cutscene to position and fade a character off of the screen.
- Actor – The actor that is being positioned onto the screen
- Screen_Position – The side of the screen the actor will leave via (left or right)
- Facing_Direction – Which direction the actor should face during the exit animation
- Position_Duration – The time it takes an actor to slide off the screen (0 for instant)
- Fade_Duration – How long it takes an actor to fade from opaque to transparent
- Fade_Delay – Whether the actor should completely fade out before sliding off screen (used for if you want an actor to appear to fade off the screen rather than slide)
- Map – The map in which the cutscene takes place
- Skippable – A flag used to determine if the event should be skipped after the Skip button has been pressed
Actor_Leaves_Cutscene
An event used to remove an actor from a cutscene and position them onto a map while a cutscene is still taking place. For example, this can be used to make it appear a character has left a conversation and gone about their business in the background.
- Actor – The actor leaving the cutscene
- Destination_Map – The map in which the actor will be positioned after leaving a cutscene
- X_Position – The X coordinate the actor will be positioned to
- Y_Position – The Y coordinate the actor will be positioned to
- Z_Position – The Z coordinate the actor will be positioned to
- X_Magnification – The magnification the actor will be resized to on the X axis
- Y_Magnification – The magnification the actor will be resized to on the Y axis
- Z_Magnification – The magnification the actor will be resized to on the Z axis
- Facing_Direction – Which direction the actor will be facing after leaving the cutscene
- In_Background – A flag which determines if the actor will be tinted a darker color to signify they are not active in the dialogue cutscene any longer. If an actor is positioned to another map or is otherwise no longer visible on screen, this can be set to “No”.
- Actor_Fade_Duration – The time it takes the actor to fade from transparent to opaque if they are in the background of the cutscene
- Skippable – A flag used to determine if the event should be skipped after the Skip button has been pressed
Attach_Emoticon
An event used to attach an emoticon sprite to an actor during a cutscene. The emoticon will fade into view above the actor’s head, and can slide into place when using Up, Down, Left or Right for the Movement_Direction parameter.
Map – The map in which the cutscene takes place
- Actor – The actor an emoticon is being attached to
- Emoticon – A list of sprites that enables the user to pick which emoticon they wish to display on the actor
- Emoticon_Scale – The size the emoticon will be resized to on the map
- Movement_Direction – The direction in which the emoticon will slide into position. Diagonal directions and “None” are programmed such that the emoticon will not slide.
Custom_Inn
An event that allows the player to sleep at an inn using the custom interfaces designed for this template.
- Innkeeper – The actor that offers a room at an inn to the player
- Greeting_Text – The dialogue displayed when the player speaks to the Innkeeper
- Price – How much money staying at the inn will cost
- Yes_Button_Label – The text on the button the player presses to confirm their stay
- No_Button_Label – The text on the button the player presses to decline use of the inn
- Transaction_Successful_Message – The dialogue the Innkeeper says if the player successfully pays to stay at the inn
- Cannot_Afford_Message – The dialogue the Innkeeper says if the player cannot afford to use the inn
- Sleeping_Music – The music that plays while the player is “sleeping” at the inn. The screen will remain dark until this music has finished, or for 1 second if no music is selected.
- Screen_Fade_Time – The time it takes for the screen to fade out to imitate sleeping at an inn
Custom_Shop
An event that allows the player to buy and sell items using custom interfaces designed for this template. Returns 1 if no transaction occurred or 2 if a transaction occurred.
- Shopkeeper – The actor that runs the shop
- Greeting_Text – The dialogue displayed when the player speaks to the Shopkeeper
- Anything_Else_Text – The dialogue displayed when the player returns to the shop menu
- Buy_Button_Label – The text displayed on the button for the Buy option
- Sell_Button_Label – The text displayed on the button for the Sell option
- Finish_Button_Label – The text displayed on the button used to leave the shop
- Choose_Buy_Quantity_Text – The text displayed when the player has selected an item to buy, asking how many they wish to purchase
- Choose_Sell_Quantity_Text – The text displayed when the player has selected an item, asking how many they wish to sell
- Buy_Cost_Factor – The factor each item’s Cost is multiplied by at this store when buying. 1 is default price as set in the item’s properties.
- Sell_Cost_Factor – The factor each item’s Cost is multiplied by at this store when selling
- Player_Selling_Items – A flag dictating whether or not the player is able to sell items at this shop
- Interface_Position – A slider that determines the horizontal position of the shop interfaces. Used for moving the shop to either side of the screen so that the Shopkeeper is still visible.
- Items_Available – The list of items available for the player to buy
Detach_Emoticon
An event used to remove all emoticons attached to an actor.
- Map – The map in which the cutscene takes place
- Actor – The actor whose emoticons are being removed
Dialogue_Box
A custom message box designed for this template. The Dialogue Box can have a Speaker, a Listener, or it can simply display a message to the player with no related actor.
- Speaker – The actor speaking the dialogue. Setting an actor to “Speaker” will remove any tint so that the player knows that actor is currently active.
- Listener – The actor listening to the Speaker. Setting an actor to “Listener” will darken the actor to show they are not currently active.
- Dialogue – The text that displays in the message box
- Text_Type – A flag used to set the text animation for this message box to be either Instant or Typewriter. Note that the Global Variable TextAnimationMode will override any Dialogue Box parameters if it is changed from Default to Instant or Typewriter.
- Skippable – A flag used to determine if the event should be skipped after the Skip button has been pressed
Dialogue_Box_with_Choice
A custom message box that also presents the player with a few options to pick from to progress the game.
- Speaker – The actor speaking the dialogue. Setting an actor to “Speaker” will remove any tint so that the player knows that actor is currently active.
- Listener – The actor listening to the Speaker. Setting an actor to “Listener” will darken the actor to show they are not currently active.
- Dialogue – The text that displays in the message box
- Text_Type – A flag used to set the text animation for this message box to be either Instant or Typewriter. Note that the Global Variable TextAnimationMode will override any Dialogue Box parameters if it is changed from Default to Instant or Typewriter.
- Choice_Position – A slider that determines the horizontal position of the choice interfaces. Used for moving the choices to either side of the screen so that the Speaker and Listener are still visible.
- Question – Used to give a summary of the question to which the player is responding, positioned above the available options. This can be left blank and the interface will adjust accordingly.
- Player_Choices – A list of available choices for the player to pick to progress the story. Each choice returns the index of its entry in the Choices collection so that the script can branch correctly depending on which option was selected.
Dialogue_Box_with_Item
A custom message box that also presents the player with an item that is added to their inventory.
- Speaker – The actor speaking the dialogue. Setting an actor to “Speaker” will remove any tint so that the player knows that actor is currently active.
- Listener – The actor listening to the Speaker. Setting an actor to “Listener” will darken the actor to show they are not currently active.
- Dialogue – The text that displays in the message box
- Text_Type – A flag used to set the text animation for this message box to be either Instant or Typewriter. Note that the Global Variable TextAnimationMode will override any Dialogue Box parameters if it is changed from Default to Instant or Typewriter.
- Item – The item the player is receiving from the Speaker
- Quantity – The number of said item added to the player’s inventory
- Message – A short message telling the player which item they received. Customizable by the user.
- Item_Graphic_Position – A slider that determines the horizontal position of the Item Received interfaces. Used for moving the item to either side of the screen so that the Speaker and Listener are still visible.
- Skippable – A flag used to determine if the event should be skipped after the Skip button has been pressed
Dialogue_Choices
An event used to offer the player a number of choices with an optional accompanying question only. No Dialogue Box is used with this event.
- Interface_Position – A slider that determines the horizontal position of the choice interfaces. Used for moving the choices to either side of the screen so that the Speaker and Listener are still visible.
- Question – Used to give a summary of the question to which the player is responding, positioned above the available options. This can be left blank and the interface will adjust accordingly.
- Player_Choices – A list of available choices for the player to pick to progress the story. Each choice returns the index of its entry in the Choices collection so that the script can branch correctly depending on which option was selected.
End_Cutscene
An event used to reset the actors involved in a cutscene to their saved scales and positions, and to remove the darkened background covering the map.
- Map – The map in which the cutscene took place
- Parallax_Index – The index of the Black Background parallax layer used to darken the map behind the actors involved in a cutscene. Set this to the index of the Black Background parallax layer (-2 by default).
- Parallax_Fade_Duration – The time it takes for the Black Background parallax layer to become transparent
- Actor_Fade_Duration – The time it takes for the actors returning to the map from a cutscene to fade from transparent to opaque
- Actor – The actor (or actors) that are being restored to their saved scales and positions.
Item_Received
An event used to show the Item Received interfaces without an accompanying Dialogue Box.
- Item – The item the player is receiving from the Speaker
- Quantity – The number of said item added to the player’s inventory
- Message – A short message telling the player which item they received. Customizable by the user.
- Interface_Position – A slider that determines the horizontal position of the Item Received interfaces. Used for moving the item to either side of the screen so that the Speaker and Listener are still visible.
- Skippable – A flag used to determine if the event should be skipped after the Skip button has been pressed
NPC_Item_Request
An event used to display the player’s inventory onscreen to allow them to choose an item to present to an NPC. Returns 1 if the player declines to present an item; 2 if the player offers an unacceptable item; 3 if the player doesn’t offer enough of an acceptable item; and 4 if the player offers the correct amount of an acceptable item.
- Interface_Position – A slider that determines the horizontal position of the Inventory interfaces. Used for moving the inventory to either side of the screen so that onscreen actors are still visible.
- Request – A short message stating what the NPC is asking for
- Minimum_Quantity – The minimum number of acceptable items the NPC requires
- Remove_Items – A flag determining whether or not the player has the items they present to the NPC removed from their inventory if the items were acceptable and met the minimum quantity
- Acceptable_Items – A list of items the NPC will accept for this request
Set_Travel_Locations
An event used to determine which maps a player can travel to from the map in which they currently reside.
- Available_Locations – A list of maps that are available to travel to from the current map. Each map’s name is added to the Global Collection TravelLocationNames.
Start_Cutscene
An event used to darken the map by fading in the Black Background parallax layer, fading out the actors involved in the cutscene, and saving their scales and positions for restoration after the cutscene has ended.
- Map – The map in which the cutscene takes place
- Parallax_Index – The index of the Black Background parallax layer used to darken the map behind the actors involved in a cutscene. Set this to the index of the Black Background parallax layer (-2 by default).
- Parallax_Fade_Duration – The time it takes for the Black Background parallax layer to become visible.
- Actor_Fade_Duration – The time it takes for the actors to fade from opaque to transparent when entering the cutscene.
- Actor – The actor (or actors) that have their attributes saved and faded out to enter the cutscene.
Sys_WordCount
An event that takes a string of text and returns the number of words using space as a delimiter. Used to calculate the delay per word for Dialogue Boxes when Auto is set to On.
- String – The text the event needs to count the number of words in
Variable Definitions
Global Variables
| Name | Description |
| LeftScreenPosition | Defines the X coordinate an actor slides to when set to be positioned on the left of the screen using the “Actor Enter Screen” custom event. |
| RightScreenPosition | Defines the X coordinate an actor slides to when set to be positioned on the right of the screen using the “Actor Enter Screen” custom event. |
| ActorOnLeft | When an actor is positioned to the left of the screen using the “Actor Enter Screen” custom event, its ID is stored here to use in events that manipulate the actors. |
| ActorOnRight | When an actor is positioned to the right of the screen using the “Actor Enter Screen” custom event, its ID is stored here to use in events that manipulate the actors. |
| AutoInitialDelay | Determines the length (in milliseconds) of the delay between finishing an event and proceeding to the next event when using the Auto system to progress through the game. This variable is combined with AutoDelayPerWord to get the total amount of time (in milliseconds) the game will wait to progress to the next event. This variable is adjustable by the player in-game. |
| AutoDelayPerWord | Determines the length (in milliseconds) added per word to AutoInitialDelay to formulate the total amount of time the game will wait to progress to the next event. This variable is adjustable by the player in-game. |
| TextAnimationMode | Determines how text fields will animate. Using the Settings menu, this can be toggled between Default, which allows the events to animate using whichever mode the game developer set per event); Instant, which forces each event to use the “Instant” text animation style; and Typewriter, which forces each event to use the “Typewriter” text animation style. This variable is adjustable by the player in-game. |
Switches
| Name | Description |
| DialogueOpen | Determines if the player has entered a cutscene or should otherwise be unable to interact directly with actors. This switch is turned ON at the start of all “Start Cutscene” events and turned OFF at the end of all “End Cutscene” events. All actors should have a “Switch Branch” checking to see if DialogueOpen is OFF before any other events in their Mouse Down triggers, as it will prevent being able to fire that trigger again until the actor is out of a cutscene. |
| Skip | Determines if a cutscene or event(s) should be skipped. This switch is turned ON when pressing the Skip button during a cutscene and turned off at the end of all “End Cutscene” custom events. |
| Auto | Determines whether the Auto system should be used to proceed through the game. When turned ON, the Auto system will progress to the next event in a script once it has paused for (AutoInitialDelay + (AutoDelayPerWord * [amount of words returned from “Sys_Wordcount”])) milliseconds. |
| InNonSkippableEvent | Determines if a script has started an event that has had its Skippable parameter set to “No” by the game developer. If so, the Skip system will not skip that event. |
Collections
| Name | Description |
| Choices | Stores the choices available to the player for events such as “Dialogue Box with Choices”, “Custom Shop” and “Custom Inn”. |
| TravelLocationNames | Stores the locations available to travel to using the “Set Travel Locations” event. This collection is spawned and displayed using the “Location Name” field in the “Travel Menu” interface. |
| ShopItems | Stores the items available to purchase when using a “Custom Shop” event. This collection is spawned and displayed using the “Item Name” field in the “Shop Menu” interface. |
Tables
| Name | Description |
| Locations | Stores the Display Names of maps that are potential travel locations, as well as a brief description of the map. These values are retrieved using the collection “TravelLocationNames” to find which locations are available, and the field “Location Description” in the “Travel Menu” interface to lookup the corresponding description for each map name. |