Mouse and touch inputs (Also known as the “Cursor”) are treated equally in 001 Game Creator, this way you only need to setup this style of input once. When using a touch device (such as a phone or tablet) the input will be treated as a “Left Click”.
There are multiple ways to incorporate cursor/touch controls in your game, but the most common method is either through activating a Field, clicking on an Actor or by creating a Control and using that Control as an Input Trigger. By default, every template will come with a “Cursor” Input Set that will allow the various Mouse/Touch scripting triggers to function, which is initially turned on at the start of the game.
Cursor Co-ordinates
There are two sets of co-ordinates that are available to be retrieved via a Use Value, these being “Screen Position” and “Targeted” position.
Screen Position
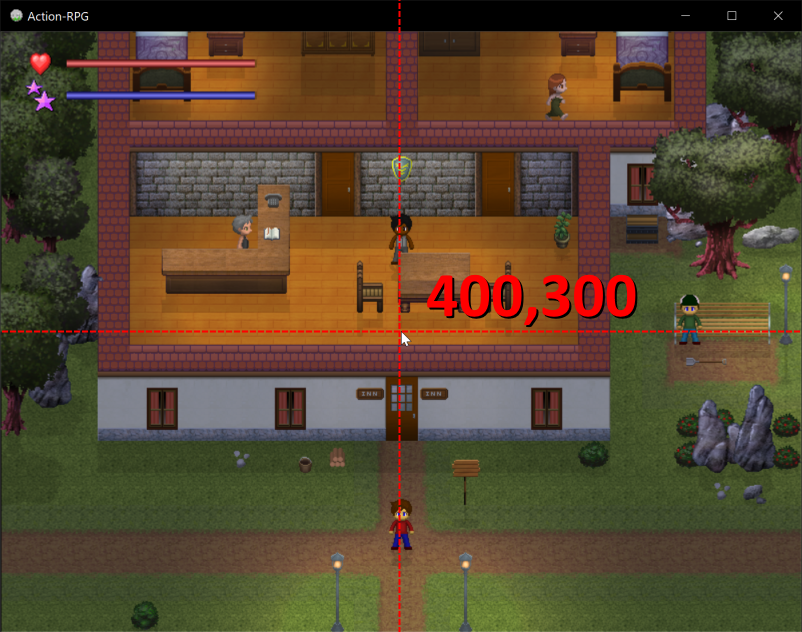
These values can be retrieved using the “X Screen Position” and “Y Screen Position” Use Values in the “Cursor / Motion” section. The screen position is the cursors actual location on the game window. As an example, the game window has a size of 800×600, and the cursor is positioned at the very center of the screen. This means that “X Screen Position” is 400 and “Y Screen Position” is 300. This co-ordinate is typically used in calculations for placing Sprites or modifying Fields on an Interface.
Targeted Position
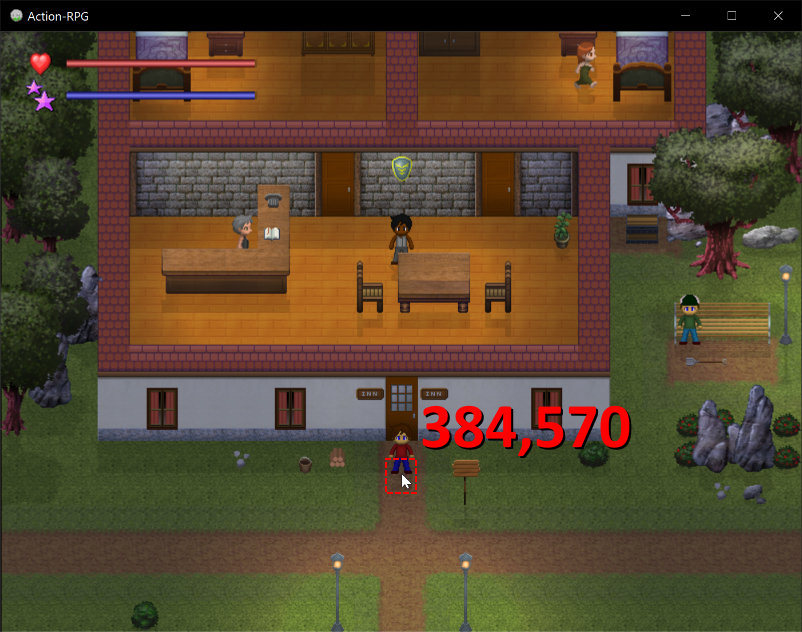
These values can be retrieved by the various “Targeted” Use Values in the “Cursor / Motion” section. The targeted position Use Value used will depend on the camera view being used. For views such as 3D, you will need to use a combination of each depending on which game layer you are trying to get the co-ordinates for. Targeted cursor co-ordinates is used to get the position of the cursor on the Map. This co-ordinate is typically used with Actor interactions on a Map, such as using Items or controlling movement.
45 Degree Games:
- Targeted X (Z)
- Targeted Y (Z)
Platformer Games:
- Targeted X (Y)
- Targeted Z (Y)
An example here is using the “Targeted X (Z)” and “Targeted Y (Z)” Use-Value to get the position of the cursor on the Map for a 45 Degree game.
Cursor Precision
When you have Actors or Fields that are clickable using the various mouse/touch scripting triggers, you are able to determine how accurately the user needs to click. You can globally enable or disable per-pixel clicking for your entire project by unchecking the “Enable per-pixel cursor clicking.” option in the Game Settings. It is highly recommended to disable this feature if your project does not require pixel-perfect clicking, as you will gain a performance benefit by disable it.
Each Field has a “Per-Pixel Cursor” which when enabled, will only allow mouse interactions when the cursor is touching a non-transparent portion of the field. When this option is disabled, the interaction area will be determined by the Width/Height of the field.
Pixel perfect precision can only be enabled/disabled based on the option set in the Game Settings. When this option is enabled it will only allow mouse interactions when the cursor is touching a non-transparent part of the Actors Sprites. When this option is disabled, the interaction area will be determined based on the collision area of the Actor.
Gestures
Gestures are an easy way to bring more functionality to cursor input, commonly used in mobile games. These support up to 5 fingers of input.
Gesture Trigger
Edit Gesture – allows you to change the shape of the gesture, how many fingers are needed for the gesture, and test the gesture.
Completeness – determines how far along the gesture path the user needs to complete for it to be recognized.
Accuracy – determines how accurately the user needs to match the gesture path for it to be recognized.
Minimum Scale – determines the lower bounds for how small the user needs to perform the gesture for it to be recognized.
Maximum Scale – determines the upper bounds for how big the user needs to perform the gesture for it to be recognized.
Maximum Orientation – determines the maximum orientation a user can perform the gesture at for it to be recognized.
When editing a scripting trigger for gestures, you can utilize the various gesture Use Values to determine what accuracy, angle, completion and scale the gesture was drawn at.
Edit Gesture (Place)
While in placing mode, you can plot points on the gesture canvas by selecting a finger, then clicking on the canvas.
Finger 1/2/3/4/5 – when selected, allows you to plot additional points for the selected finger.
Erase Last Node – deletes the last created finger node for the currently selected finger.
Clear – clears all nodes placed for the currently selected finger.
Edit Gesture (Test)
While in testing mode, you can draw on the gesture canvas to test your gesture. Which finger you are testing is determined by the finger currently selected in the place category.
Minimum Completion (%) – sets the minimum completion percentage needed to complete the gesture.
Accuracy (%) – shows you how accurately you did your gesture.
Completeness (%) – shows you how complete you did your gesture.
Scale (%) – shows you the scale at which you did your gesture.
Angle (°) – shows you the angle at which you did your gesture.
Input Simulation (Mobile)
One method of easily converting a project setup for PC to run on a mobile device (Android or iOS) is to utilize fields setup as on screen buttons, this can also be used as an alternative character control method on PC using the cursor. This can easily be accomplished by using the “Simulate Control” option found inside a Field. Ensure your field has the option “Selectable” checked, then for the “Simulate Control” drop-down select which control you would like to simulate. The input box (default set to “1”) determines which player this control should be used for.
After setting these options, when the player clicks/taps down on the field, it will press the current control down in your game. When the player releases their click/tap, the selected control will be released.