The MMORPG Kit is available on Steam as optional DLC. This page explains some of the core functionality present inside this template.
We recommend checking out our MMORPG Video Tutorials on YouTube to learn how to use this template and how it differs from our regular Action-RPG template!
Server IP Setup
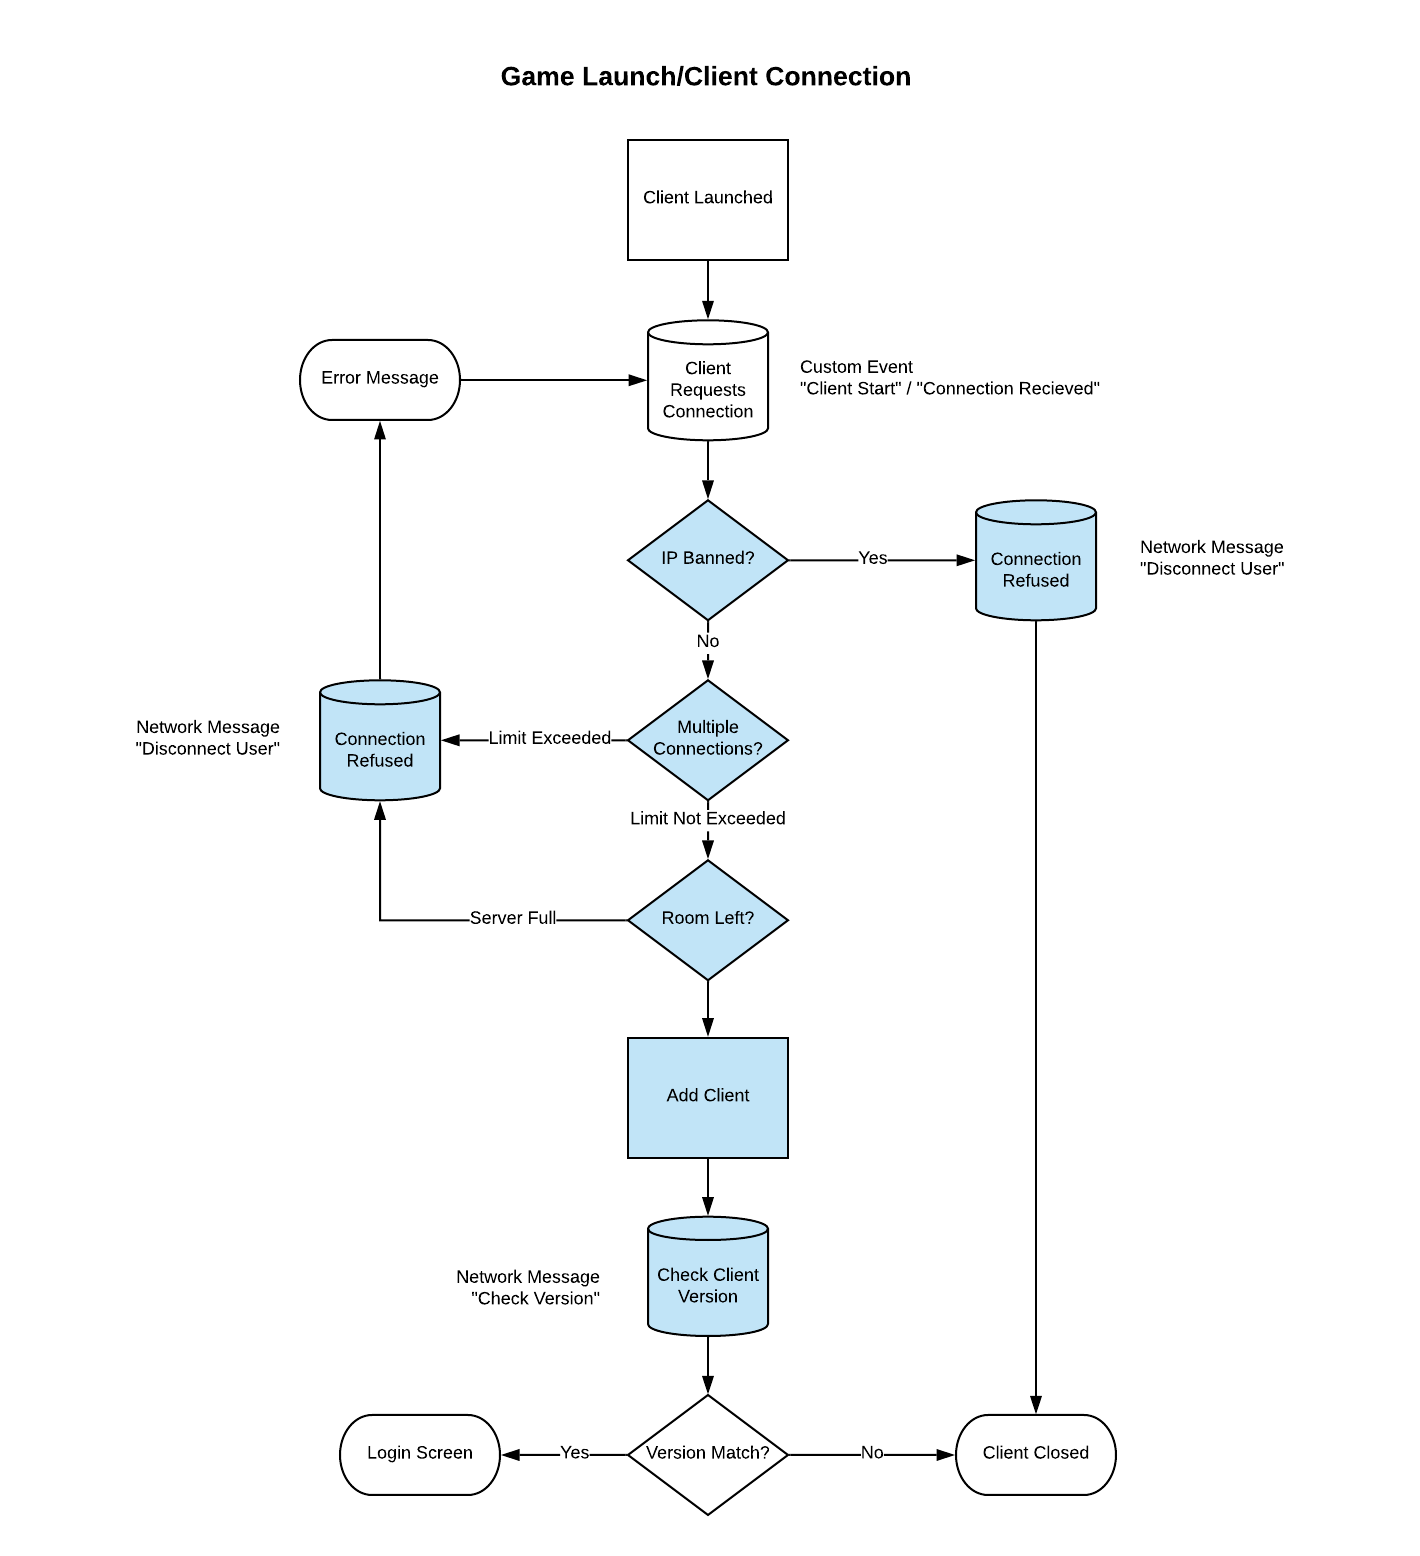
The “Server_IP” Global Variable (see Variable Definitions section) is used to define the server that the client is trying to connect to.
If you are doing local testing (whereby the server and client are on the same machine), make sure the Server IP is set to 127.0.0.1.
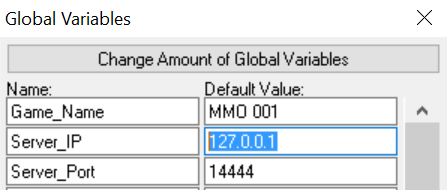
For external testing (client connecting from a different machine), you will need to set the Server IP, for the client build (see Server/Client Building section), to your Public IP. You can alternatively enter a Hostname instead of an IP address.
You may also need to configure Network Firewalls/NAT and Open TCP/UDP Ports to allow clients to connect to your server. This set up will vary from router to router – please refer to your manufacturer’s guides for more information.
Registration/Login
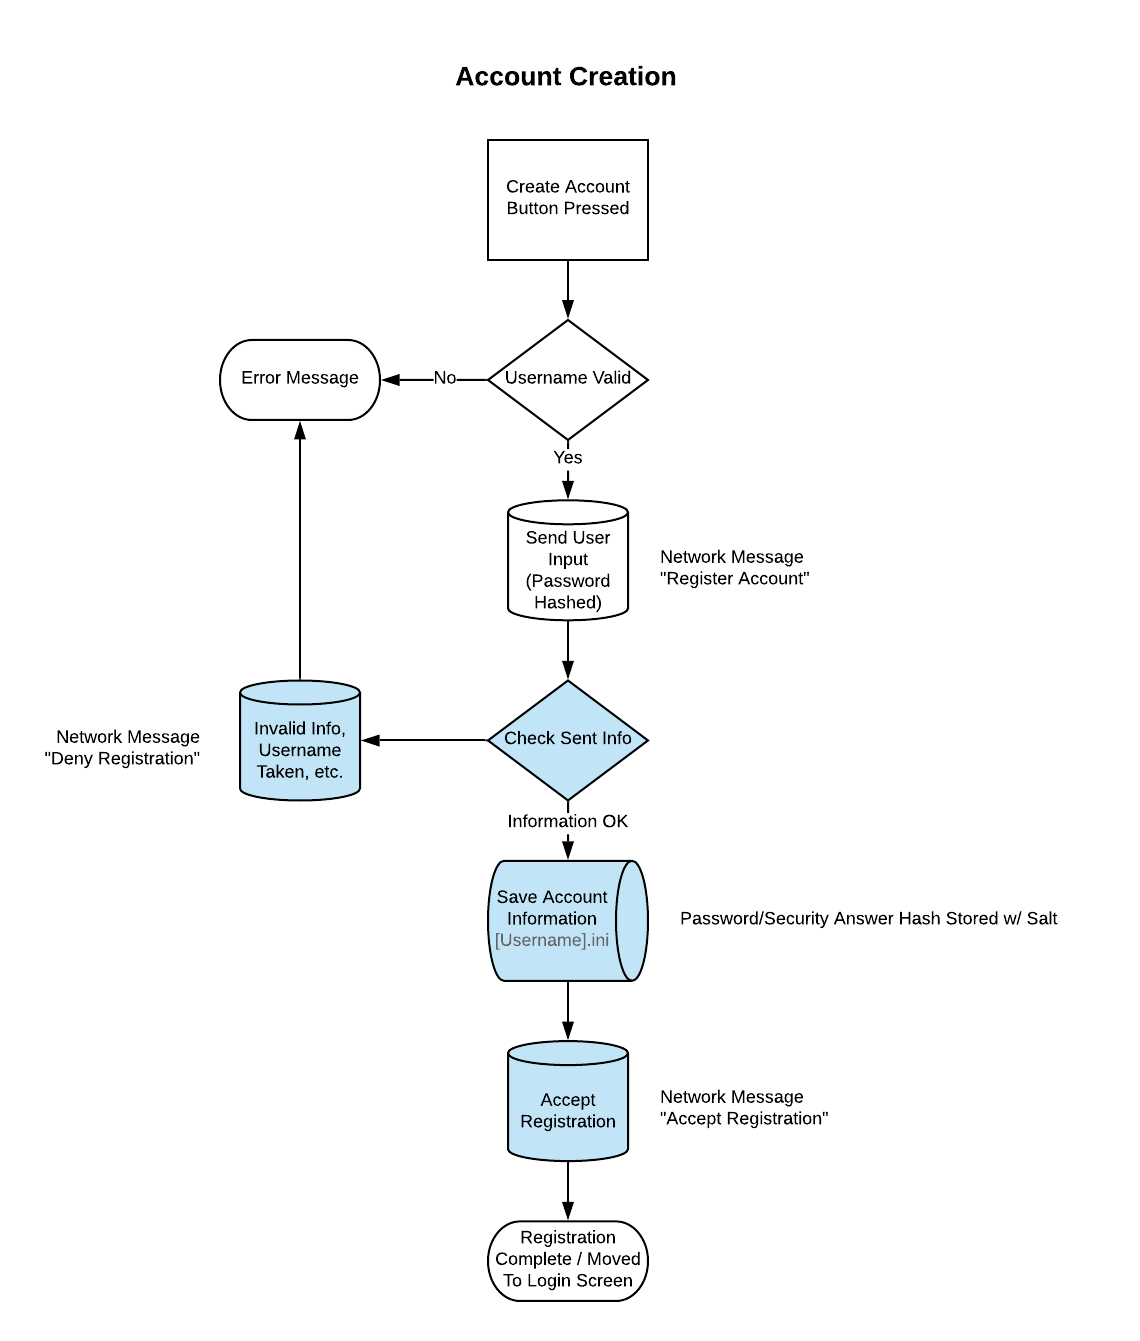
Before players can join a server and start playing your game, user registration is required so that players are individually distinguishable from others playing the game also. The “Registration” Interface allows you to do this. Required Fields include:
-
Username – a unique identifiable display name that all players can see.
-
Password – a series of letters, numbers and special characters to login to your account securely.
-
Password Confirmation – a Field that prompts users to repeat their password to ensure no mistakes are made.
-
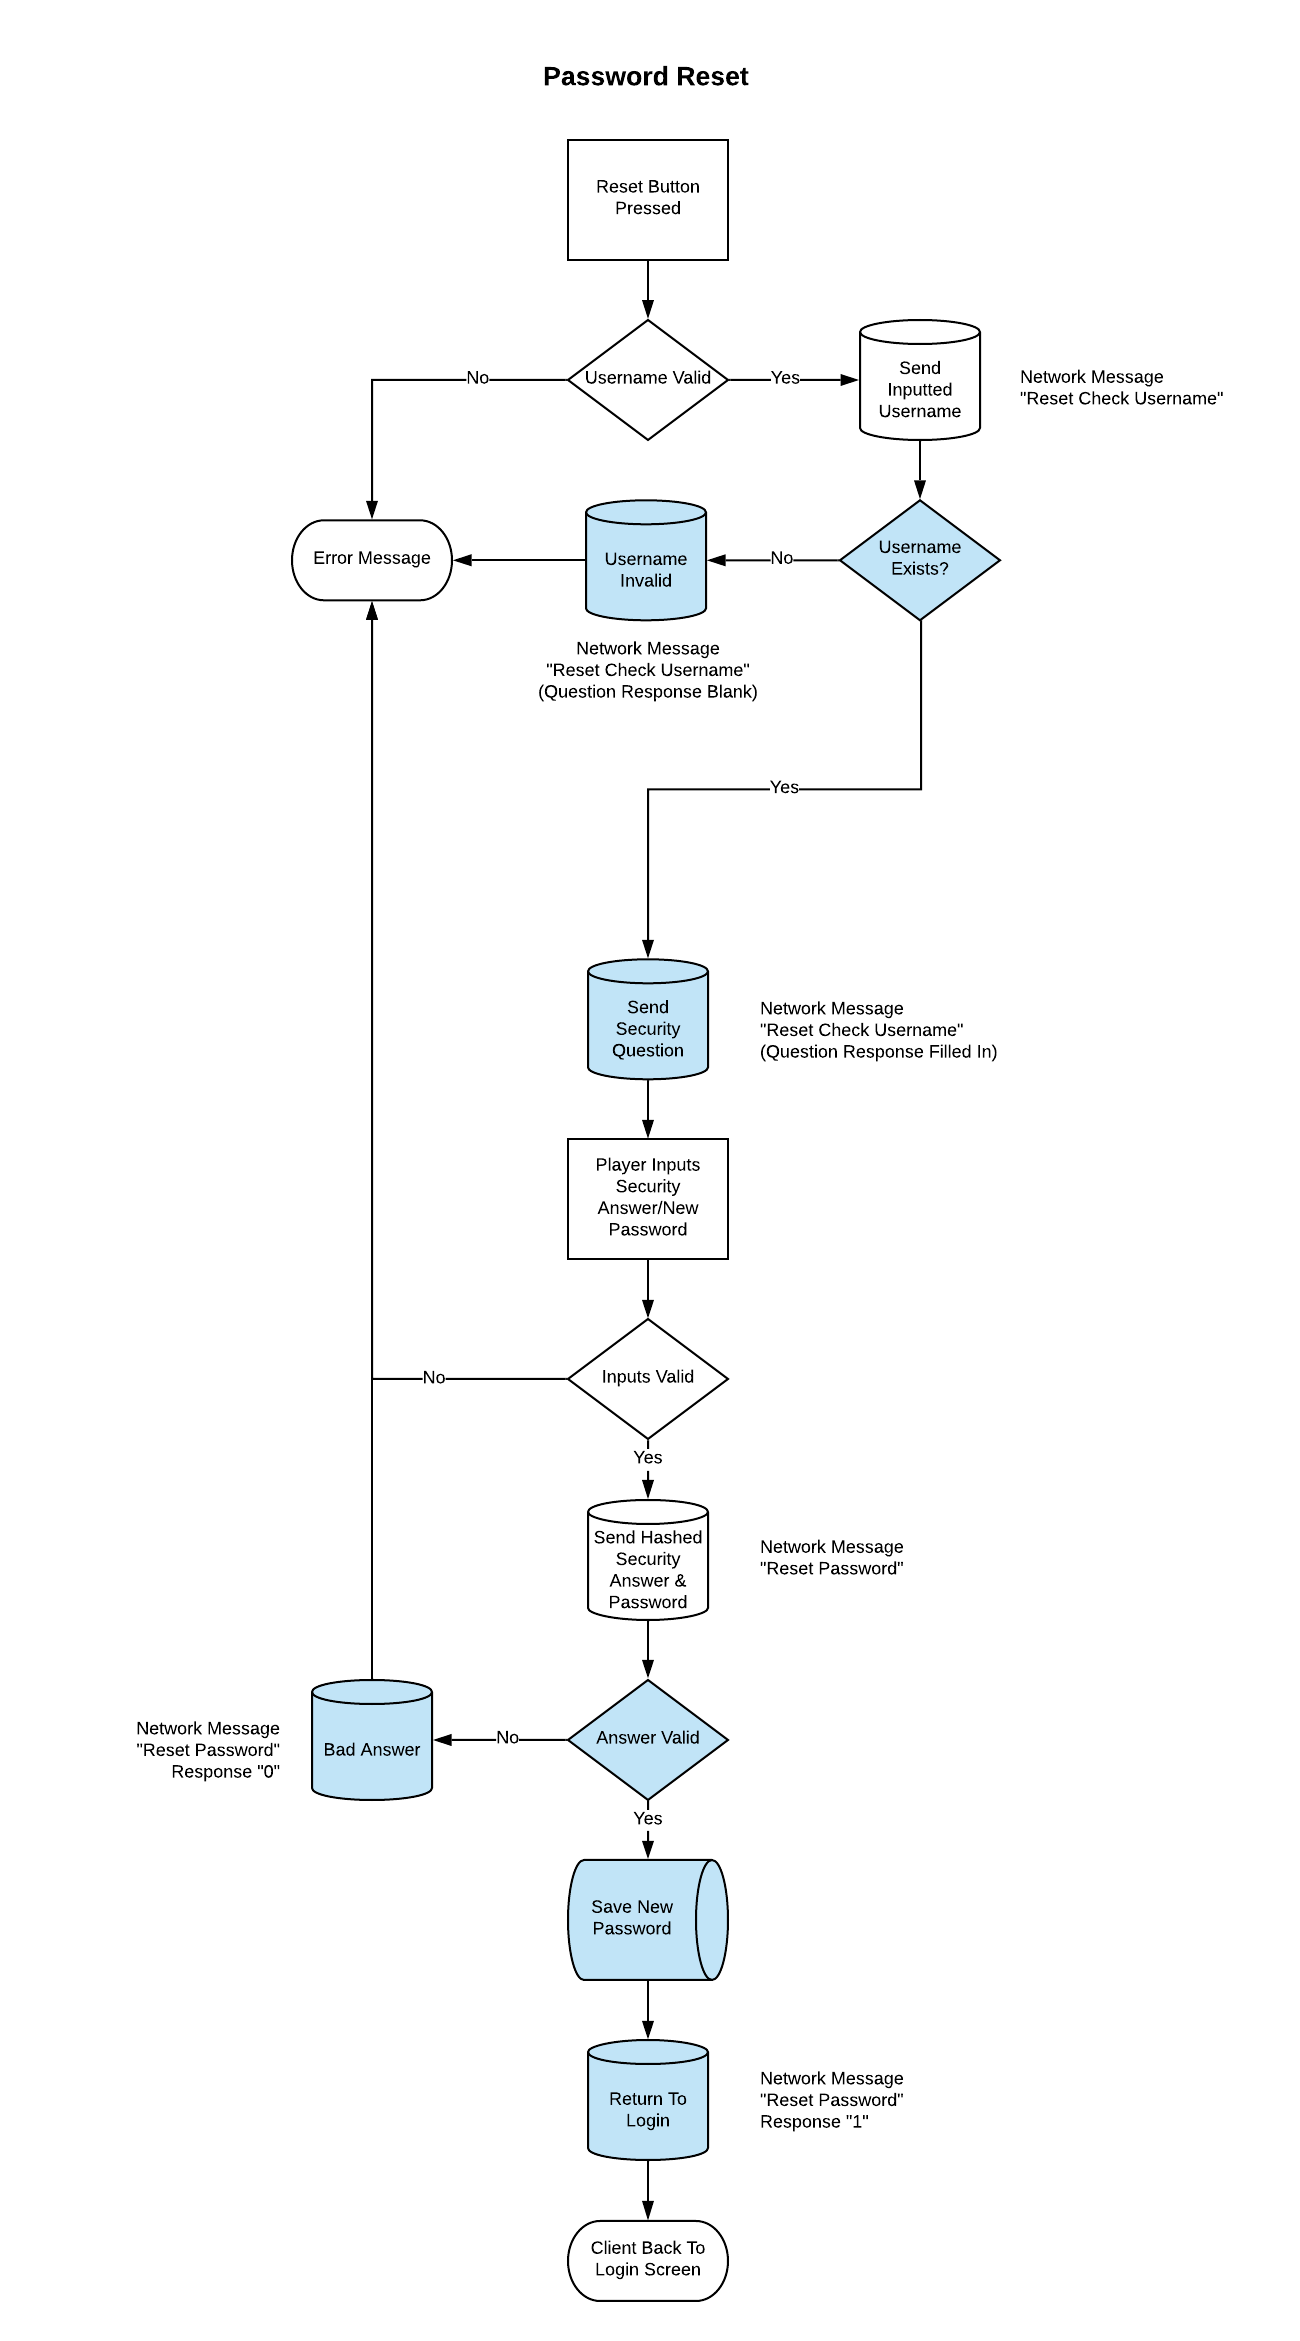
Security Question/Answer – a user question/answer that can be used for account recovery if the user forgets their password.
Once these Fields are placed, a “Create Account” Field is needed to take the user data and create an account on the server however before you can do this, you must first check the data the player has entered to ensure it’s valid.
Usernames will need to be checked against the server to ensure it’s available. This is done on the server side (see “Register Account” Network Message).
Passwords and Security Questions/Answers need a minimum character limit to ensure passwords are not too short (and therefore easily hackable) and that Security Questions/Answers are valid. Passwords also need to be checked against the Password Confirmation to make sure they’re identical. These can be checked on the client side, via the “Create Account” Field itself.
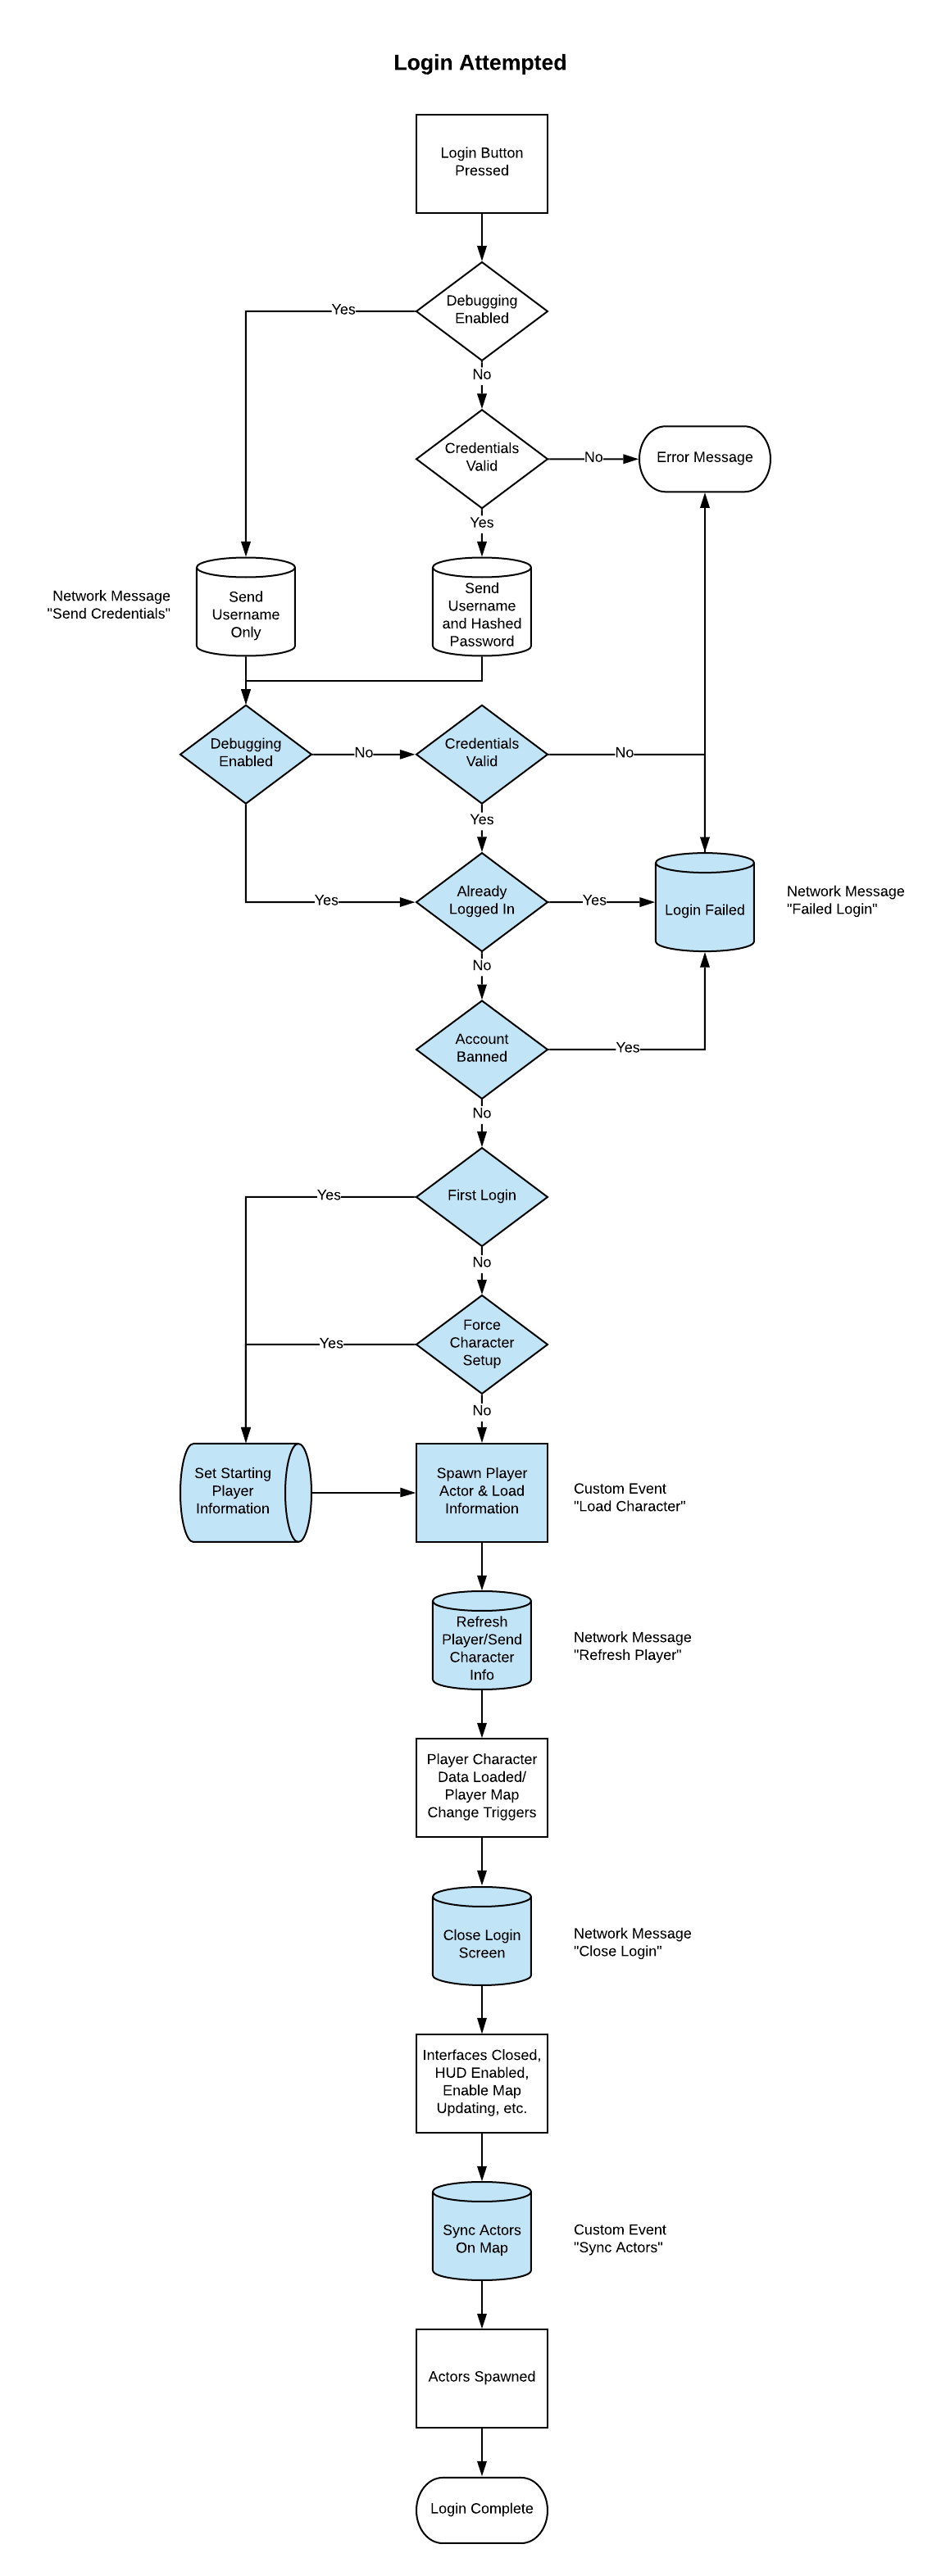
Once a user account has been successfully created, a separate “Login” Interface is needed to ask players for their Username and Password. These credentials will then be checked by the server to ensure they’re valid (see “Send Credentials” Network Message). Here are a few things you should be checking:
-
Does the Username/Password match any accounts?
-
Is the account in question already logged in?
-
Is the account in question banned from the server?
-
Is this the first time the account in question has logged in?
In regards to the last question: The server needs to check if it’s the first time the player has logged into the game, in order to ensure their account is properly configured/a save file is present before they’re dropped into the world (see “First Login” Sub Script of “Send Credentials” Network Message).
Player Save Data (INI File)
Player save data is stored inside an INI file in Documents > 001 > Games > [name_of_project] > Player Data. The file is split into the following sections:
-
[Account] – Contains data about the player’s account name, date joined, password, IP, security question/answer and character gender.
-
[Character] – Contains data regarding the player’s position, level, experience, money, points, Statistics, equipped Items/Magic, inventory and character appearance.
-
[Objectives] – Contains data about active and completed quests. See “Quests” and “Player Objectives” sections below for more information about how these are set up.
Actor Logic
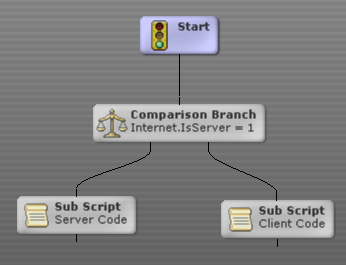
Setting up Actors for the MMORPG template is different to a regular single player game. You must consider what code you want to run on the client and what code you want to run on the server. In this section we will describe how to set up various basic Actor types.
Client-Side Actor
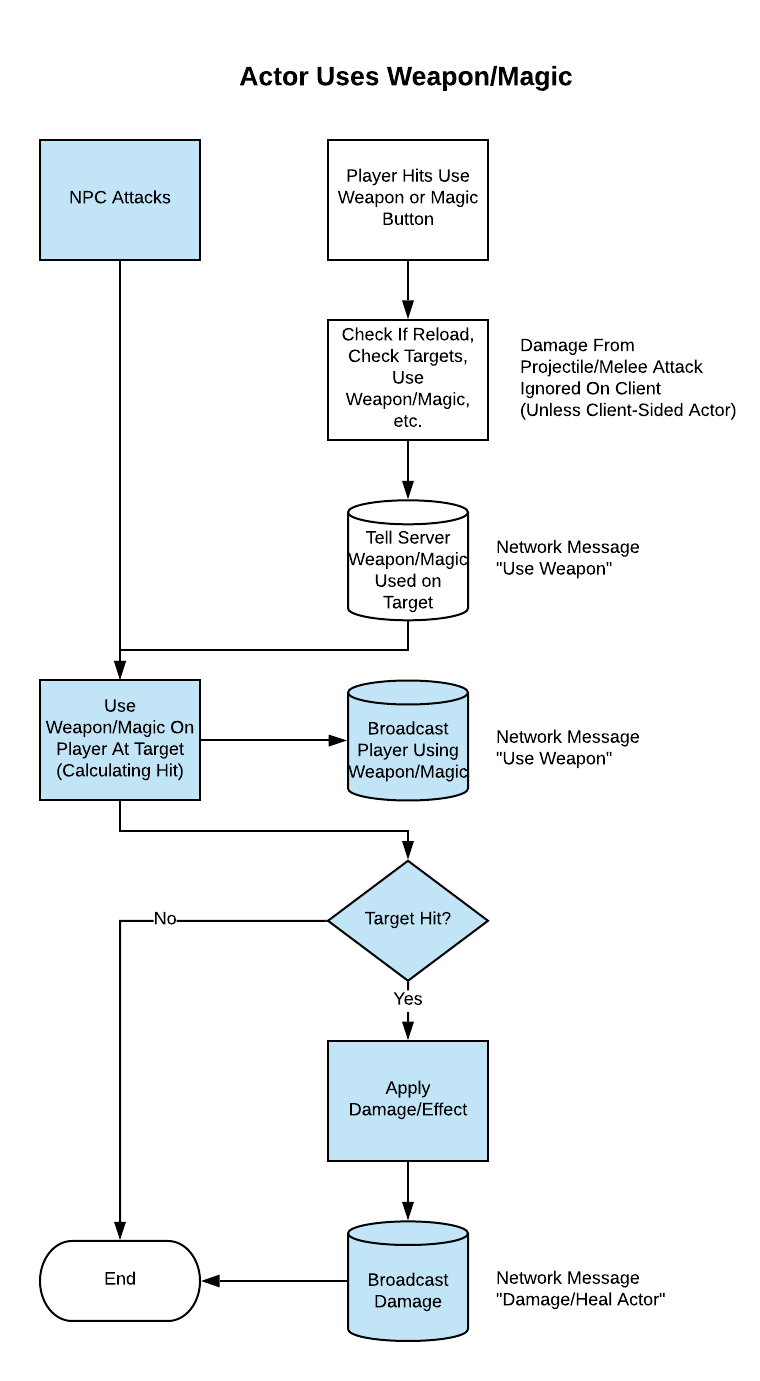
This type of Actor will never run any code on the server, only the client. As far as the server is concerned, this Actor does not exist at all. You can use this for very basic Actors that never need to be manipulated by the server. For example: Having an Actor that only repeats the same dialogue when spoken to.
To create one of these kinds of Actors, simply select the Actor Template “Client NPC” and place it on the Map. This Actor can be scripted exactly like any other 001 Actor, though please note that any changes will be client-side ONLY and will not be acknowledged by the server. This is also seen as an “Untrusted” NPC, and can/should not hand out money, experience, points or Items to the player.
Important Notes:
-
In order to update this Actor, you would need to send out a new version/patch of the game
-
The server does not acknowledge this as a valid NPC and does not exist on the server. They are deleted upon server start.
-
Running the “Activate Actor” Custom Event on this Actor will NOT work!
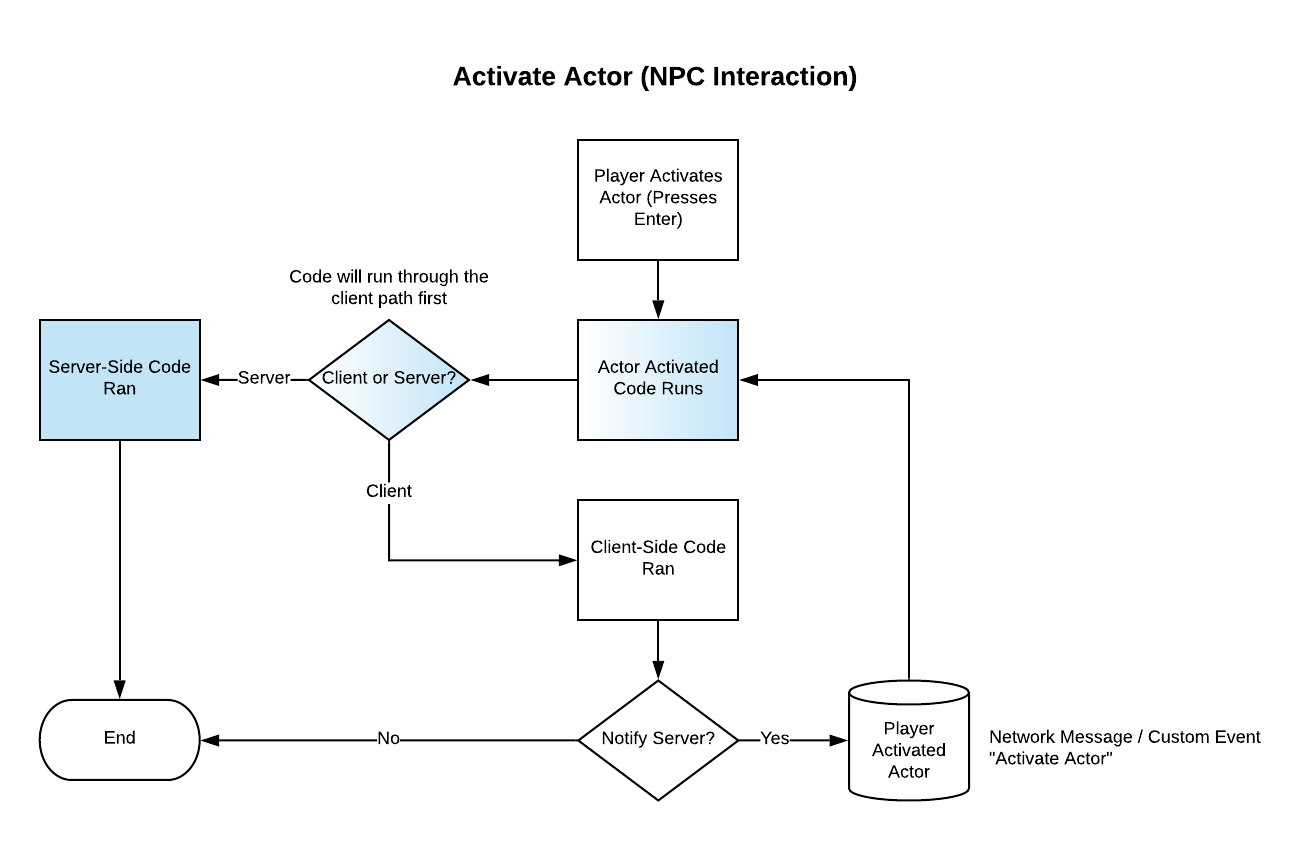
Dynamic Server Actor
This sort of Actor can only run code on the server; client-side code is not possible. If you need to run client-side code and server-side code please see the “Static Server/Client Actor” section. These Actor types will make up the bulk of your Actors and will be used for shopkeepers, innkeepers, quest givers, etc.
Unlike client-side Actors, you must follow this “Base” script which defines the logic used for client/server interaction:
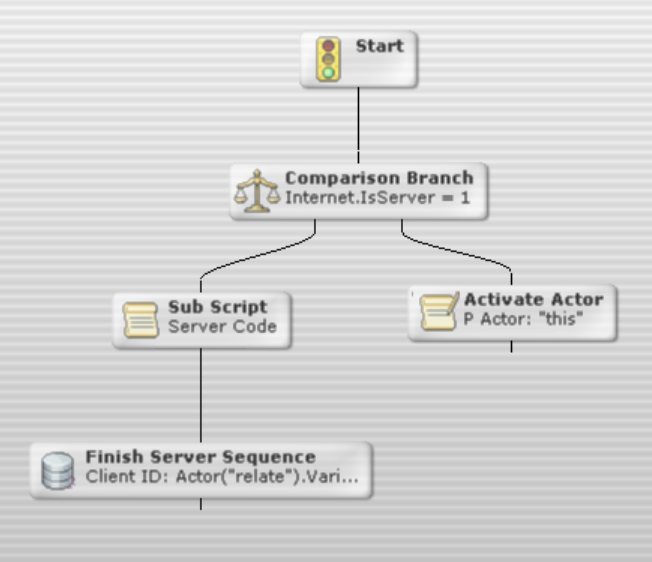
When the player talks to this Actor, it will take the right branch and run the “Activate Actor” Custom Event. This tells the server to re-activate the Actor again, but instead on the server, this takes the left branch. The left branch then runs the server-side code and finishes the server sequence.
To create a dynamic Actor, simply place an Actor with the Actor Template “Dynamic Actor” on the Map (located in Actor > Server Actor > NPC Actors > Dynamic Actor). By default, it will already have an “Activated” trigger set up, so all you have to do is place your server-side code inside the “Server Code” sub-script.
Important Notes:
-
You cannot run any client-side code with this Actor Template
-
This Actor type is entirely controlled by the server
-
You cannot use the “Create Actor” event with this Actor type
-
If you want to change every instance of this Actor, you MUST change them all individually, since they are all unique
Static Server/Client Actor
This kind of Actor can run both server-side and client-side code. This is ideal for any non-unique generic Actors that either need to be created freely or easily editable. They should always have “Allow changes in placed actors” UNCHECKED in the Actor Template window.
Unlike client-side Actors, you must follow this “Base” script which defines the logic used for client/server interaction:
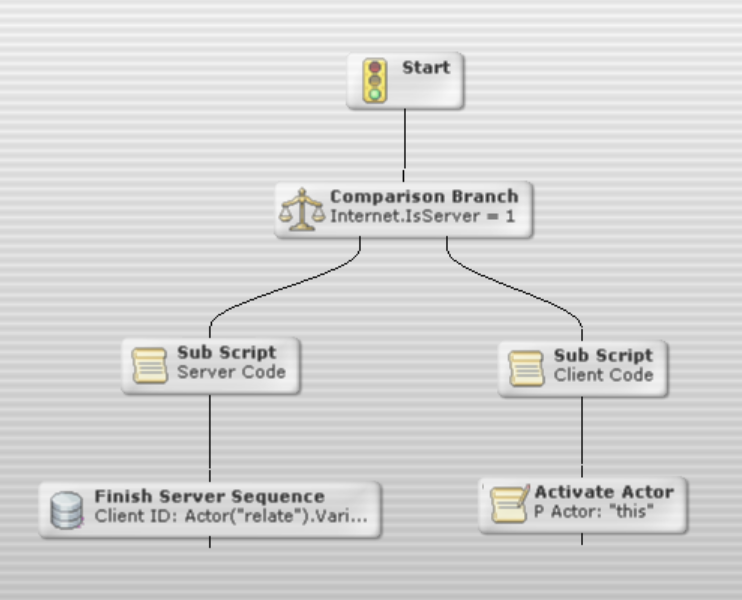
When the player talks to this Actor, it will take the right branch and run the client-side code. Once the client-side code has finished it will run the “Activate Actor” Custom Event. This event tells the server to re-activate the Actor again, but instead on the server, this takes the left branch. The left branch then runs the server-side code and finishes the server sequence.
To create a static Actor you must first create a new Actor Template anywhere under the “NPC Actors” group (located in Actor > Server Actor > NPC Actors) and ensure that you keep “Allow changes in placed actors” UNCHECKED.
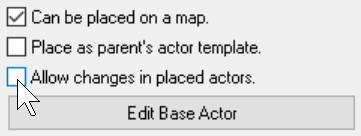
You can also copy and paste the static Actor Template (located in Actor > Server Actor > NPC Actors > Static Actor). You then need to click the “Edit Base Actor” button which will bring up the Actor editor. Here is where you will set up your desired Actors, taking note that assuming you copied the “Static Actor” template, it will come with a default “Activated” trigger (You can delete this if you don’t want to be able to talk to this Actor). If you want to be able to talk to this Actor you can edit the “Activated” trigger. You can then place any client-side code inside the “Client Code” sub-script, and any server code inside the “Server Code” sub-script.
Important Notes:
-
You can run both client-side and server-side code with this Actor Template
-
This Actor type is entirely controlled by the server
-
Can be created using the “Create Actor” event or spawned using a Timer
Zones
In order to use Zones you have to consider how the MMORPG template handles scripting on both the client and the server. On the client, the player that is being controlled is handled as a “Player” in 001, however on the server it is handled as a “Computer”. This means when setting up our Zones we will have to check the Actor Template if we want it to only affect player characters. In this example we will go over setting up a Zone when the player walks over it.
Place a Zone on the Map, it is best to not specify a “Player” or “Computer” for the trigger, but rather edit the trigger and uncheck the “Controlled By” box. This will cause the scripting trigger to fire every time any Actor walks on the Zone allowing us to customize when to fire the script.
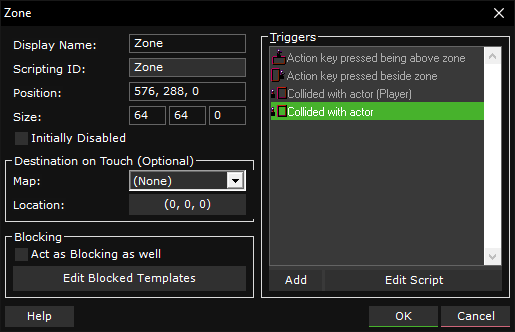
Next we can setup our script based on what we need. You can use a common example such as this to run code every time any actor walks over the zone:
If you want the zone to only run when a “Player” runs over the Zone, you can use a “Template Branch”. If you are checking the template on the “Server Code” you will want to make sure you check for the template “Player”. If you are checking on the “Client Code” you will want to make sure you check for the template “Client Actor”.
Quests
As mentioned in the previous section, MMORPGs require networking for most client-side actions – including quests. When creating a quest-giving NPC (see the “Talked to / Activated” triggers inside the “Stuck-Up Steve” Actor in the default map “Spawn” for collection quest and the “Lost Soul” Actor in the default map “Monster Area” for kill quest) the client needs to let the server know an action has been performed and then the server can initiate the action on the player’s behalf (see “Activate Actor” Network Message).
On the server side, it will check to see the status of a given quest (see “Objective Get” Custom Event). If the value is equal to 0 then the quest hasn’t begun, so this is where you will need to inform the player on the requirements for completing the quest (see “Server Notification” Custom Event) and then set the appropriate objective value to start the quest (see “Objective Set” Custom Event). When the player has completed an objective, you will then need to update the objective value for that quest (see the “Defeated / Destroyed” trigger inside the “Slime” Actor Template for kill quests, for example).
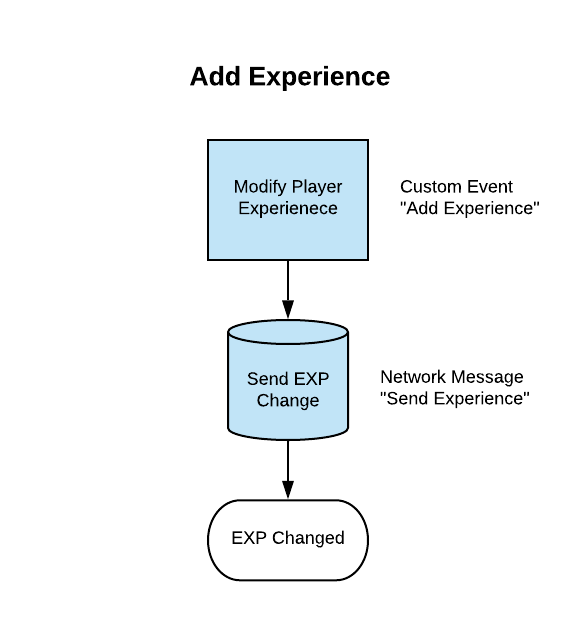
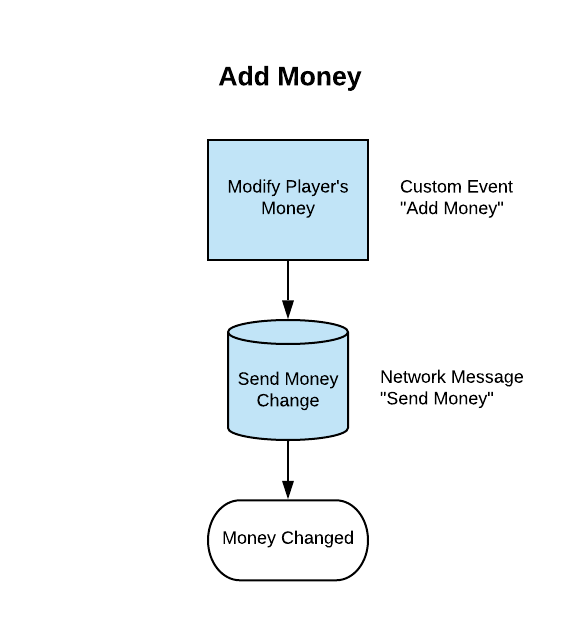
Upon returning to the quest giver, the server will once again check the value of the objective to determine the status of the quest. If the player has successfully completed the quest, then you can issue an appropriate reward (see “Add Money” and “Add Experience” Custom Events). The objective must then be updated one more time so that the quest is officially marked as completed (and to stop the player from constantly receiving a reward for completing the quest).
Player Objectives
Player objectives are stored as Variables that are saved when the user logs out. To set up new player objectives, you will need to use the “Objective Set” Custom Event and specify the username of the current player the objective applies to (use the “Display Name” Use Value to retrieve the player’s title), the name of the objective itself and the value of the objective (used internally to keep track of the player’s progress).
Server Log/Console Commands
A server log is a log file created and maintained by the server that lists all of the activities the server has performed (see the “Console” Interface). Whenever an action is performed, it’s typically a good idea to update the server log so that you have a record of all ongoing activities. This can be extremely useful for tracking down suspicious activity on your server, such as player exploits/cheating.
The console also provides administrators with a means of executing server-level commands to retrieve/change values whilst the server is running. By typing “Help” into the server log, you’ll be able to see the full list of supported commands. These commands include:
| Name | Description |
|---|---|
| Help | Displays a list of all supported commands. |
| Quit | Saves and shuts down the server. |
| Map Set | Shows the specified Map. |
| Map Move | Repositions the game’s camera. |
| Map Focus | Forces focus on a specified Actor. |
| Kick | Removes a player from the game. |
| Ban Player | Removes a player from the game and prevents them from connecting to the server. |
| Ping | Pings the specified client and returns the connection speed to the server. |
| Player Objective Get | Returns the value of the specified player objective. |
| Player Objective Set | Sets the value of an objective for a specified player. |
| Player Item Add | Adds the specified Item to the player’s inventory. |
| Player Item Set | Sets the quantity of a specified Item the player has. |
| Player EXP Add | Increases player experience points. |
| Player Money Add | Increases player’s available funds. |
| Get Connected | Returns all currently connected players and their IDs. |
| Save | Forces the server to save every player’s data. |
| Unban Player | Restores a banned player to allow them to connect to the server. |
| Ban IP | Prohibits an IP from connecting to the server. |
| Unban IP | Restores a banned IP to allow it to connect to the server. |
| Broadcast | Broadcasts a message to the server. |
| Permission | Sets the permission level of a user. See “Custom Commands” section below. |
| Global | Switches player to Global chat. |
| Area | Switches player to Area chat. |
When a command is activated the “Run Command” Custom Event will execute and carry out its assigned instructions. If a command is entered incorrectly, or is not recognised, an error message will be sent to the server log instead.
Custom Commands
Each command is stored inside the “Commands” Table and new ones can be added by adding a new entry in the Table. The “Run Command” Custom Event will parse text commands and execute its code. Certain commands may need their own Custom Events to perform specific actions (see “Command Get Connected”, “Command Help” and “Command Map Set” Custom Events).
Below is a structure of the “Commands” Table and what each cell represents:
| Cell | Name | Description |
|---|---|---|
| 1 | Command | The command BEFORE any inputs. For example: “Help” |
| 2 | Command Help Syntax | What appears when you enter “help command_name”, so rather than having it show up “Map Move NUMBER NUMBER NUMBER” it shows up as “Map Move X Y Z” instead. |
| 3 | Input Type | The type of input after the command. You can place an underscore if its optional (MUST BE LAST INPUT ONLY). For example: The command “Map Move” and its input “NUMBER NUMBER NUMBER” is what makes the command, “Map Move NUMBER NUMBER NUMBER”. Input types can be “TEXT”, “MAP”, “NUMBER”, “ACTOR”, “CLIENT”, “USERNAME”, “ITEM”, “INTEGER” or blank if there is no input. |
| 4 | Description | A simple instruction to what the command does. |
| 5 | Code to Run | Where you put your text-based 001 code. To reference an INPUT you can use {1} to specify the first input, {2} to specify second input, etc. You can run multiple commands by separating them with “| |”. For example, the “Quit” command looks like this: Custom.Save_All| |Quit. An example of a command using multiple inputs (such as “Map Move”) looks like this: Interface(“Full Screen”).Show(1, 1, 1)| |Screen.Pan2(Screen.FocusMap, “{1}”, “{2}”, “{3}”, 0). To retrieve a text script, you’ll need to set the mode to “Textual” inside the Script Editor. Please Note: If you save a script in this mode, it will forever stay in text mode! |
| 6 | REQ Permission | The permission level to use the command. If you do not have the required permissions to run the command the server will act as if it does not exist. |
| 7 | Leave | The last cell should be left as 0. |
By default, players have a permission level of 10. The lower this number is, the more access a user has. Permission levels are as follows:
-
Player = 10
-
Moderator = 2
-
Administrator = 1
-
Console = 0
Chat Log
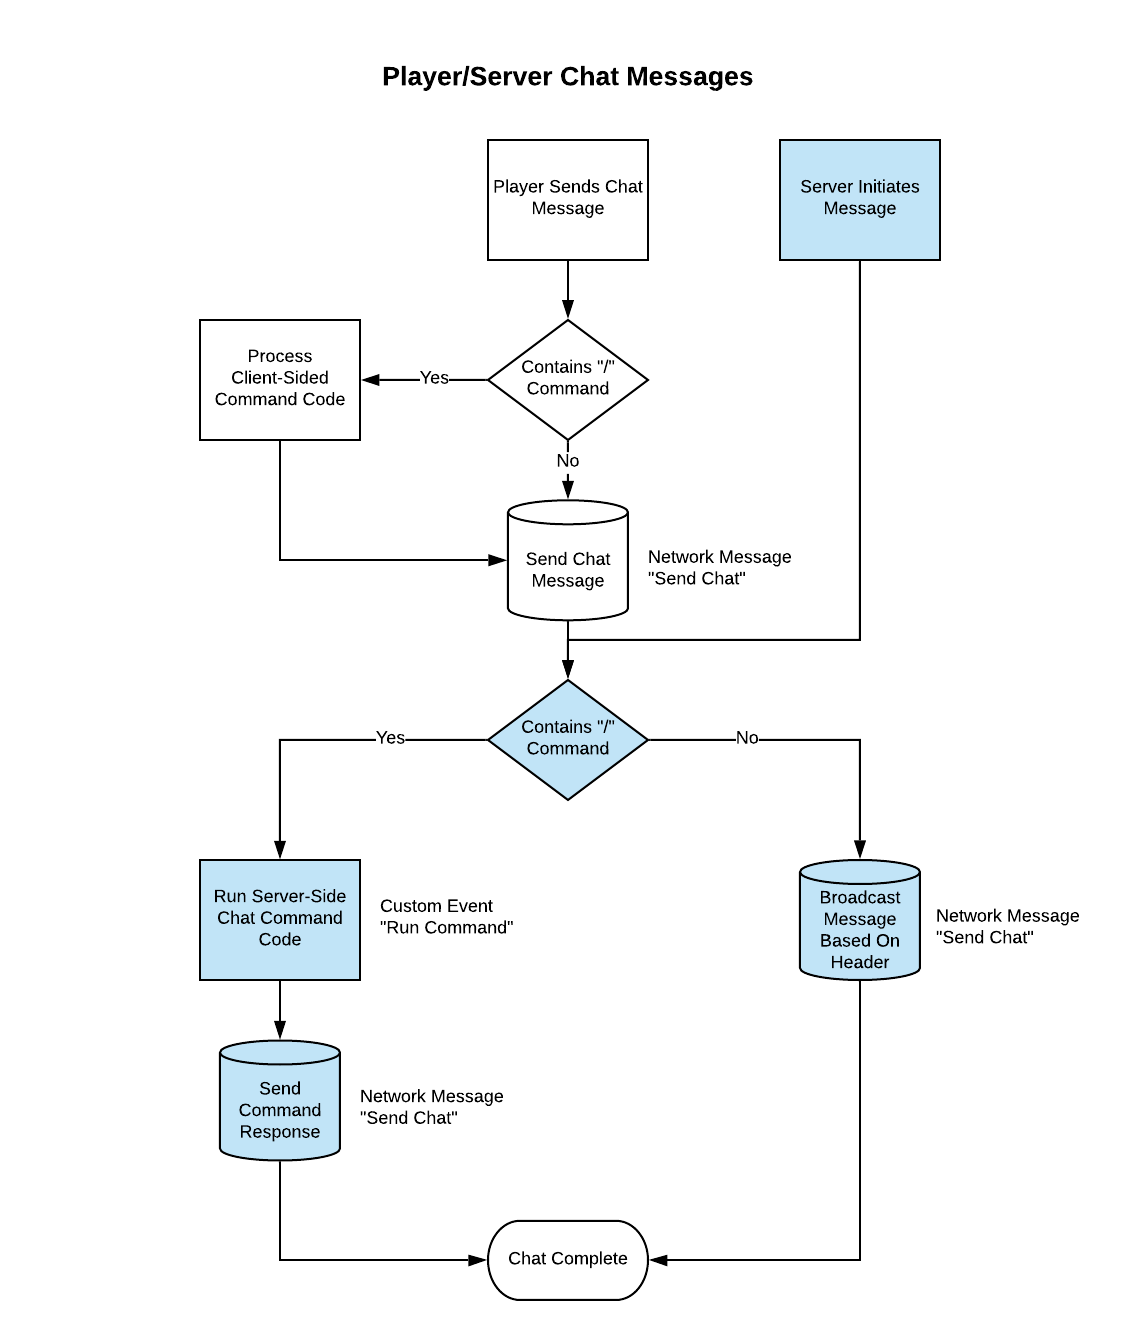
Communication is an essential part of most MMORPGs – with players being able to speak to one another through a chat console (see “Chat” Interface). Players are given the option to set their chat message to “Area” or “Global” which will determine who will see it:
-
Area – a message that is sent to all players within a specific Map where the message was sent.
-
Global – a message that is sent to all players, regardless of location.
Whilst the player is typing out their message a “Text Inputted” trigger (inside the “Chat” Field) will activate and run a “Check Text” Custom Event to determine whether or not the characters entered are acceptable. The Custom Event has parameters that allow you to set what type of characters you wish to allow such as Letters, Numbers, Underscores, Symbols and Spaces. If the player types an invalid character the Field will cut the character out, making it appear as though it was never typed in.
When the “Action” Control is pressed (Enter key by default) the player’s message will be sent to the server (see “Send Chat” Network Message) where it will be distributed to all players. Depending on whether “Area” or “Global” is set, the message will be sent to some or all connected users.
Network Messages
See the flowcharts below for each Network Message to better understand how they operate. Click to enlarge.
Login & Registration
Actor Interactions
- Activate Actor
- Actor Attacks
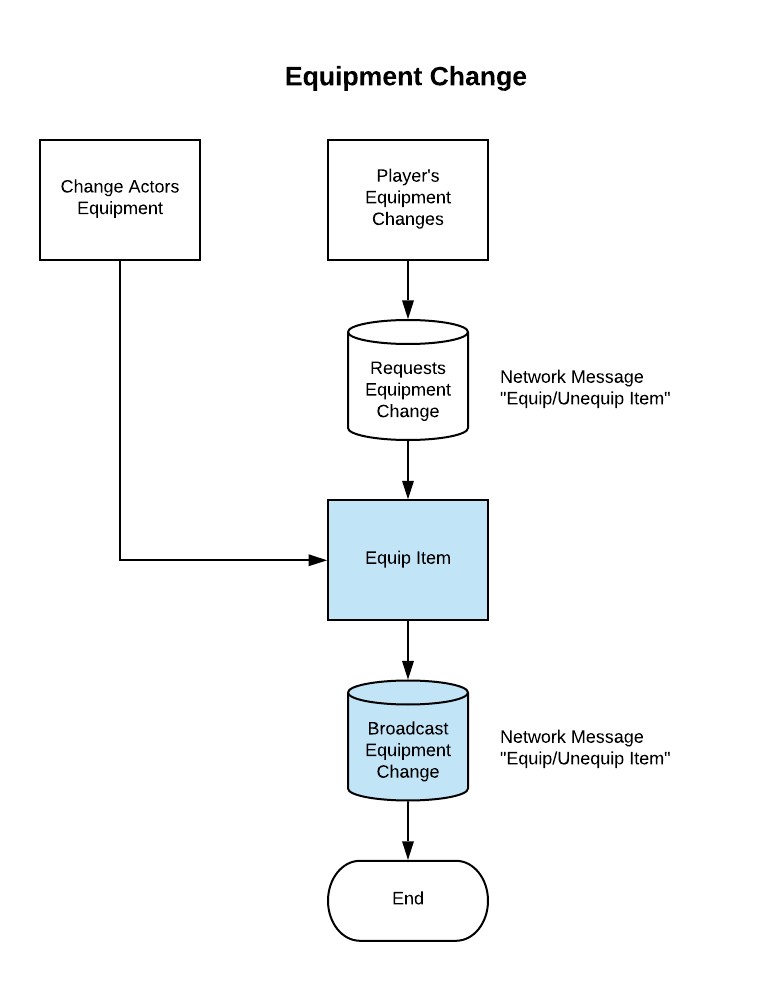
- Actor Equips
- Add Experience
- Add Money
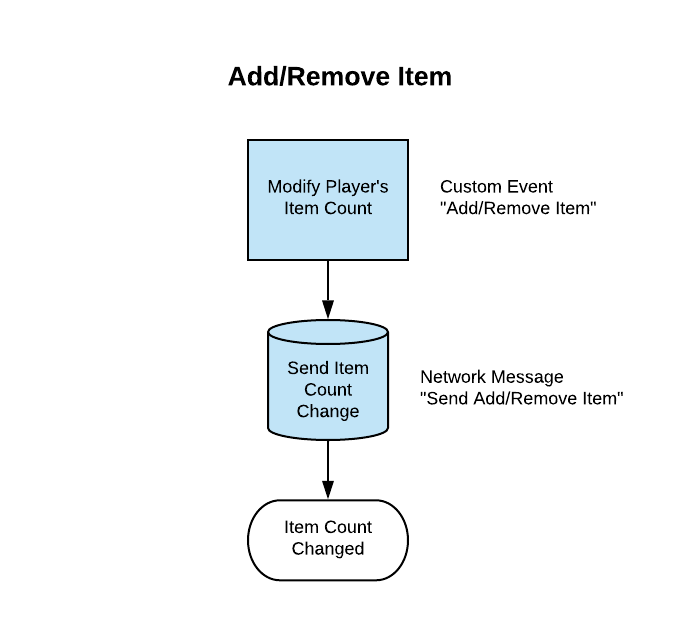
- Add/Remove Item
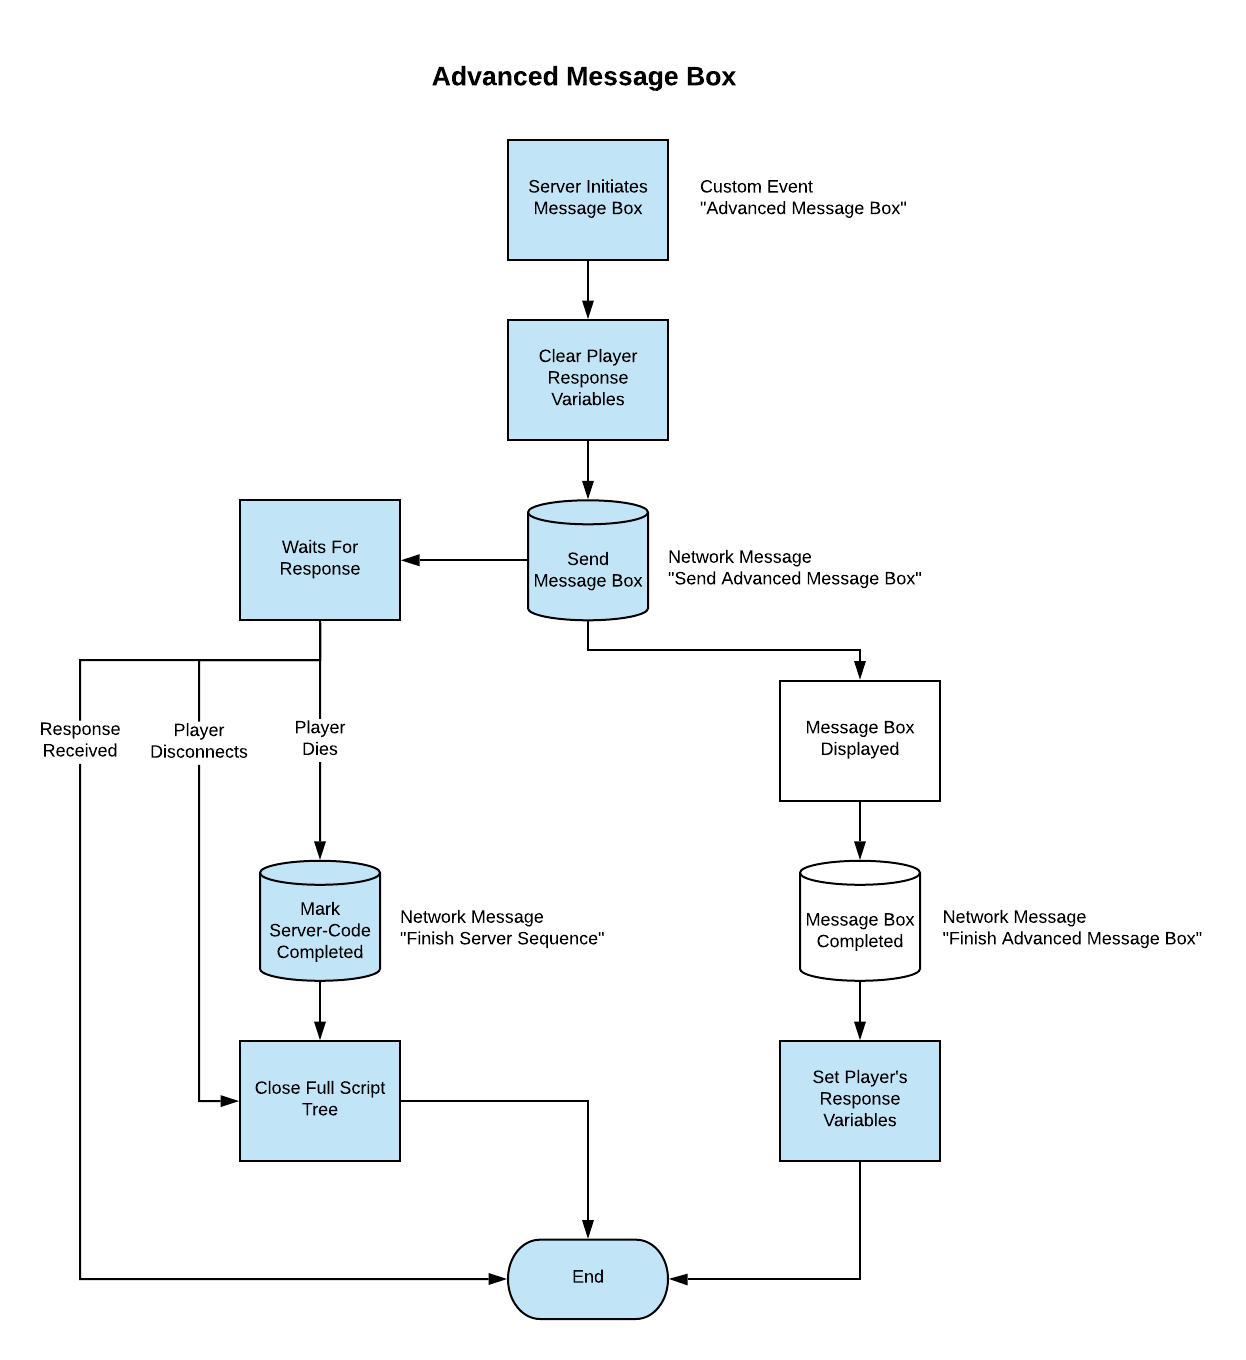
- Advanced Message Box
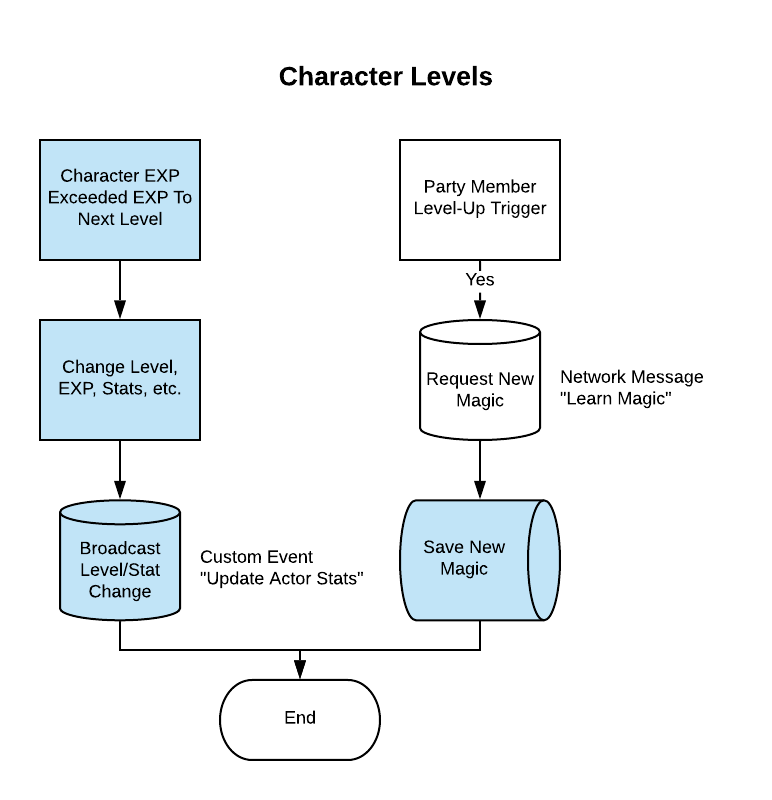
- Character Levels
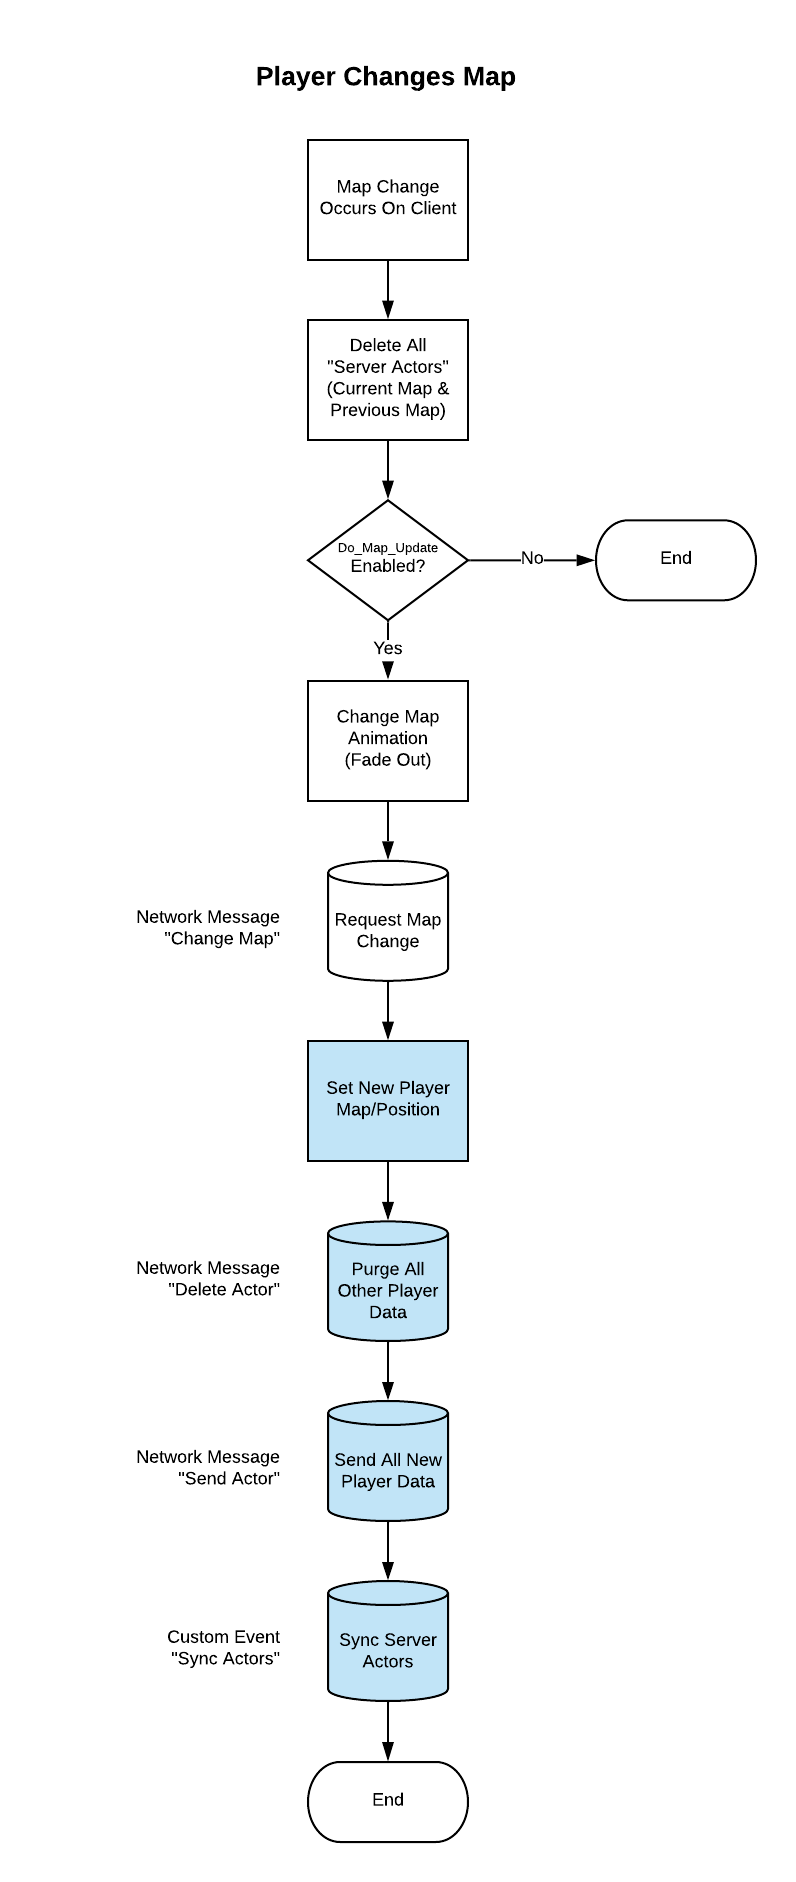
- Map Change
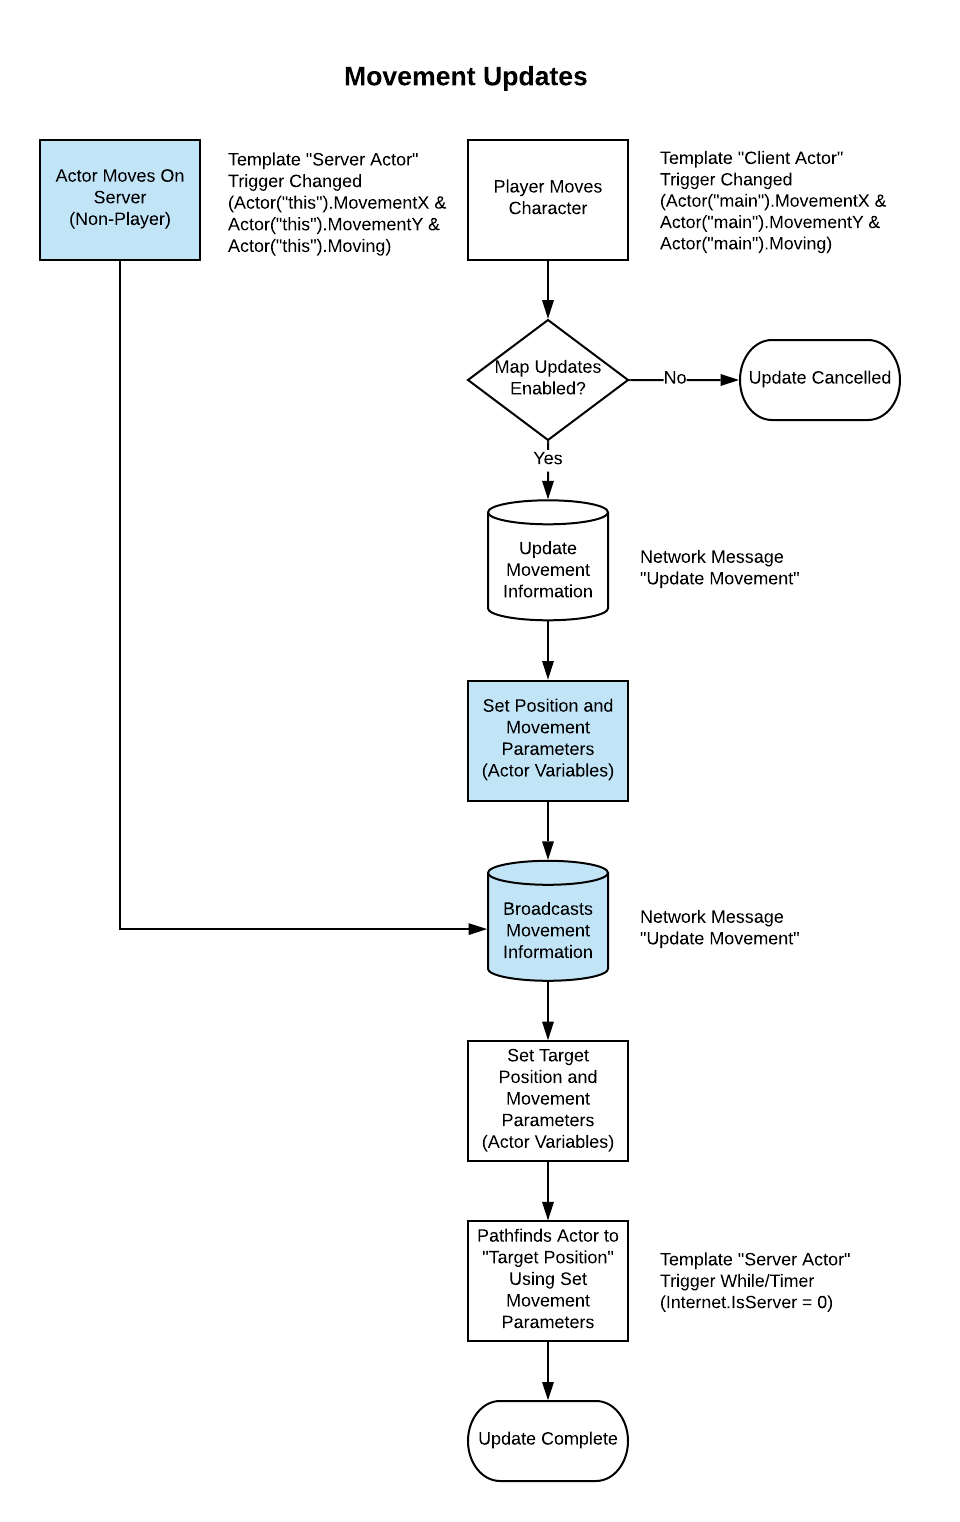
- Movement Updates
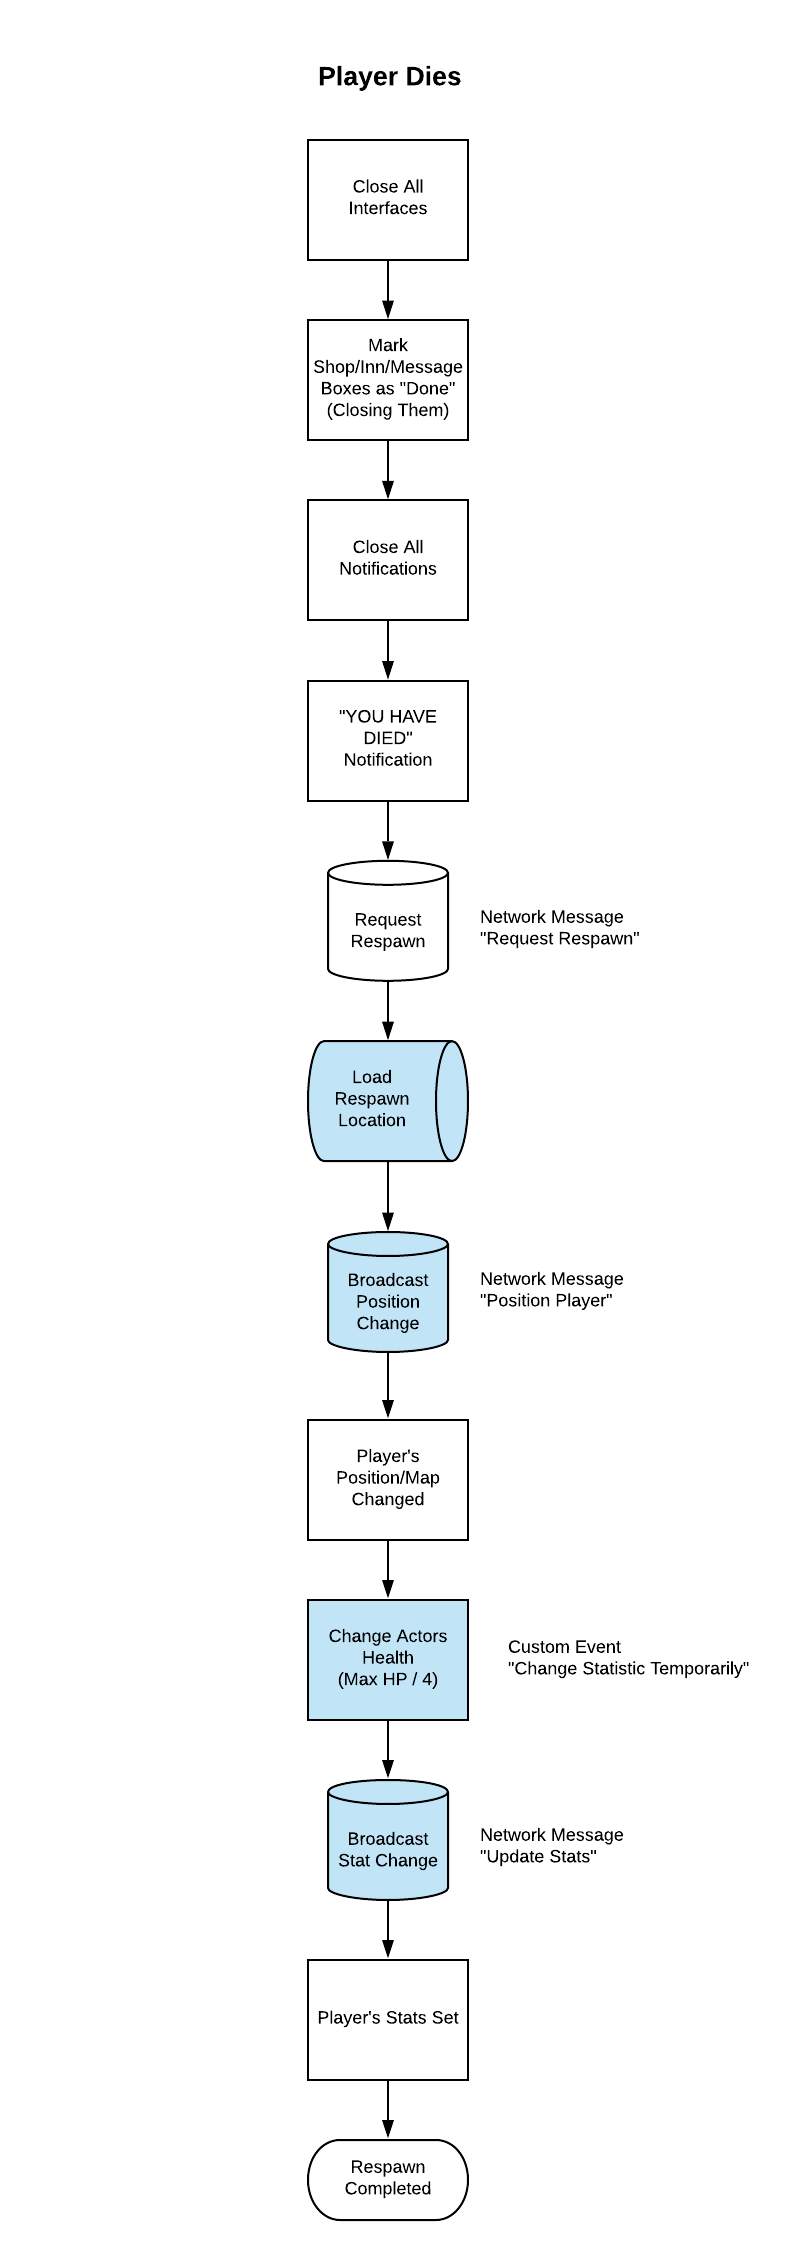
- Player Dies
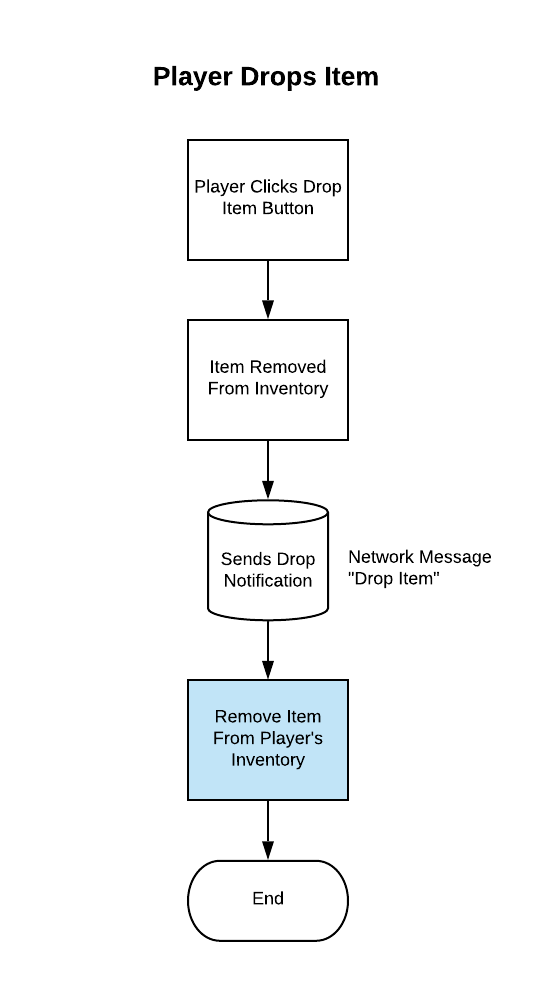
- Player Drops Item
- Send Chat
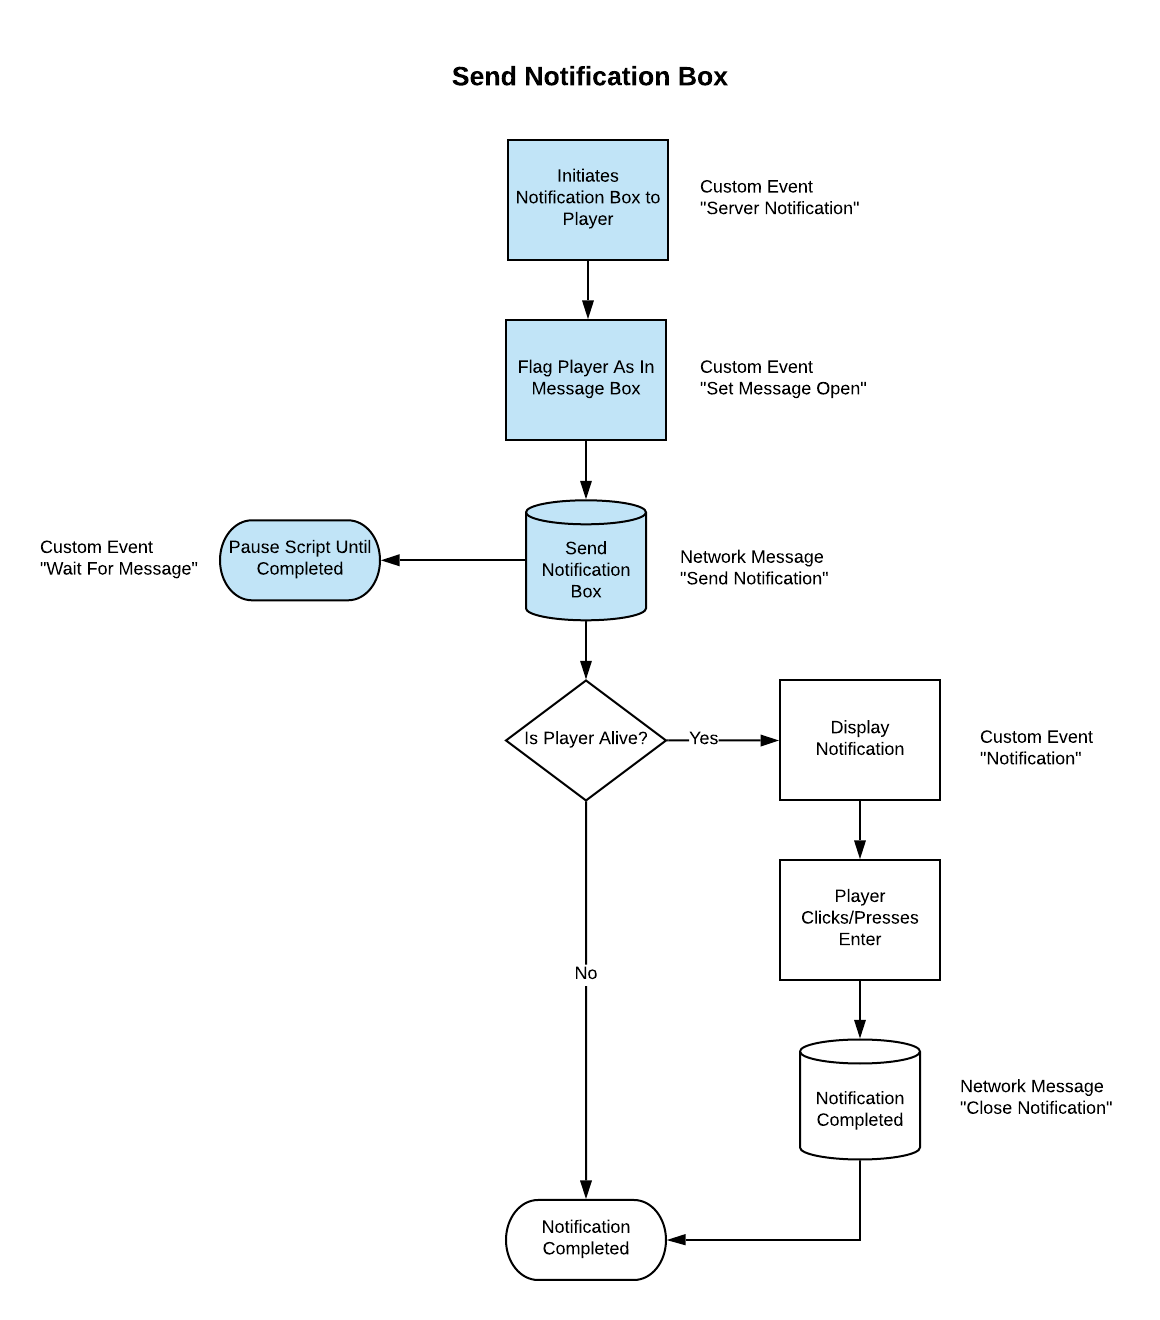
- Send Notification
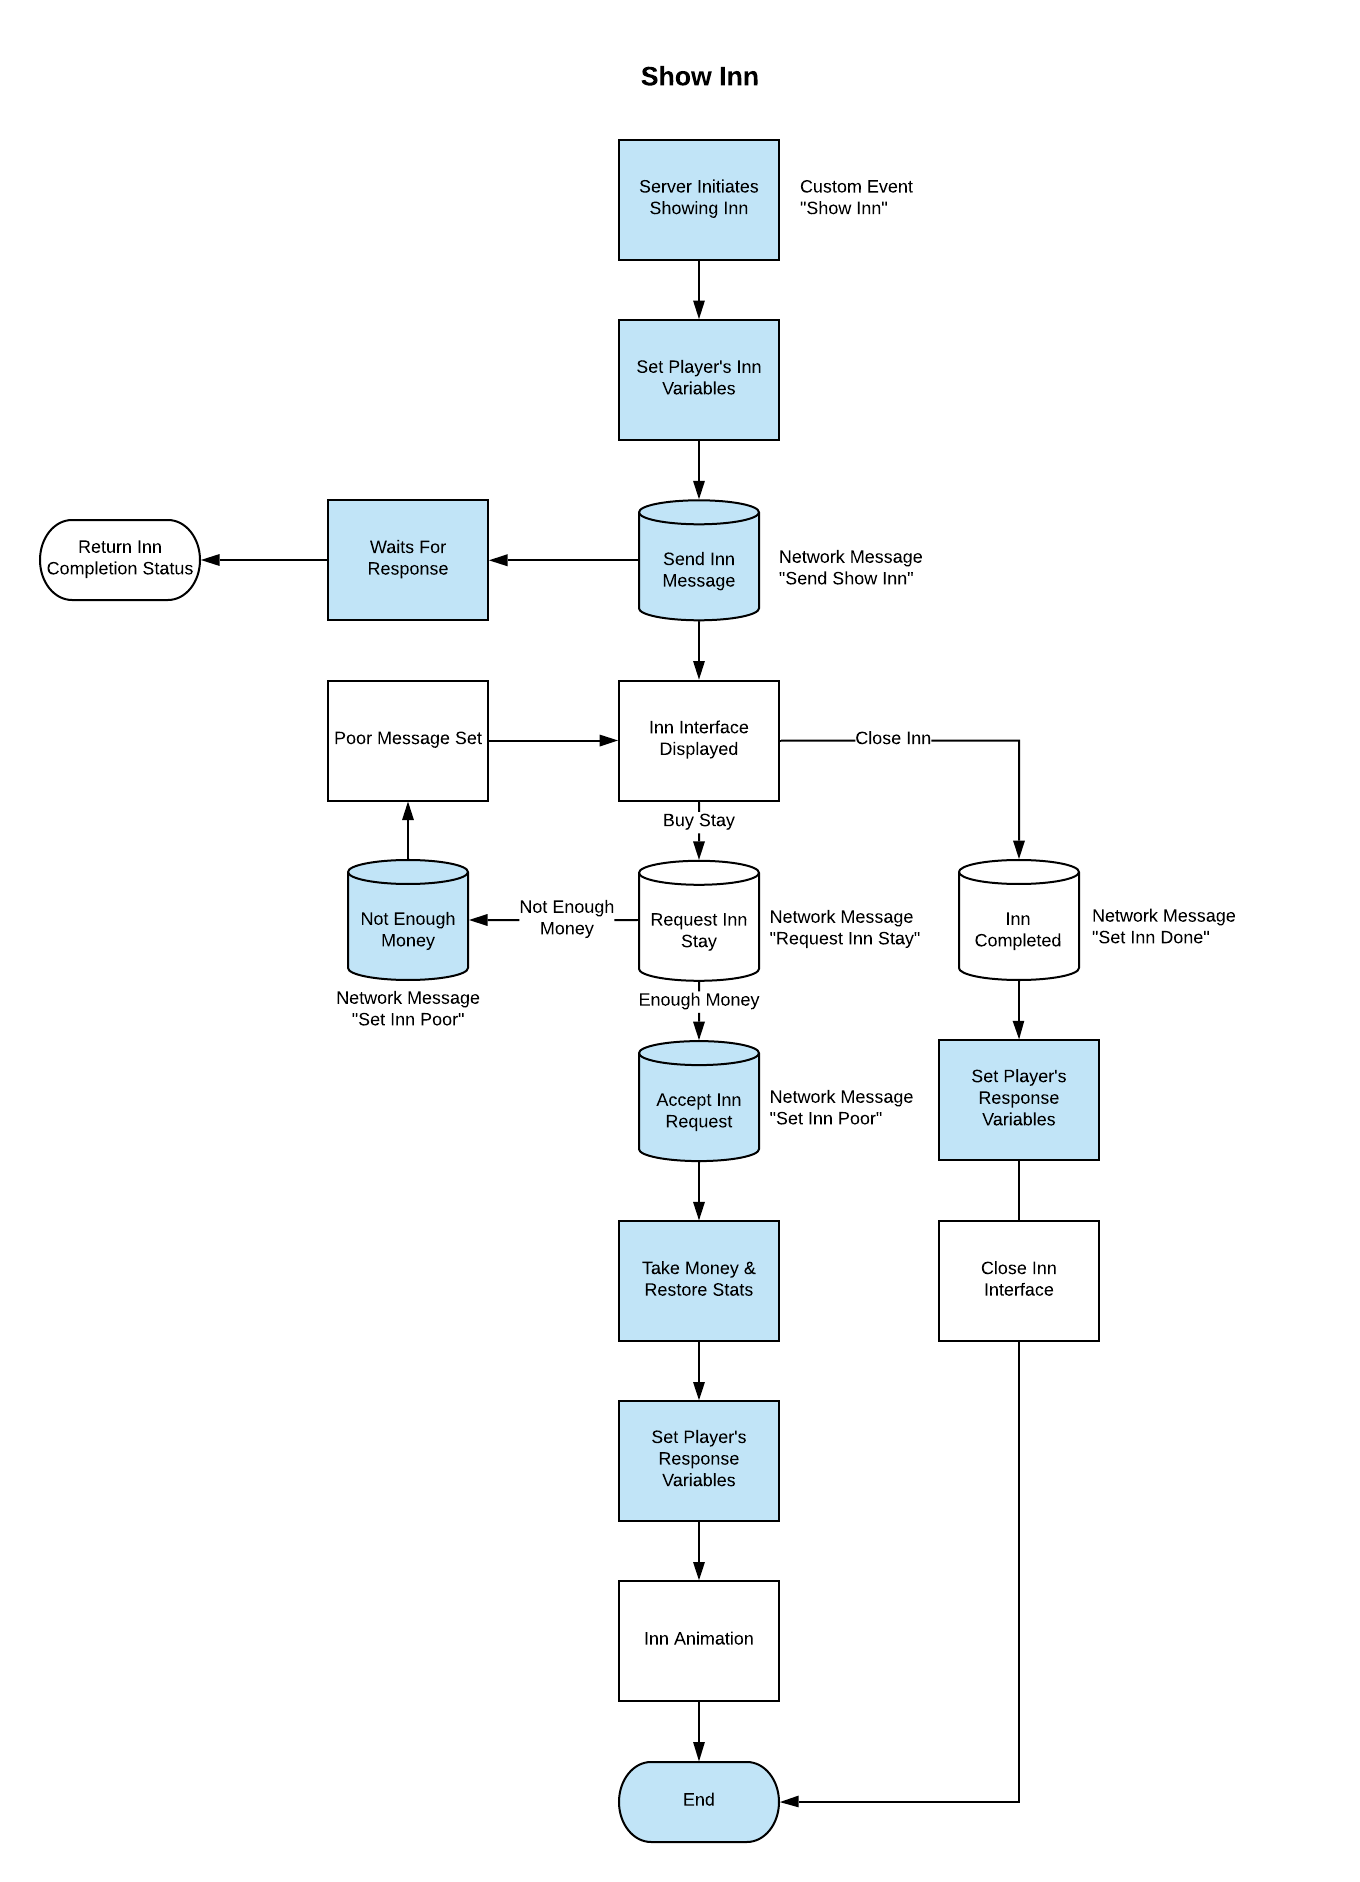
- Show Inn
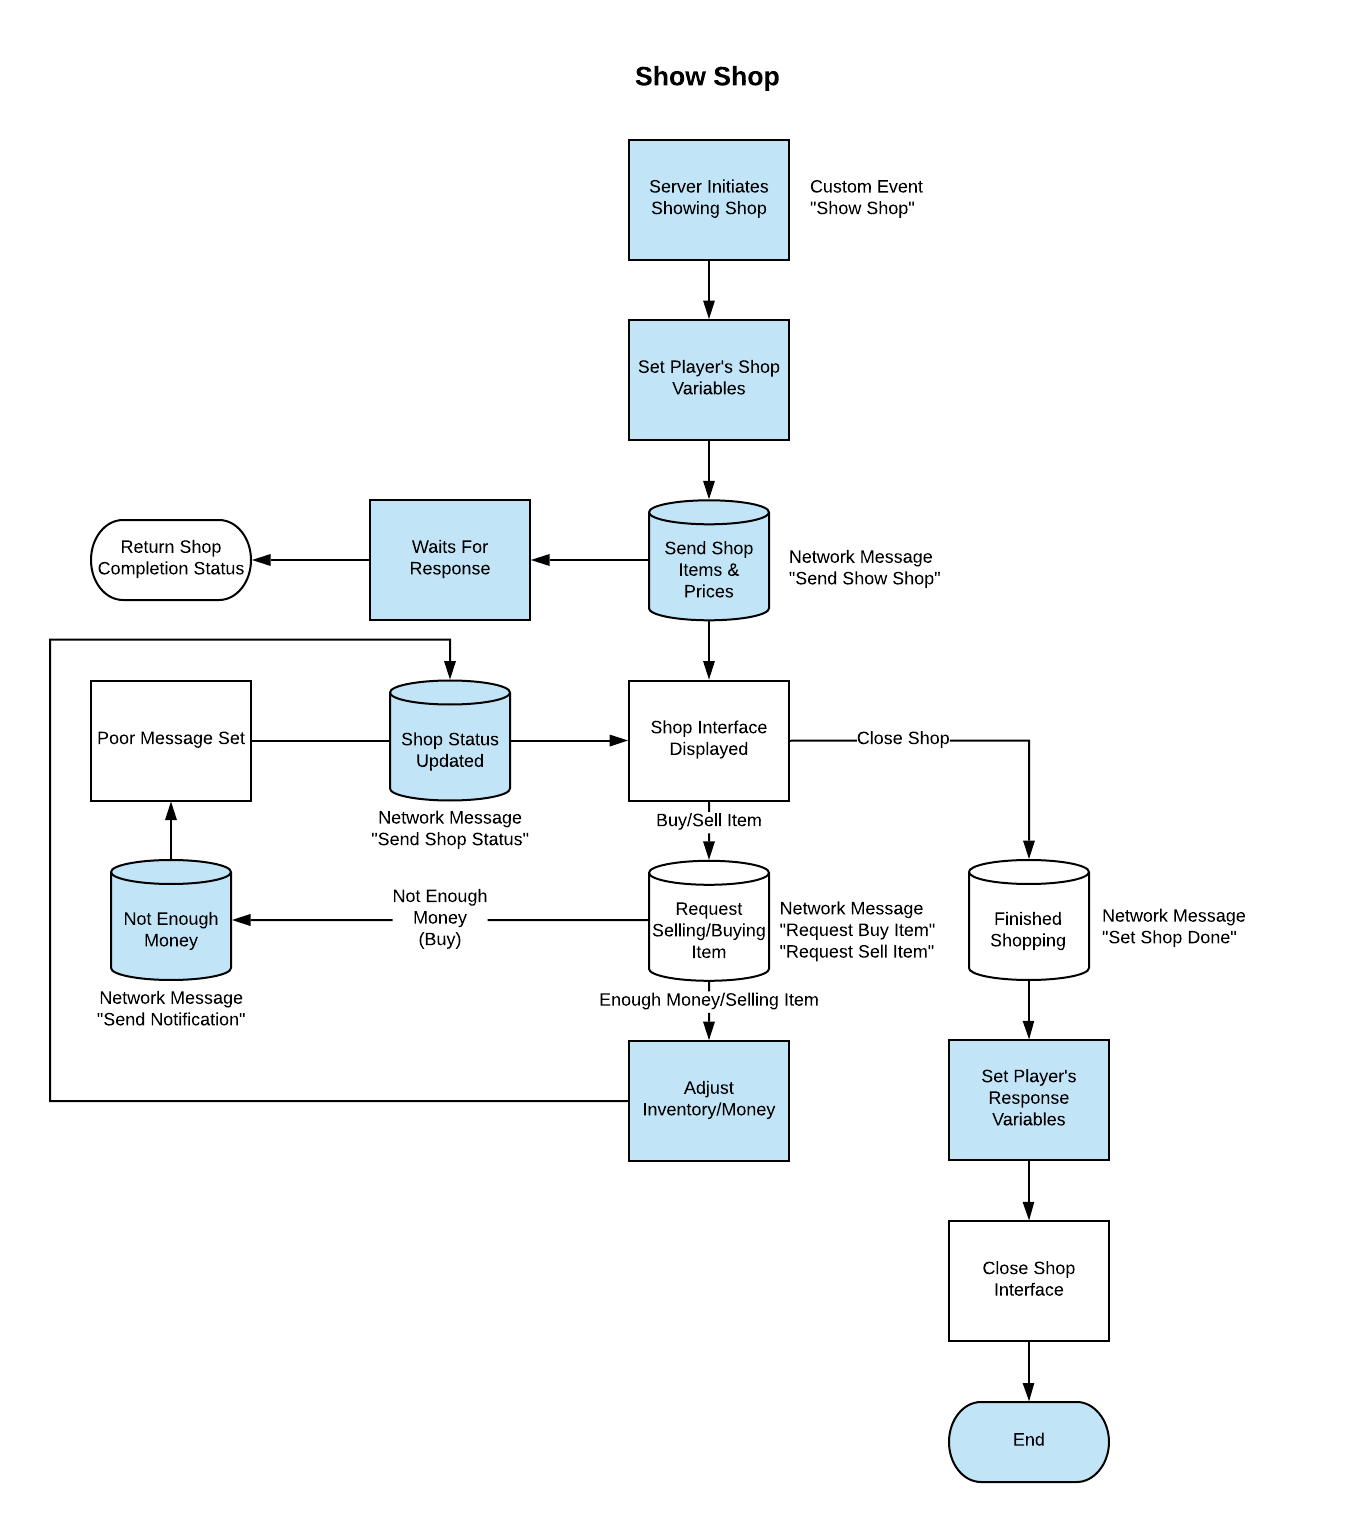
- Shop Shop
Variable Definitions
Global Variables
| Name | Description |
|---|---|
| Game_Name | Name displayed on the main menu |
| Server_IP | IP of the server that the client is connecting to |
| Server_Port | Port the server is hosted on |
| Game_Version | Checks version to make sure the client is running the same version as the server |
| Max_Connections_Per_IP | How many clients a single IP can run (0 for unlimited) |
| Max_Connections | How many clients the server can have running at once (0 for unlimited) |
| Max_Console_Entries | How many entries the console can hold before it deletes old ones |
| Max_Chat_Entries | How many entries the chat can hold before it deletes old ones |
| Force_New_Character_Data | Setting this to 1 will force all characters that login to be treated as a first login and will clear various info |
| Autosave_Frequency | When set to a value greater than 0 the game will automatically save all player data based on the value in seconds. For example: To have the server auto-save every minute, set the value to “60” for 60 seconds |
Switches
| Name | Description |
|---|---|
| Left_Click_Condition | Used in various Interfaces to keep track of when you can click on stuff |
| Do_Map_Update | Having this enabled allows the client to send repeating data (like movement) to the server. This is defaulted to OFF to prevent the client from sending information before logging in |
| In_Notification | Determines if the player is inside a notification or not |
| Server_Started | Used by the server to determine if the server has successfully hosted or not |
| In_Server_Sequence | Turned ON when server-sided NPC’s are activated by the player (See “Activate Actor” Custom Event) and turned OFF when the server sequence is finished (See “Finish Server Sequence” Network Message) |
| Debugging_Mode | Used to login with any username (no password required). Please Note: NOTHING will be saved in this mode and player objectives will always return their default value |
Collections
| Name | Description |
|---|---|
| Alphabet | Allowed “Alphabet” characters |
| Numbers | Allowed “Numeric” characters |
| Symbols | Allowed “Symbol” characters |
| Console_Log | The console log |
| Console_Display | Used to sort out console entries |
| Console_Filter | Any HEADER entries put here will not display/save to the log file |
| Chat_Log | The chat log |
| Chat_Display | Used to sort out chat entries |
| Chat_Filter | Headers that are filtered out of the chat |
Tables
| Name | Description |
|---|---|
| Connections | Holds various information about each client that is connected |
| Commands | Controls each of the commands used in the console/chat. This is where you set up custom text commands |
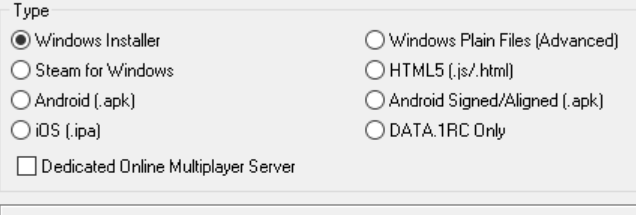
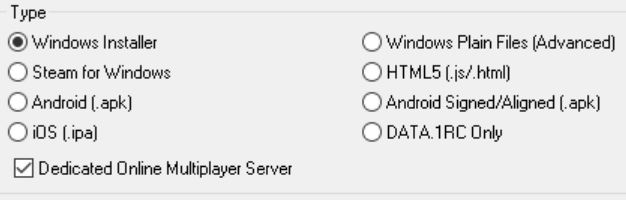
Server/Client Building
To build your MMORPG game, you will need to create two separate installers (one for the client and another for the server). Each installer requires a different directory in order to prevent them from overwriting each other. See images below:
Client Build Settings:
Server Build Settings:
For local testing, we recommend using the Test Game functionality instead, as this will automatically launch two windows for the server and client respectively. The dedicated server will appear as a GUI application (so that OpenGL is not required).