This window is used to set up Controls and assign inputs to activate up to 4 different players.
Controls are useful to reduce the amount of Input Triggers in a project, as you can assign multiple inputs to a single Control. When adding a new Control Combination to the Input Triggers window, you can select a Control, from the bottom of the Input window, instead of pressing a key so that if multiple keys are set up for a single Control, any one of them can be pressed to activate the same trigger.
Add Control
Clicking on the “Add Control” button at the top will create a new control panel in the list underneath.
Display Name – is used to identify the Control in the editor.
Scripting ID – is used to identify the Control through scripting.
Graphic (32×32) – a 32×32 image to make it easier to identify your Control in the Input Triggers window.
Default Keys/Buttons – is used to set key(s)/button(s) for up to 4 supported players. When clicking on the “Add” button an Input window will be displayed with a list of different input categories. You can directly press a key/gamepad button at the top or select an input type from one of the drop down menus.
Gamepad
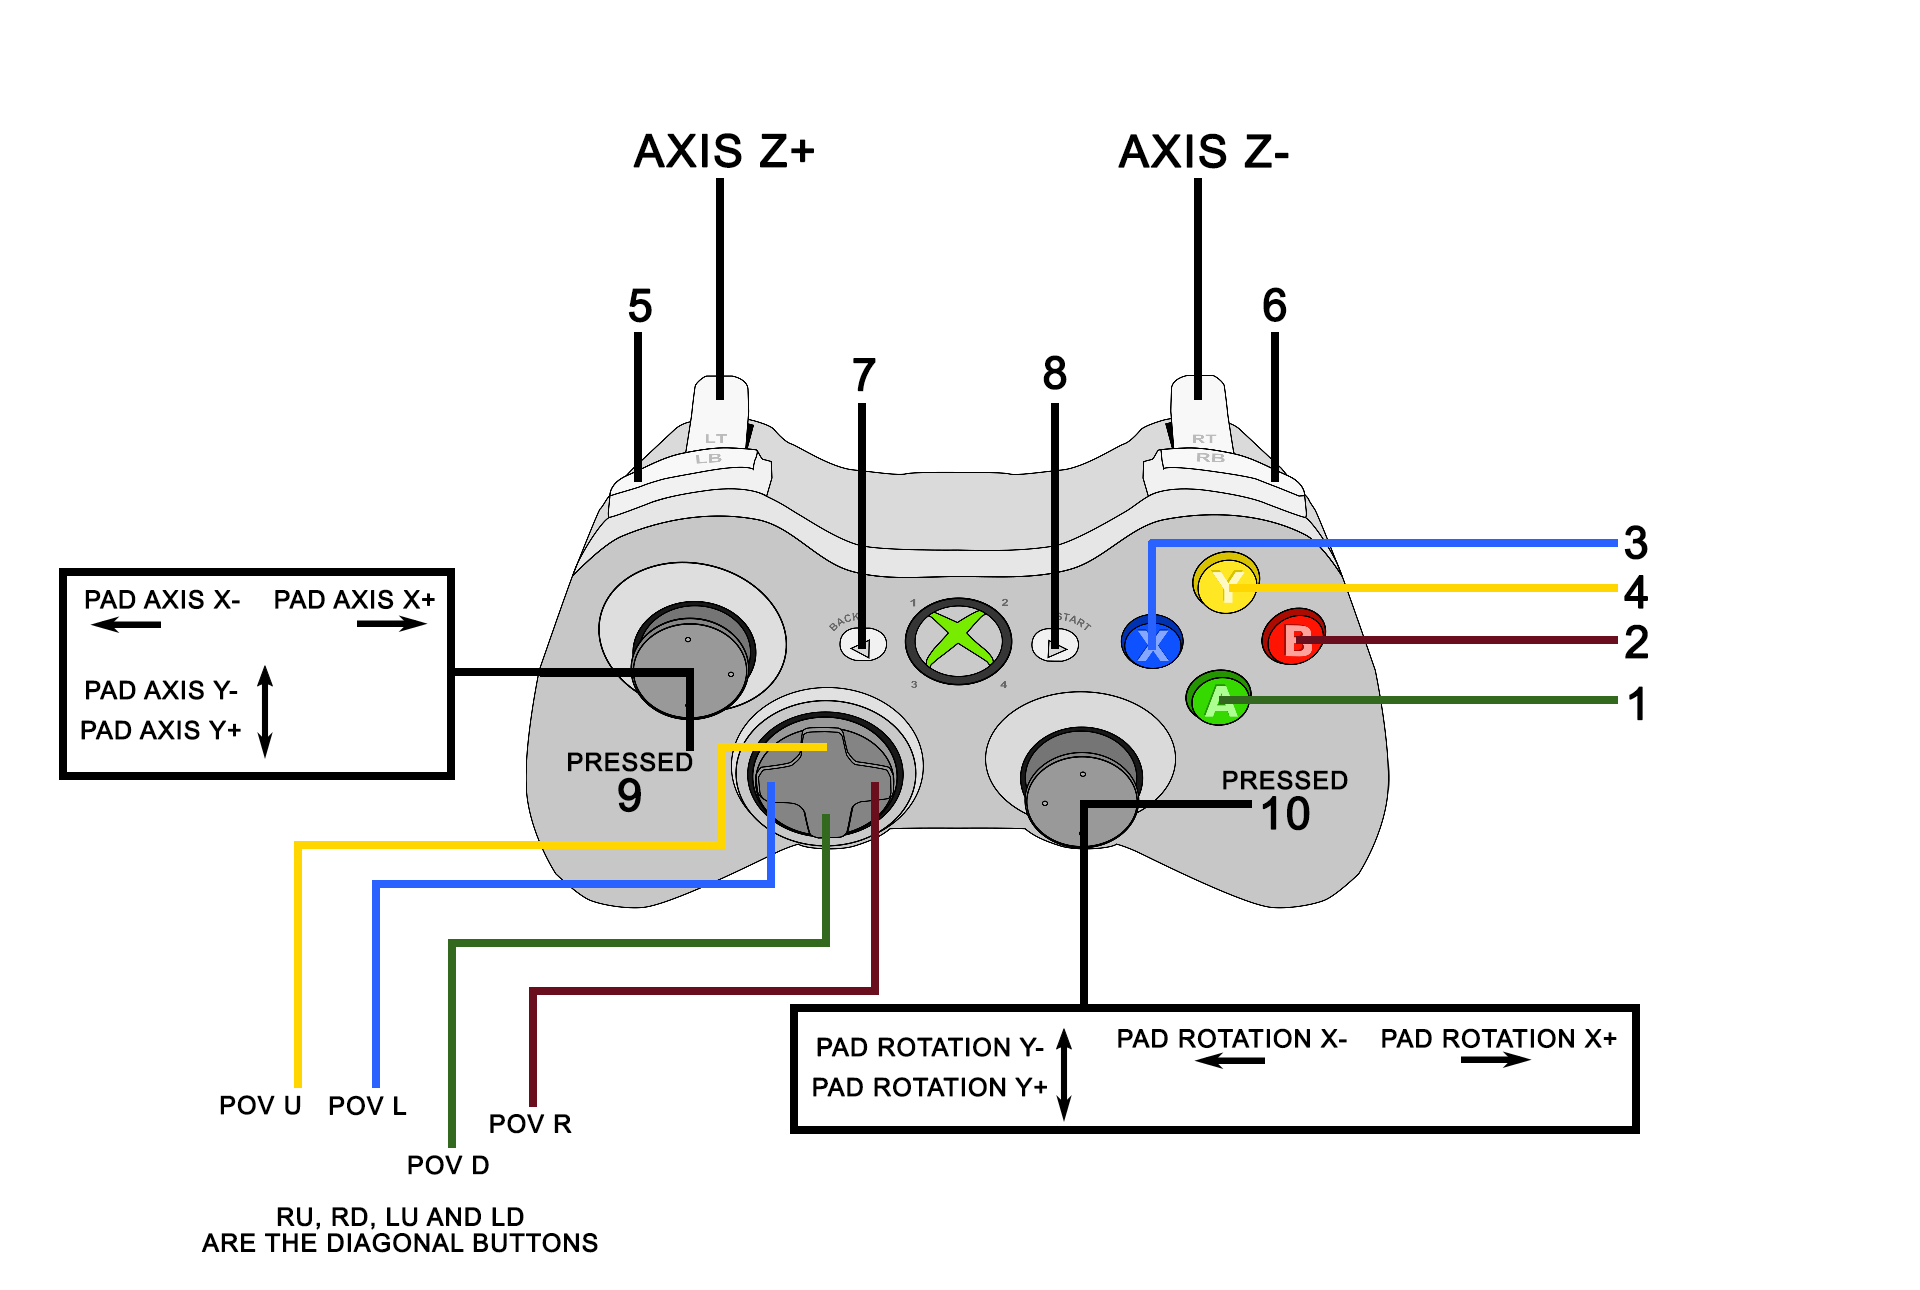
This section will explain how to set up a controller to use in your games by using a Microsoft console gamepad as an example. Please keep in mind that different gamepads/controllers are supported and may have different configurations than what is outlined below. 001 Game Creator supports up to 4 controllers/gamepads with unique button bindings (4 players) for built projects.
Face Buttons
Use Buttons 1-32 to select the various face buttons on your controller. You can also plug in your controller and press them directly for them to appear in the “Key / Gamepad” text box at the top of the Input window.
-
Button 1 = A Button
-
Button 2 = B Button
-
Button 3 = X Button
-
Button 4 = Y Button
-
Button 5 = Left Shoulder Button
-
Button 6 = Right Shoulder Button
-
Button 7 = Back Button
-
Button 8 = Start Button
-
Button 9 = Left Analogue Button
-
Button 10 = Right Analogue Button
POV 1-4
The Point Of View (POV) inputs have 8 directions and 4 sets that can be used. The “POV 1” inputs are used to control the D-Pad. Please note that the number after POV does not refer to player number but POV set number as every gamepad is different and may or may not have more than one POV related input set.
-
POV L = Left
-
POV LU = Left Up
-
POV U = Up
-
POV RU = Right Up
-
POV R = Right
-
POV RD = Right Down
-
POV D = Down
-
POV LD = Left Down
The POV Use Value will return a direction angle or an empty string if there’s no direction.
Rotation X/Y
For each rotation axis there exists a plus (+) and minus (-) variant. This allows you to easily distinguish between the left/right direction (X axis) and up/down direction (Y axis).
-
X- = Left
-
X+ = Right
-
Y- = Up
-
Y+ = Down
The “Rotation X” and “Rotation Y” inputs are used to control the horizontal and vertical position of the Right Analogue Stick.
Axis X/Y/Z
For each axis there exists a plus (+) and minus (-) variant. This allows you to easily distinguish between the left/right direction (X axis) and up/down direction (Y axis).
-
X- = Left
-
X+ = Right
-
Y- = Up
-
Y+ = Down
-
Z- = Right Trigger
-
Z+ = Left Trigger
The “Axis X” and “Axis Y” inputs are used to control the horizontal and vertical position of the Left Analogue Stick.
The “Axis Z” inputs are used to control the right and left triggers.
The X, Y and Z Use Values have a value range between -1.0 to 1.0.


