For creating Art specifically, check out the For Artists page.
Tile-Sets include flooring, furniture (like tables and chairs), wall decorations (like pictures and windows) and walls themselves.
The buttons in the top-left corner of the window allow you to Manage your resources.
General
Display Name – is used to identify the Tile-Set in the editor.
Scripting ID – is used to identify the Tile-Set through scripting.
Editable Selection – sets the graphic of the selected tile.
Tile Name – sets the name of the selected tile.
Render both sides in 3D – when ticked, both the top and bottom of the tile will be rendered. Please note that Wall tiles will render both the top and bottom regardless of whether this option is ticked; instead rendering the inside of the Wall tile which may result in performance issues.
Smooth Scaling of Tiles – when ticked, this will smooth the edges of a Tile-Set when scaled (anti-aliasing).
Keep Resource in Memory – when ticked, the Tile-Set will stay in active memory (RAM).
Display as a Square in Map Editor – when ticked, this will make the entire Tile-Set display as a small square image in the Draw panel when editing a Map. If unticked, the Tile-Set will be split up and displayed as two rectangle images on top of each other. This option makes no difference to how the tiles are displayed in-game.
Edit Material
Ambient – sets the color of the tile when it’s not illuminated.
Color/Diffuse / Alpha – sets the color/alpha of the tile when it is illuminated.
Specular / Strength – sets the highlight color of the tile and its visible strength.
Specular Sharpness – sets how defined the specular highlight is.
Glow/Emissive – sets the glow color of the tile.
Reset to Defaults – sets all material values back to what they were originally.
Layer
-
Ground – tiles for flooring, mainly for buildings in-game. These Tile-Sets are also used for standing platforms in Platformer Game Projects.
-
Lower Objects – tiles for various objects on the lower layer, such as furniture for buildings, outside cliffs/ledges, fences, etc. You can apply collision boxes to Lower Objects by clicking on the “Edit” button and then selecting either “Rectangle”, “Polygon” or “Sphere/Capsule” collision and drawing the collision on the graphic. This allows you to give objects substance so the player cannot walk through them. You can also select specific collision types by selecting them from the drop down menu to the right of the button.
-
Upper Objects – tiles used for objects on the upper layer, like small objects that can be placed on top of Lower Objects or placed against walls (like picture frames and windows).
-
Wall – tiles used for walls of buildings. Walls have their own height meter in the Map editor to allow for varying wall heights.
Style
-
Expanded – enlarges the default 256×256 Tile-Set sheet to 512×512 pixels.
-
Flipping – allows Tile-Sets to be flipped using the “Flip Horizontally” and “Flip Vertically” Map Tools. This is the default option.
-
Rotating – changes the “Flip Horizontally” and “Flip Vertically” Map Tools to rotate the Tile-Sets, rather than flipping them.
Advanced Mapping – “Color/Diffuse” is the default tile texture whereas “Normal” is used to add an optional texture for greater detail.
HD Tiles
To learn how to import HD tiles, see the appropriate section on the For Artists page.
Tile-Set Extractor
The Tile-Set Extractor allows you to create Tile-Sets from Sprite sheets and other graphics. Once you select a source image, it will be displayed on the large panel to the right. You can then click on a square or drag out a large region on the Tile-Set and then click on the appropriate tiles in the Tile-Sets editor to place them in the Tile-Set.
Edit Compression
Opens the Graphic Platform Compression window. This window is used to compress large graphics so that they take up less space on the video card. This is particularly useful for Android games.
Animation
While some tiles are static, you can also animate Tile-Sets. Click on the “Edit” button and then left-click on tiles you wish to become frames in your animation. You can right-click tiles inside the animation strip to remove frames. Removing all of the frames will delete the animation.
Frame Duration – sets the amount of time spent on each frame in your animation.
Please note: Make sure you deselect the “Edit” button when you’ve finished your animation!
Floor Options
Submersion (tiles) – sets whether the player can be submerged in the selected tile and how far they submerge, such as with water tiles or long grass.
Wall Options
Default Roof – sets the default Roof tile that will be associated with the selected Wall tile.
Display Shadow – sets whether the Wall will display a shadow or not.
Object Options
Tile Shape – sets how the tile will render on the Map.
-
Flat (below shadow) – renders tile beneath shadows (eg: “Big Blue Rug”)
-
Flat (above shadow) – renders tile above shadows (eg: “Wood Counter”)
-
Tall – default rendering style (eg: “Tree”)
-
Against Wall – renders tile against a “Wall” tile (eg: “Small Picture”)
-
Bent – renders bottom half of tile “Tall” and top half “Flat”. Only noticeable with lighting/3D perspective (eg: “Blackjack Table”)
Altitude – sets how high (in pixels) the tile will render on the Map.
Scale % – sets the size of the tile as a percentage.
Lower Object Options
Collision – sets a “Rectangle”, “Polygon” or “Sphere/Capsule” collision around a Lower-Object which Actors can collide with.
Shadow Distance – sets how far the shadow will be rendered away from the selected Lower-Object tile (in pixels). 001 uses built-in shadows size calculations. Shadows are cast based on the distance value which is calculated from tile center:
sizeX = 1.0
sizeY = 0.5
Terraformation Graphics
Change Amount – sets the amount of tile terraformation graphics for your selected Tile-Set.
Terraform off into map’s edges – when ticked, this will cause terraformation to occur when tiles are placed along the edges of your Maps.
Tile Terraformation
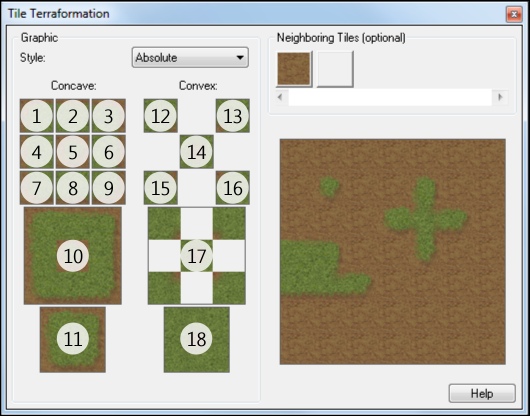
Click on the “Change Amount” button to specify the amount of tile terraformation graphics for your selected Tile-Set. Then click on the square(s) to open the Tile Terraformation window. The columns of three boxes underneath “Concave” and “Convex” show how the tiles will interact with one another.
You can manually edit/insert tile terraformation graphics into the 9 individual “Concave” boxes and 5 individual “Convex” boxes or you can edit/insert a single 96×96 graphic in the large box below it. You can use any resolution of graphic beyond 96×96. The preview window to the right will allow you to test your terraformation to make sure it’s working correctly.
Style – Allows you to specify how the terraformation will render on your Map.
-
Absolute – best performance. Functions like “Overlay Inside” except isn’t overlayed.
-
Overlay Inside – overlays terraformation on the tile its placed on.
-
Overlay Outside – worst performance. Overlays terraformation on up to 8 tiles around the tile its placed on.
-
Ignore – forces tile to ignore terraformation for instances where you don’t want terraformation to occur (eg: Bricks by Water)
Concave – this column of 3 boxes is for the interior outline terraformation graphics. This is how it will appear when the current tile is being surrounded by the chosen neighboring tile. The 32×32 box in the centre of the top set of tiles is for the single terraformation tile. This is the default tile that displays when you start drawing tiles on your Map.
Convex – this column of 3 boxes is for the exterior outline terraformation graphics. This is how it will appear when the current tile is surrounding the chosen neighboring tile. Unlike the “Concave” pattern, the “Convex” box displays only 5 separate 32×32 boxes at the top. Each of these represents one corner where neighboring tiles interact.
Neighboring Tiles (optional) – sets a tile(s) that the current tile can interact with when they are next to each other. These tiles will change depending on what their neighboring tile is.

-
Top-Left of terraformation
-
Top-Middle of terraformation
-
Top-Right of terraformation
-
Middle-Left of terraformation
-
Default single tile that is placed on the Map (comprised of tiles 1, 3, 7 and 9’s outer corners)
-
Middle-Right of terraformation
-
Bottom-Left of terraformation
-
Bottom-Middle of terraformation
-
Bottom-Right of terraformation
-
Large 96×96 concave Tile-Set that fills in 1-9 and 11
-
For larger areas of terraformation
-
Top-Left intersection of neighboring tile
-
Top-Right intersection of neighboring tile
-
Middle intersection of neighboring tile (comprised of tiles 12, 13, 15 and 16’s inner corners)
-
Bottom-Left intersection of neighboring tile
-
Bottom-Right intersection of neighboring tile
-
Large 96×96 convex Tile-Set that fills in 12-16 and 18
-
For larger areas of terraformation
Variability
Offset – sets the X, Y and Z offset position in which the tile will be displayed when it’s placed.
Color – sets the primary and secondary colors the tile will use when it’s placed.
Flip Vertically – when ticked, the selected tile will be flipped vertically when placed.
Flip Horizontally – when ticked, the selected tile will be flipped horizontally when placed.
Rotate at 90, 180 or 270 degrees – when ticked, the user is able to rotate the selected tile at 90 degree angles when placed.

